مقدمه
Thank you for choosing the Epson EB-L210SF projector. This manual provides essential information for the safe and efficient use of your projector. Please read it thoroughly before operating the device and keep it for future reference.
The Epson EB-L210SF is a 3LCD Full-HD projector designed for clear and vibrant image projection. It features a laser light source for long-lasting performance.
اطلاعات مهم ایمنی
- ایمنی لیزر: Do not look directly into the projector lens when the laser light source is active. Avoid direct eye exposure to the laser beam.
- تهویه: Ensure adequate ventilation around the projector. Do not block ventilation openings. Overheating can cause damage.
- منبع تغذیه: فقط از منبع تغذیه مشخص شده برای این پروژکتور استفاده کنید.
- رسیدگی: Handle the projector with care. Avoid dropping or subjecting it to strong impacts.
- تمیز کردن: قبل از تمیز کردن، سیم برق را جدا کنید. از یک پارچه نرم و خشک استفاده کنید. از پاک کننده های مایع یا آئروسل استفاده نکنید.
راه اندازی
1. باز کردن بسته بندی و قرار دادن
Carefully remove the projector and all accessories from the packaging. Place the projector on a stable, level surface. Ensure there is sufficient space around the projector for proper ventilation.

شکل 1: جلو و کنار view of the Epson EB-L210SF projector, showing the lens and ventilation grilles.
2. اتصال برق
- سیم برق ارائه شده را به ورودی برق متناوب پروژکتور وصل کنید.
- سر دیگر سیم برق را به یک پریز برق متصل به زمین وصل کنید.
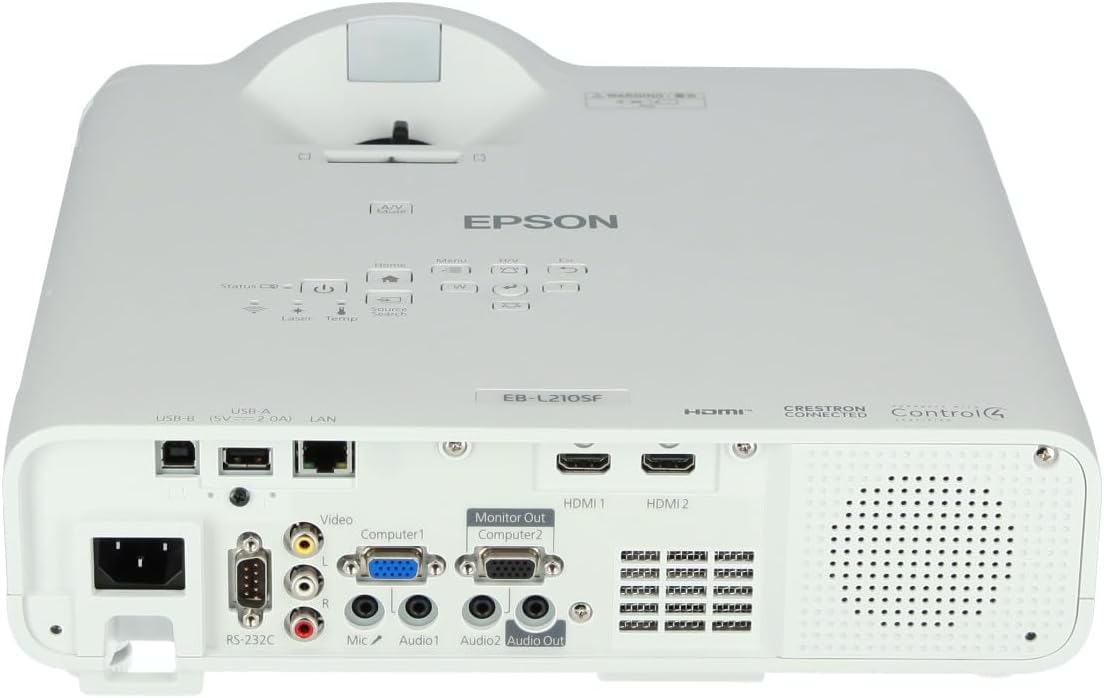
۳. اتصال منابع ورودی
The projector supports various input sources. Connect your device (computer, Blu-ray player, etc.) to the appropriate port on the projector's rear panel.

Figure 2: Rear panel of the projector, displaying various input and output ports including HDMI, Computer (VGA), Video, USB, and Audio connections.
- HDMI: Connect an HDMI cable from your device to one of the HDMI ports (HDMI 1 or HDMI 2).
- کامپیوتر (VGA): Connect a VGA cable from your computer to the Computer 1 or Computer 2 port. For audio, connect a separate audio cable to Audio 1 or Audio 2.
- ویدئو: Connect composite video and audio cables to the Video and Audio (R/L) ports.
- USB: Use the USB-A port for connecting USB storage devices or the USB-B port for display over USB.
- LAN: Connect an Ethernet cable for network control and monitoring.
۳. روشن کردن اولیه و تنظیم تصویر
- Press the power button on the projector or remote control to turn on the device. The power indicator will illuminate.
- را تنظیم کنید حلقه فوکوس دور لنز بچرخان تا تصویر واضح و شفاف شود.
- استفاده کنید zoom lever (if available) to adjust the image size.
- اگر تصویر به شکل ذوزنقهای به نظر میرسد، از تصحیح کیستون feature (manual or automatic) to square the image. Refer to the Operating section for details on menu navigation.
راه اندازی پروژکتور
1. کنترل پنل به پایان رسیدview
The control panel on top of the projector allows access to various functions and settings.
شکل 3: بالا view of the projector, highlighting the control panel with buttons for power, menu, source selection, and navigation.
- دکمه پاور: پروژکتور را روشن یا خاموش می کند.
- جستجوی منبع: بین منابع ورودی موجود گردش میکند.
- دکمه منو: Opens the on-screen display (OSD) menu.
- Navigation Buttons (Arrow keys): برای پیمایش بین گزینههای منو استفاده میشود.
- دکمه Enter: انتخابهای موجود در منو را تأیید میکند.
- Esc Button: Exits the current menu or returns to the previous screen.
- دکمه خانه: Accesses the home screen or quick settings.
- بی صدا A/V: Temporarily mutes audio and blanks the screen.
۵.۳ انتخاب منبع ورودی
را فشار دهید جستجوی منبع button on the control panel or remote control to cycle through the connected input sources (e.g., HDMI 1, HDMI 2, Computer 1, Video). The projector will automatically detect and display the active source.
3. Adjusting Image and Audio Settings
را فشار دهید منو button to access the projector's on-screen display (OSD) menu. Use the navigation buttons to browse categories such as:
- تصویر: روشنایی، کنتراست، رنگ، ته رنگ، وضوح و دمای رنگ را تنظیم کنید.
- علامت: Configure input signal settings, aspect ratio, and overscan.
- تنظیمات: General projector settings like language, display options, and power management.
- صوتی: Adjust volume, mute, and audio input selection.
یک گزینه را انتخاب کنید و فشار دهید وارد کنید to modify its value. Press Esc برای خروج از منو
تعمیر و نگهداری
۲. تمیز کردن پروژکتور
- نمای بیرونی: Wipe the projector's exterior with a soft, dry, lint-free cloth. For stubborn dirt, dampen the cloth slightly with water, then wipe dry.
- لنز: Gently wipe the lens with a lens cleaning cloth or lens paper. Avoid using abrasive materials or excessive force.
- فیلتر هوا: Regularly check and clean the air filter to prevent dust buildup, which can affect performance and cause overheating. Refer to the projector's on-screen menu for filter maintenance reminders.
2. Laser Light Source
The Epson EB-L210SF uses a laser light source, which offers a long operational life and does not require lamp replacement. No user maintenance is typically required for the laser light source itself.
عیب یابی
اگر با پروژکتور خود با مشکلاتی مواجه شدید، به مشکلات و راهحلهای رایج زیر مراجعه کنید:
| مشکل | علت / راه حل احتمالی |
|---|---|
| تصویری پخش نشده است |
|
| تصویر تار یا خارج از فوکوس است |
|
| تصویر اعوجاج دارد (ذوزنقهای) |
|
| صدا نداره |
|
| Projector is not wireless | The Epson EB-L210SF is not inherently a wireless projector. Wireless functionality typically requires an optional external wireless adapter, which is sold separately. Please consult Epson's official website or your retailer for compatible wireless adapters. |
| Overheating warning (Temp indicator) |
|
مشخصات
| ویژگی | جزئیات |
|---|---|
| شماره مدل | V11HA75080 |
| وضوح نمایش | 1920 x 1080 (Full HD) |
| فناوری اتصال | HDMI, VGA, USB, LAN |
| ابعاد محصول | 11.81 x 11.81 x 11.81 اینچ |
| وزن مورد | 10.14 پوند |
| منبع نور | لیزر |
| سازنده | اپسون |
| موارد استفاده توصیه شده | نظارت |
| ویژگی خاص | سبک وزن |
| باتری های مورد نیاز | 1 AAAA (for remote control, not included with projector unit) |
| تاریخ برای اولین بار در دسترس است | 14 نوامبر 2023 |
گارانتی و پشتیبانی
برای اطلاعات دقیق در مورد گارانتی، لطفاً به کارت گارانتی ارائه شده همراه محصول خود مراجعه کنید یا از وبسایت رسمی اپسون دیدن کنید. webشرایط و ضوابط گارانتی ممکن است بر اساس منطقه متفاوت باشد.
برای پشتیبانی فنی، ثبت محصول یا دانلود جدیدترین درایورها و نرمافزارها، لطفاً از پشتیبانی رسمی اپسون دیدن کنید. website or contact Epson customer service in your region. Contact information can typically be found on the Epson webسایت


