1. محصول تمام شدview
The FITORCH V10 is a compact and powerful Everyday Carry (EDC) flashlight designed for versatile use. It features a high-brightness main LED, multi-color side lights including UV, red, green, and blue, and a magnetic tail cap. This manual provides instructions for safe and effective operation.

Image 1.1: FITORCH V10 EDC Flashlight, showing the device, a USB-C charging cable, and a keyring. The flashlight is compact and features two main light emitters and side lights.

تصویر 1.2: تمام شدview of FITORCH V10 features, including high brightness, beeping warning, multi-source sidelights, USB-C charging, magnetic adsorption, and mini portable design.
2. محتویات بسته
بررسی کنید که آیا همه اقلام در بسته موجود است یا خیر:
- 1 x FITORCH V10 EDC Flashlight
- 1 عدد کابل شارژ USB-C
- 1 عدد حلقه کلید
- ۱ عدد دفترچه راهنمای کاربر (این سند)
3. راه اندازی و شارژ
3.1 شارژ اولیه
Before first use, fully charge the flashlight. The FITORCH V10 features a built-in 1000mAh rechargeable battery.
- پورت شارژ USB-C دستگاه را پیدا کنید.
- Connect the provided USB-C cable to the flashlight and a compatible USB power source (e.g., computer, wall adapter).
- During charging, a red light will flash.
- پس از شارژ کامل، چراغ نشانگر به رنگ سبز ثابت روشن خواهد شد.
Charging time is approximately 120-180 minutes (2-3 hours).

Image 3.1: Illustration of the FITORCH V10's internal 1000mAh built-in battery, highlighting its capacity for extended use.

Image 3.2: The bottom right panel shows the USB-C charging port and the indicator lights: red flashing for charging, green solid for full charge.
4. دستورالعمل های عملیاتی
The FITORCH V10 features two main buttons: a Power button (left) and a Mode button (right).
۷.۱ عملکرد چراغ اصلی
The main light provides up to 1000 lumens of brightness with multiple modes.
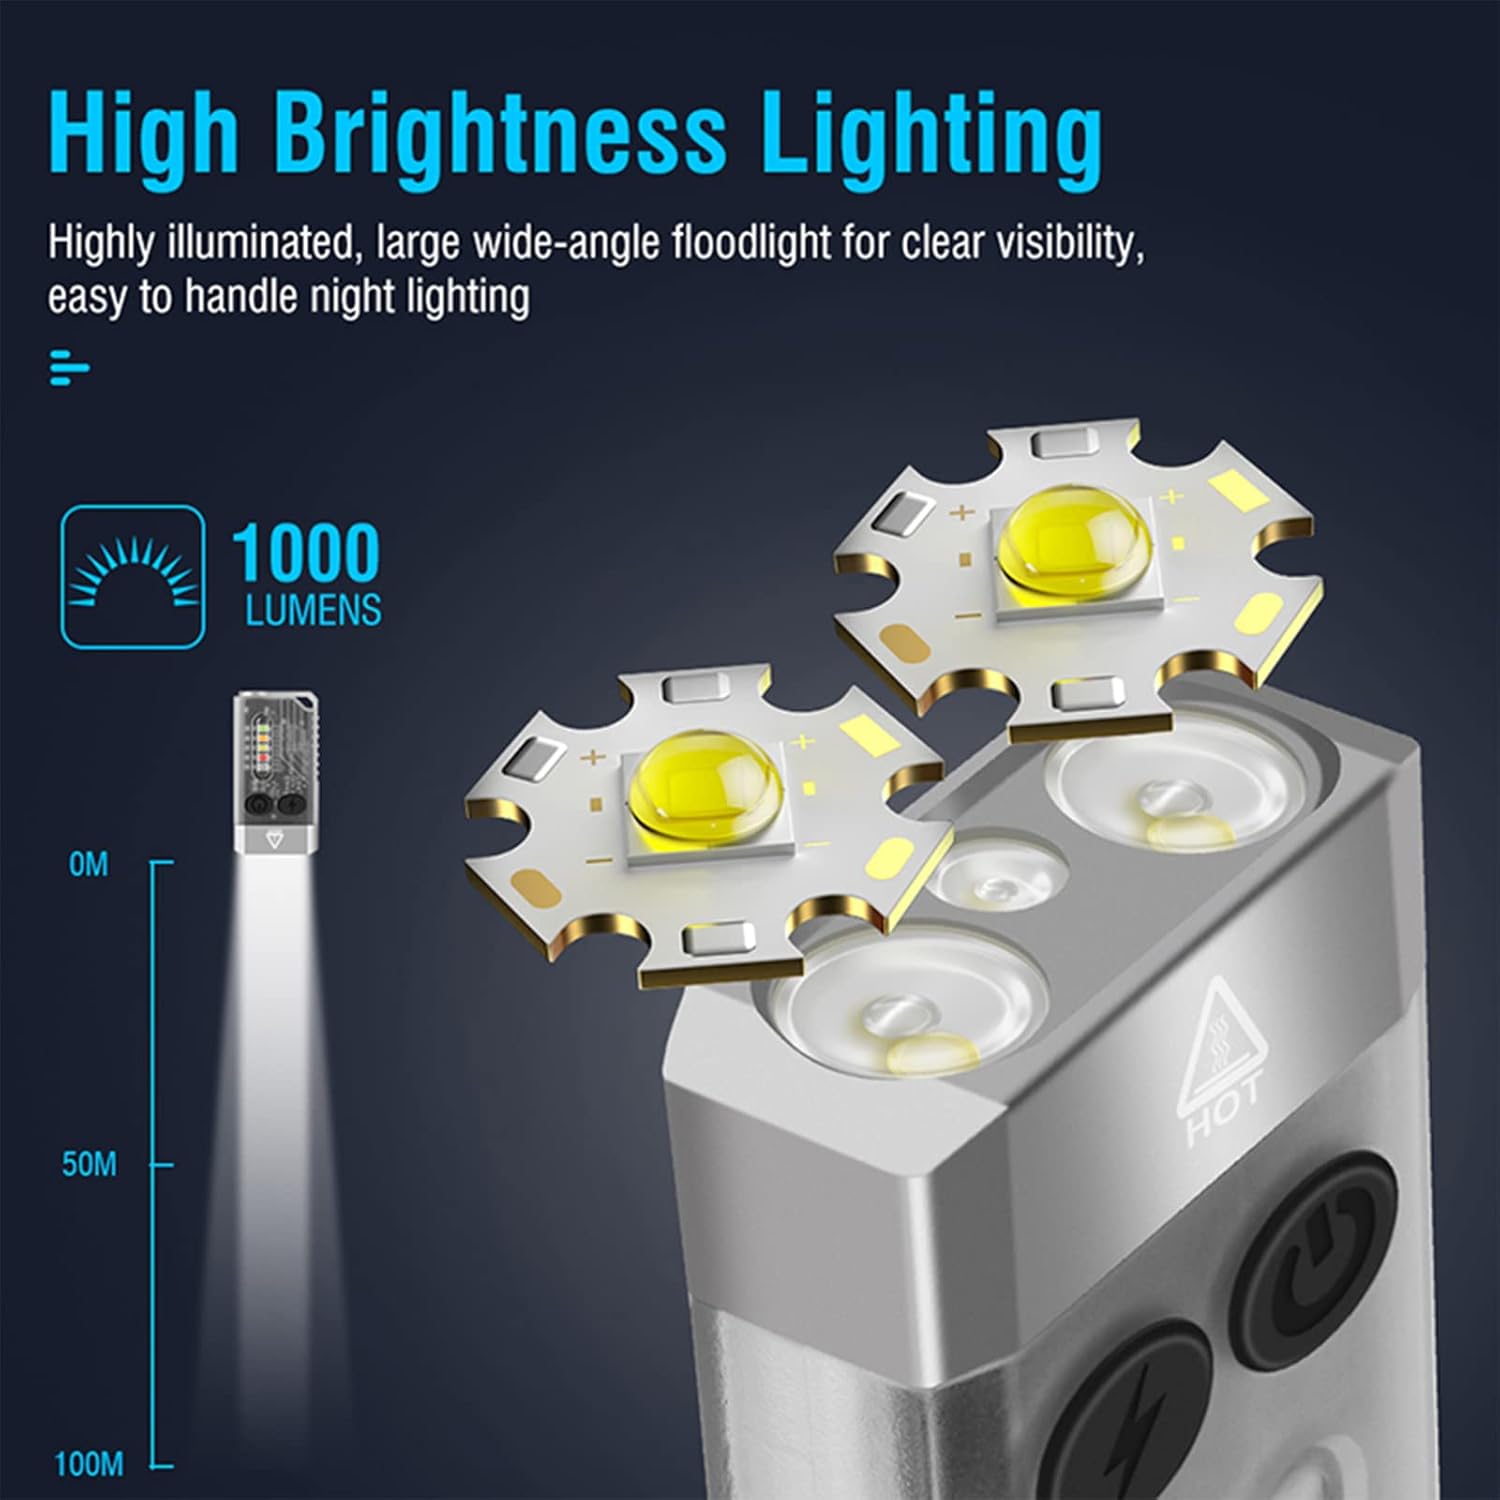
Image 4.1: Illustration of the FITORCH V10's high brightness main light, capable of 1000 lumens and projecting light up to 100 meters.
- روشن / خاموش: Double-click the Power button to turn the main light ON. Long press the Power button to turn it OFF.
- تغییر حالت ها: While the main light is ON, click the Power button to cycle through High, Medium, Low, and Economic modes.
- حالت توربو: Long press the Power button from any state to activate Turbo mode. Release the button to turn off Turbo mode.
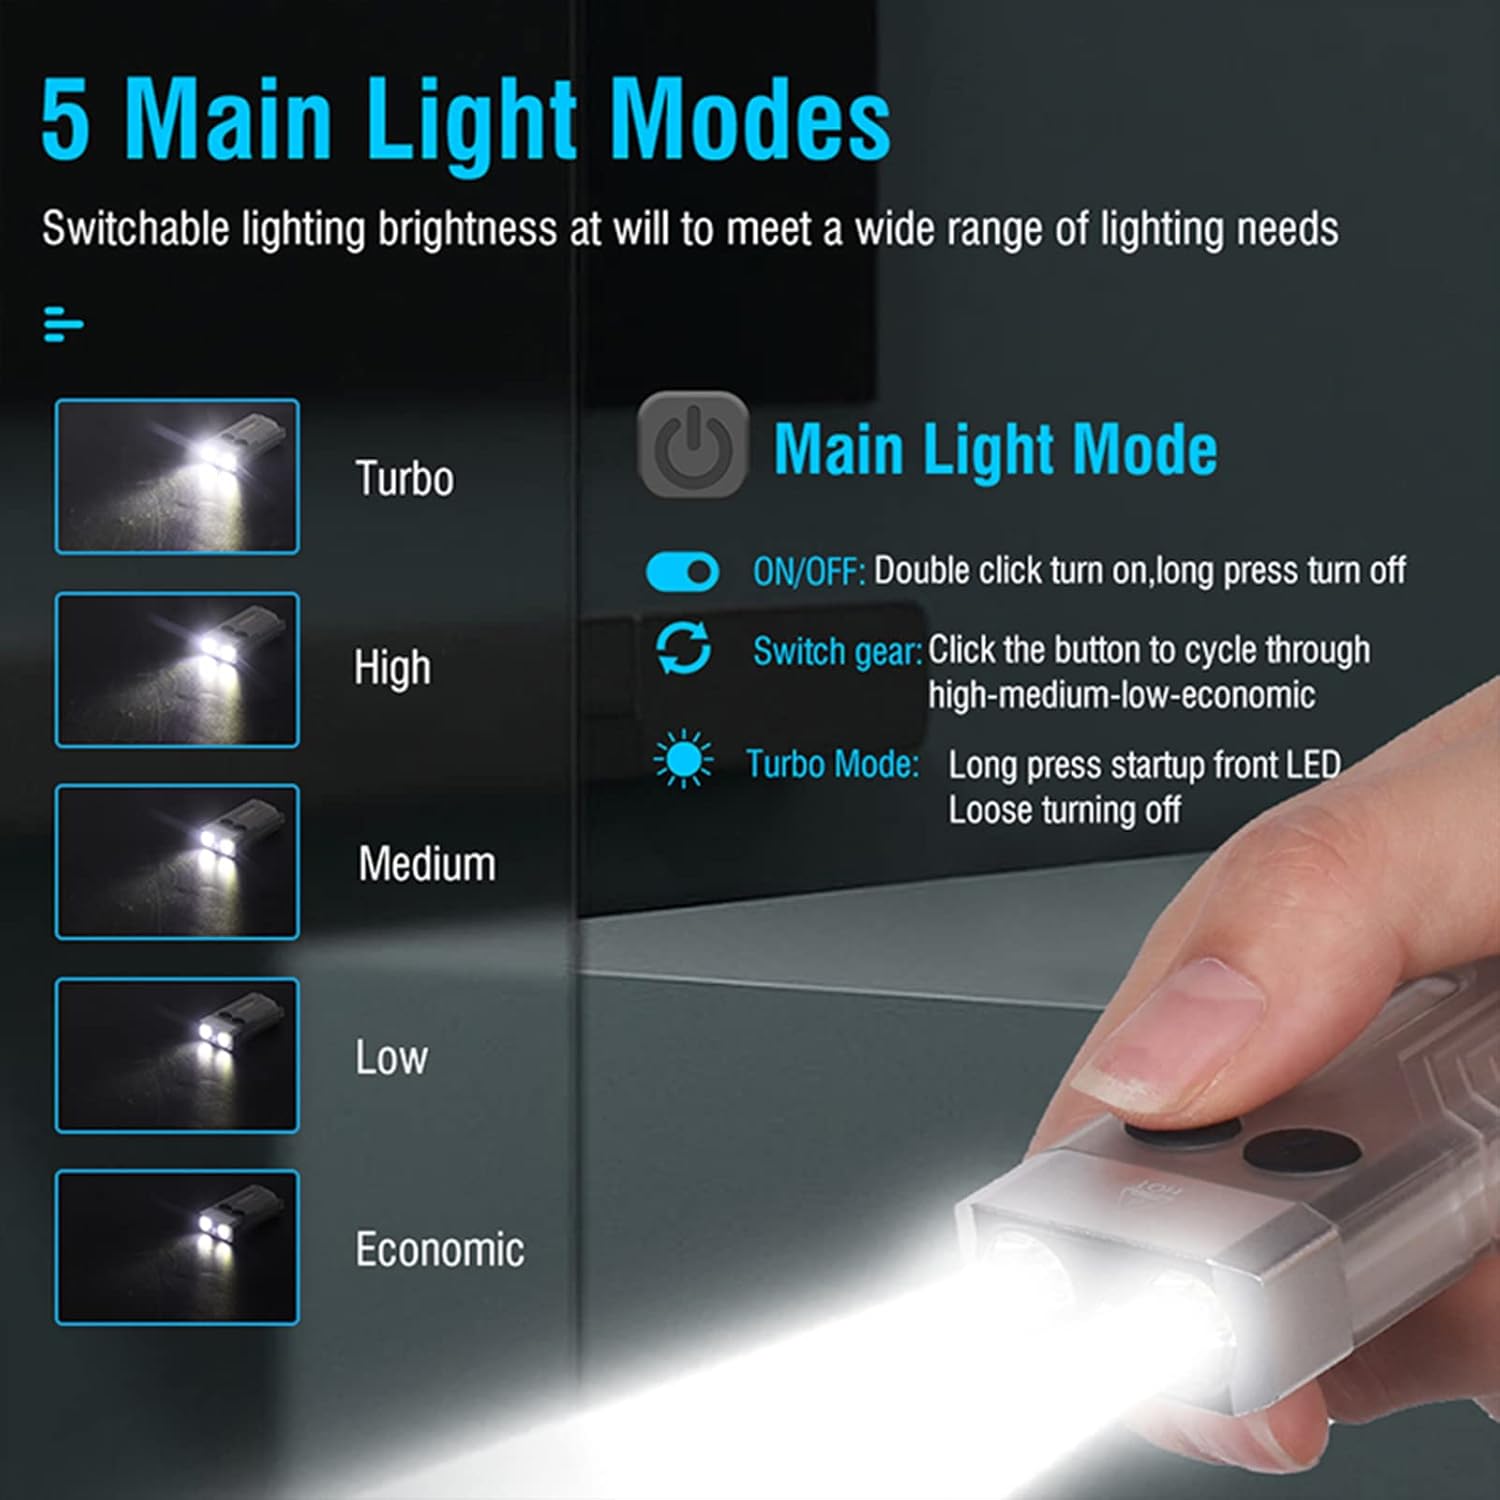
Image 4.2: Diagram illustrating the 5 main light modes (Turbo, High, Medium, Low, Economic) and their activation methods using the Power button.
4.2 Side Light Operation
The side lights offer various colors and functions, including UV light.
- روشن / خاموش: Double-click the Mode button to turn the side light ON. Long press the Mode button to turn it OFF.
- تغییر حالت ها: While the side light is ON, click the Mode button to cycle through White, Warm, Green, Red, Blue, Red Flash, Red & Blue Flash.
- حالت UV: Triple-click the Mode button from any state to enter UV mode.

Image 4.3: Diagram illustrating the multi-source sidelights (White, Warm, Green, Red, Blue, Red Flash, Red & Blue Strobe, UV Light) and their activation methods using the Mode button.

تصویر ۴.۲: مثالamples of 365nm UV light applications, including money inspection, antique appraisal, fluorescent agent detection, and treasure hunt.
4.3 عملکرد زنگ هشدار
The flashlight includes an 80dB beeping alarm with flashing red and blue lights.
- فعال کردن زنگ هشدار: Triple-click the Power button from any state to activate the alarm (beeping + red and blue flashing).
- غیرفعال کردن زنگ هشدار: Long press the Power button to turn off the alarm.
4.4 Magnetic Tail Cap
The FITORCH V10 features a magnetic tail cap for convenient attachment to metal surfaces, allowing for hands-free operation.
Image 4.5: The top left panel shows the FITORCH V10 attached to a metal surface via its magnetic tail cap, illuminating an engine bay.
5. تعمیر و نگهداری
5.1 تمیز کردن
- بدنه چراغ قوه را با یک پارچه نرم و لطیف پاک کنید.amp پارچه
- از پاک کننده ها یا حلال های ساینده استفاده نکنید.
- پورت شارژ را از گرد و غبار و آلودگی پاک کنید.
5.2 ذخیره سازی
- چراغ قوه را در جای خشک و خنک و دور از نور مستقیم خورشید نگهداری کنید.
- برای نگهداری طولانی مدت، هر ۳ تا ۶ ماه یکبار باتری را تقریباً تا ۵۰٪ شارژ کنید تا سلامت باتری حفظ شود.
5.3 مراقبت از باتری
- از خالی کردن مکرر باتری به طور کامل خودداری کنید.
- فقط از کابل USB-C ارائه شده یا معادل تأیید شده آن برای شارژ استفاده کنید.
- سعی نکنید باتری داخلی را تعویض کنید.
6 عیب یابی
- روشن نشدن چراغ قوه:
- مطمئن شوید که باتری شارژ شده است. آن را به منبع تغذیه وصل کنید و نشانگر شارژ را بررسی کنید.
- Verify correct operation: Double-click the Power button for the main light, double-click the Mode button for side lights.
- نور خروجی کم است:
- ممکن است باتری ضعیف باشد. چراغ قوه را دوباره شارژ کنید.
- مطمئن شوید که لنز تمیز و عاری از هرگونه مانع است.
- Flashlight gets warm during use:
- It is normal for high-power LED flashlights to generate heat, especially in Turbo or High modes. This is a normal operating characteristic.
- If the flashlight becomes excessively hot, reduce the brightness mode or turn it off to allow it to cool.
- شارژ کار نمیکند:
- Check the USB-C cable for damage and ensure it is properly connected to both the flashlight and the power source.
- یک کابل USB-C یا آداپتور برق دیگر را امتحان کنید.
- از تمیز بودن پورت شارژ اطمینان حاصل کنید.
7. مشخصات
| ویژگی | جزئیات |
|---|---|
| مدل | V10 |
| نام تجاری | فیتورچ |
| مواد | آلیاژ آلومینیوم |
| نوع منبع نور | LED |
| روشنایی | تا Lumens 1000 |
| ظرفیت باتری | 1000mAh (Built-in Rechargeable) |
| رابط شارژ | USB-C |
| شارژ جلدtage | 4.5V-5V |
| زمان شارژ | 120-180 دقیقه |
| ابعاد محصول | ۷.۶ اینچ در ۶.۶۹ اینچ در ۱.۵۴ اینچ (۱۷۰ میلیمتر در ۱۹۳ میلیمتر در ۳۹ میلیمتر) |
| وزن مورد | 1.76 اونس (50 گرم) |
| مقاومت در برابر آب | IPX4 (ضد پاشش آب) |
| ویژگی های خاص | UV Light, Red/Green/Blue Side Lights, Magnetic Tail, Alarm Function |
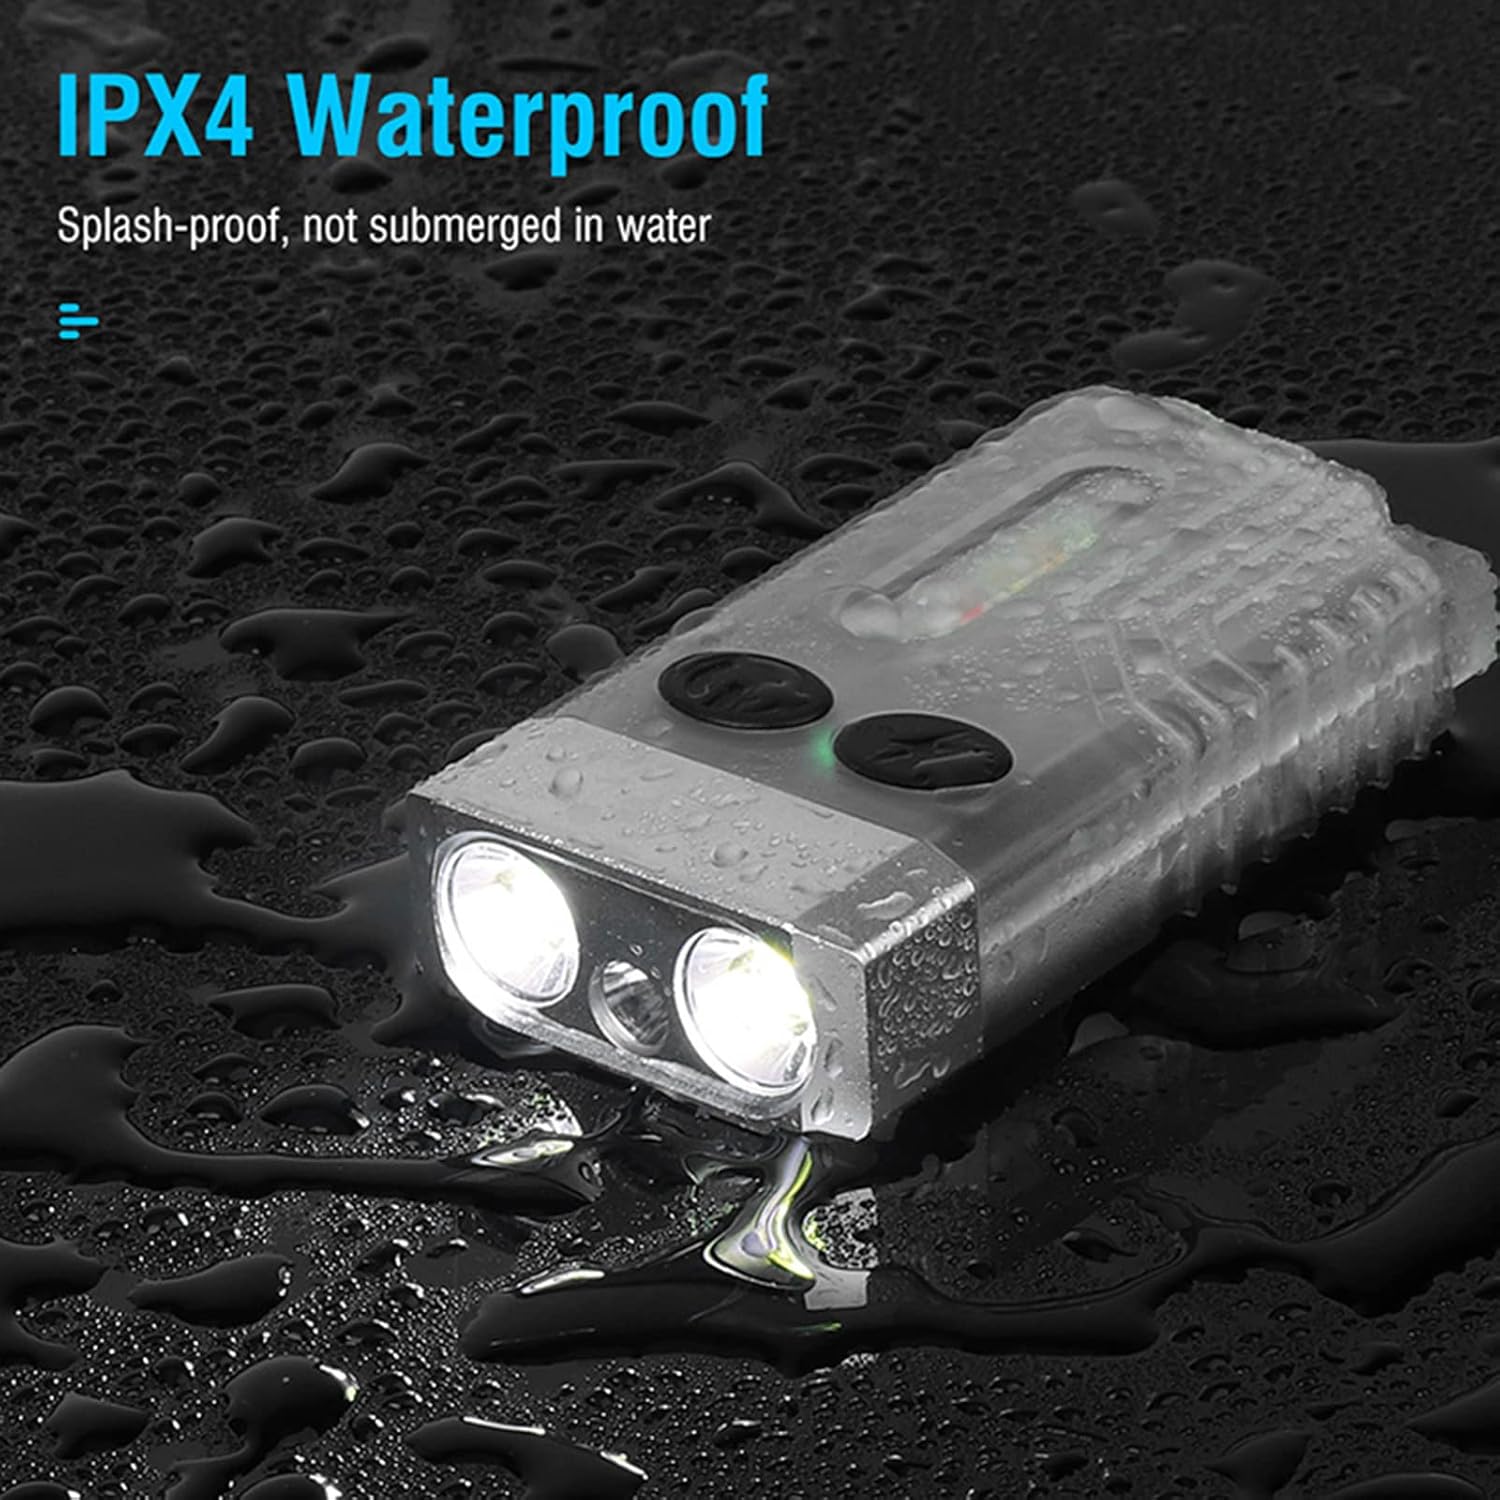
Image 7.1: The FITORCH V10 demonstrating its IPX4 splash-proof water resistance, indicating it is protected against water splashes from any direction.
8. گارانتی و پشتیبانی
FITORCH products are manufactured to high-quality standards. For warranty information or technical support, please refer to the official FITORCH webسایت یا با فروشنده خود تماس بگیرید.
لطفاً مدرک خرید خود را برای ادعاهای گارانتی نگه دارید.


