1. مقدمه
This manual provides essential information for the installation, operation, and maintenance of your Montech Titan Gold 850W ATX 3.0 Power Supply. This high-end power supply is designed for gaming systems, featuring 80 Plus Gold and Cybenetics Gold certifications, fully modular cabling, and readiness for PCIe 5.0 with a new 12VHPWR connector. Please read this manual thoroughly before installation and use to ensure proper functionality and safety.

Figure 1: Montech Titan Gold 850W Power Supply and its retail packaging.
2. اطلاعات ایمنی
Always observe the following safety precautions to prevent injury or damage to your power supply and system components:
- Ensure the power supply is disconnected from the AC power outlet before installation or handling.
- منبع تغذیه را باز نکنیدasing. حجم بالاtagقطعات داخلی وجود دارند و هیچ قطعهای وجود ندارد که توسط کاربر قابل تعمیر باشد.
- منبع تغذیه را در مکانی با تهویه مناسب، دور از منابع گرما، نور مستقیم خورشید و رطوبت نصب کنید.
- فقط از کابلهای ماژولار ارائه شده با این منبع تغذیه استفاده کنید. استفاده از کابلهای ناسازگار ممکن است باعث آسیب شود.
- Ensure all connectors are securely seated before powering on the system.
3. محتویات بسته
بررسی کنید که آیا همه اقلام در بسته موجود است یا خیر:
- Montech Titan Gold 850W Power Supply Unit
- مجموعه کابل ماژولار (شامل کابل 12VHPWR)
- سیم برق AC
- پیچ های نصب
- بست کابلی/بندهای چسبی
- راهنمای کاربر (این سند)

Figure 2: Included modular cables and accessories for the power supply.
4. راه اندازی و نصب
برای نصب منبع تغذیه خود، این مراحل را دنبال کنید:
- کیس کامپیوتر خود را آماده کنید: Ensure your PC case is compatible with ATX power supplies.
- نصب منبع تغذیه: Secure the power supply into the designated PSU bay in your PC case using the provided mounting screws. Ensure the fan is oriented correctly for optimal airflow (typically facing downwards if your case has a bottom vent).
- کابلهای ماژولار را وصل کنید: Identify the necessary cables for your motherboard, CPU, graphics card(s), and storage devices. Connect these cables to the corresponding ports on the power supply. The fully modular design allows you to connect only the cables you need, reducing clutter.
- اتصال به کامپوننتها: Route the connected cables through your case's cable management channels and connect them to your motherboard (24-pin ATX, 8-pin EPS/CPU), graphics card(s) (PCIe, including the 12VHPWR for compatible GPUs), and storage drives (SATA, Molex).
- اتصالات امن: Double-check all connections to ensure they are firm and properly seated.

شکل 3: تمام شده استview of the modular cable connection ports on the power supply.
5. دستورالعمل های عملیاتی
After installation, follow these steps to operate your power supply:
- برق AC را وصل کنید: Plug the AC power cord into the power supply's AC inlet and then into a wall outlet or surge protector.
- سوئیچ قدرت: کلید اصلی برق را در پشت منبع تغذیه پیدا کنید و آن را در موقعیت «روشن» (I) قرار دهید.
- System Power On: Press the power button on your PC case to start your computer.
- Smart Zero Fan Feature: This power supply includes a 'Smart Zero Fan' switch. When enabled (ON), the fan will remain off under low load conditions for silent operation. The fan will automatically activate when the load increases to maintain optimal temperatures. If disabled (OFF), the fan will operate continuously.

Figure 4: Rear panel with main power switch and Smart Zero Fan control.
6. تعمیر و نگهداری
برای اطمینان از طول عمر و عملکرد بهینه منبع تغذیه، تعمیر و نگهداری دورهای توصیه میشود:
- تمیز کردن گرد و غبار: Regularly clean dust from the power supply's fan intake and exhaust vents using compressed air. Ensure the power supply is turned off and unplugged before cleaning.
- بازرسی کابل: Periodically check all modular cable connections for looseness or damage. Re-seat any loose cables.
- شرایط محیطی: Maintain a clean, dry, and cool environment for your PC to prevent excessive heat and dust buildup.

شکل 5: بالا view of the power supply, highlighting the fan grill for cleaning.
7 عیب یابی
اگر با منبع تغذیه خود با مشکل مواجه شدید، به مشکلات و راهحلهای رایج زیر مراجعه کنید:
- بدون برق:
- مطمئن شوید که سیم برق متناوب (AC) به طور محکم به منبع تغذیه و پریز برق وصل شده است.
- Verify the main power switch on the PSU is in the 'ON' (I) position.
- Check all modular cable connections, especially the 24-pin ATX and 8-pin EPS/CPU cables, for secure seating.
- پریز برق را با دستگاه دیگری امتحان کنید تا از وجود برق در آن مطمئن شوید.
- سیستم به طور غیرمنتظره خاموش میشود:
- This could indicate an overload or overheating. Ensure your system's power consumption does not exceed the PSU's 850W capacity.
- Check for proper ventilation around the PSU and inside the PC case. Clean any dust buildup.
- Ensure the 'Smart Zero Fan' is functioning correctly or try disabling it to force continuous fan operation.
- Fan Not Spinning (under low load):
- If the 'Smart Zero Fan' feature is enabled, the fan will not spin under low loads. This is normal operation. The fan will activate when the system load increases.
- If the fan never spins even under high load with 'Smart Zero Fan' disabled, contact customer support.
8. مشخصات
Detailed technical specifications for the Montech Titan Gold 850W Power Supply:
| ویژگی | مشخصات |
|---|---|
| نام تجاری | مونتک |
| نام مدل | Titan Gold 850W (TIS0124) |
| واتtage | 850 وات |
| وات خروجیtage | 750 Watts (Note: Product title states 850W, specifications list 750W. Please verify with manufacturer if discrepancy is critical.) |
| صدور گواهینامه کارایی | 80 Plus Gold, Cybenetics Gold |
| فاکتور فرم | ATX |
| طراحی منبع تغذیه | ماژولار کامل |
| نوع رابط | ATX, PCIe 5.0 (12VHPWR) |
| روش خنک کننده | Air (1 Fan) |
| وزن مورد | 7.52 پوند |
| تاریخ برای اولین بار در دسترس است | 13 دسامبر 2022 |
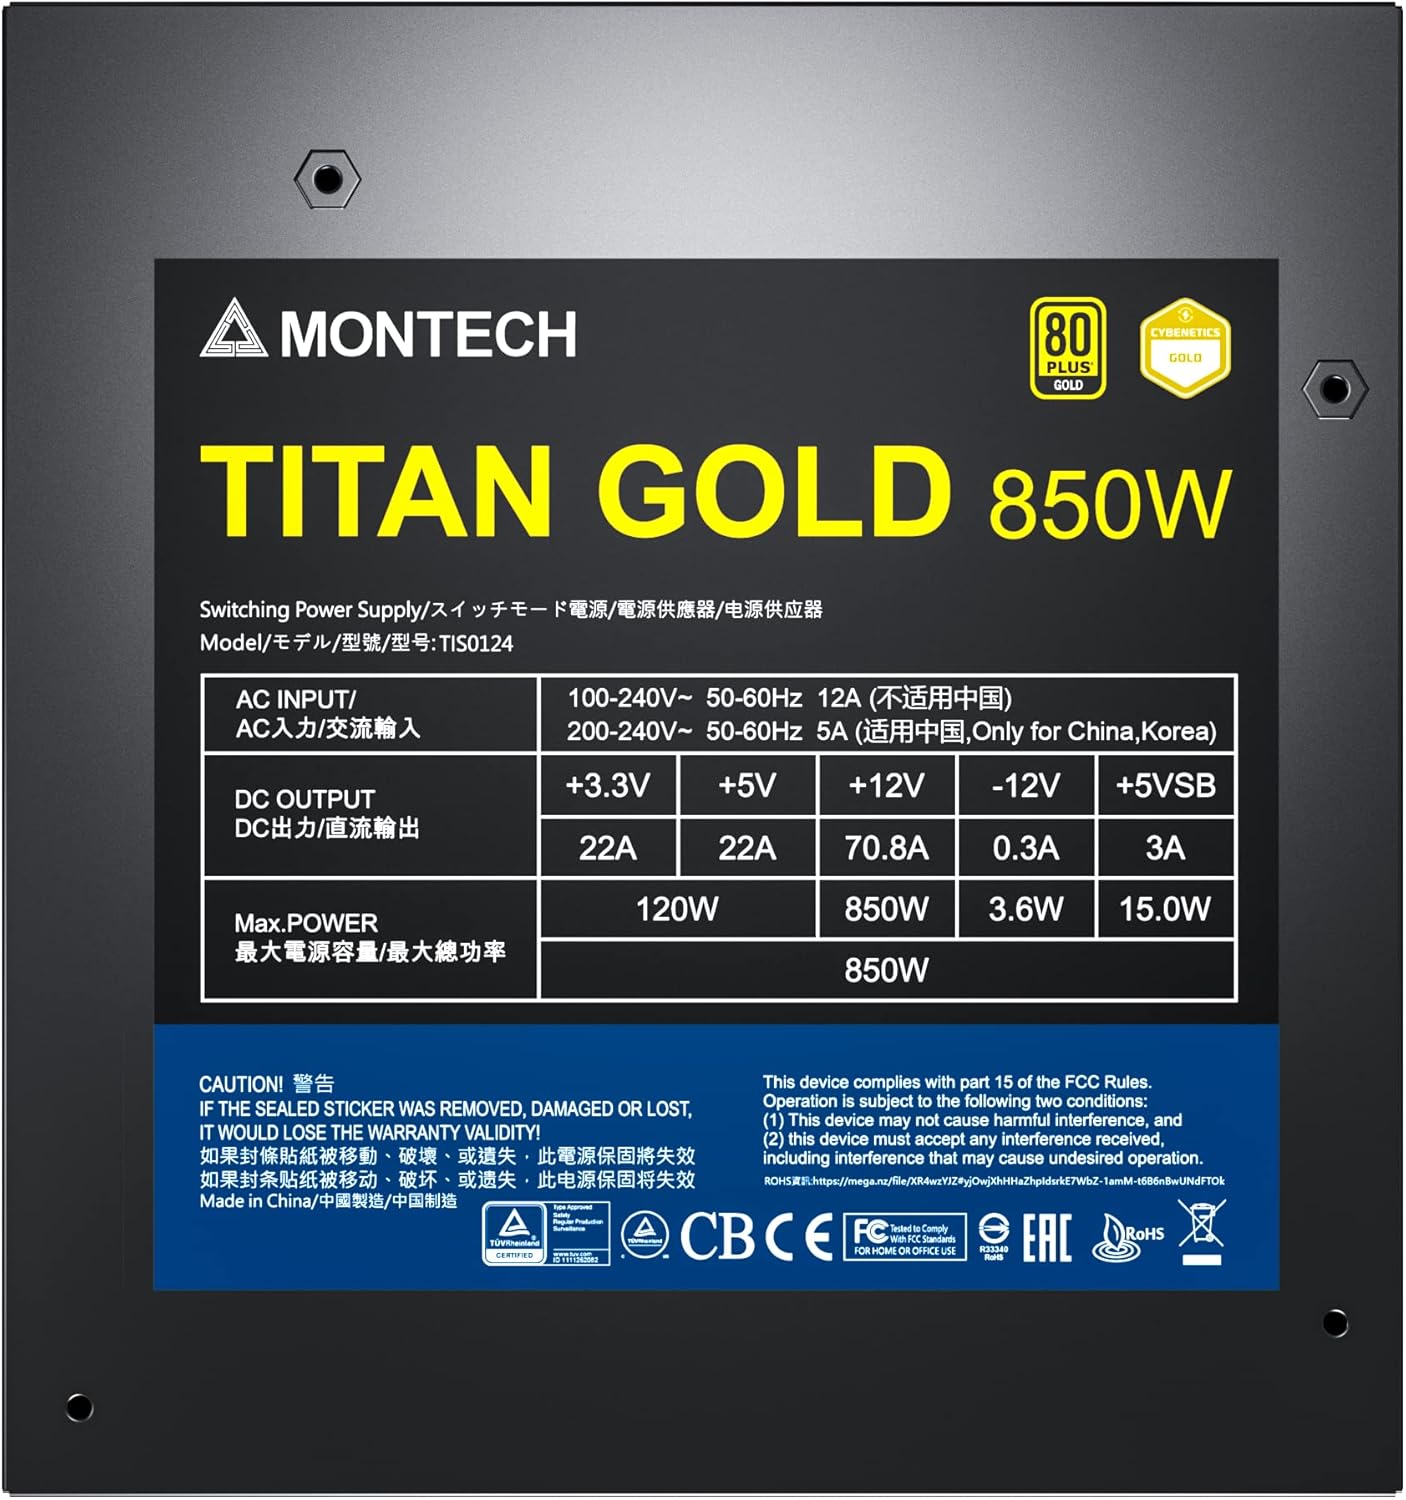
Figure 6: Product label displaying electrical specifications and certifications.
9. ضمانت و پشتیبانی
The Montech Titan Gold 850W Power Supply comes with a 10 سال گارانتی, ensuring long-term reliability and peace of mind. For technical support, warranty claims, or further assistance, please visit the official Montech webسایت یا با بخش خدمات مشتریان آنها تماس بگیرید.
لطفا رسید خرید خود را برای بررسی گارانتی نگه دارید.


