1. مقدمه
ممنون از خریدتونasing the Optoma X309ST projector. This manual provides essential information for safely installing, operating, and maintaining your device. Please read this manual thoroughly before using the projector to ensure optimal performance and longevity.
آنچه در جعبه است
- Optoma X309ST Projector
- سیم برق
- کنترل از راه دور (با باتری)
- کابل VGA
- راهنمای کاربر (این سند)
- کارت گارانتی
2. اطلاعات ایمنی
هشدار: برای جلوگیری از آتشسوزی یا برقگرفتگی، این دستگاه را در معرض باران یا رطوبت قرار ندهید.
- منافذ تهویه را مسدود نکنید. فضای کافی در اطراف پروژکتور برای جریان هوای مناسب فراهم کنید.
- هنگام روشن بودن پروژکتور، مستقیماً به لنز آن نگاه نکنید.amp روشن است. نور شدید میتواند به چشمان شما آسیب برساند.
- فقط از سیم برق ارائه شده همراه پروژکتور استفاده کنید.
- سعی نکنید خودتان این محصول را سرویس دهید. کلیه خدمات را به پرسنل خدمات واجد شرایط ارجاع دهید.
- پروژکتور را از آب یا رطوبت دور نگه دارید.
- از قرار دادن پروژکتور روی سطوح ناپایدار خودداری کنید.
3. محصول تمام شدview
اجزای پروژکتور

شکل 3.1: بالا view of the Optoma X309ST projector. This image displays the control panel with buttons for power, menu navigation, and source selection, along with the focus and zoom adjustment rings located near the lens.

شکل 3.2: جلو view of the Optoma X309ST projector. The main projection lens is visible, flanked by ventilation grilles on either side, designed for efficient heat dissipation.
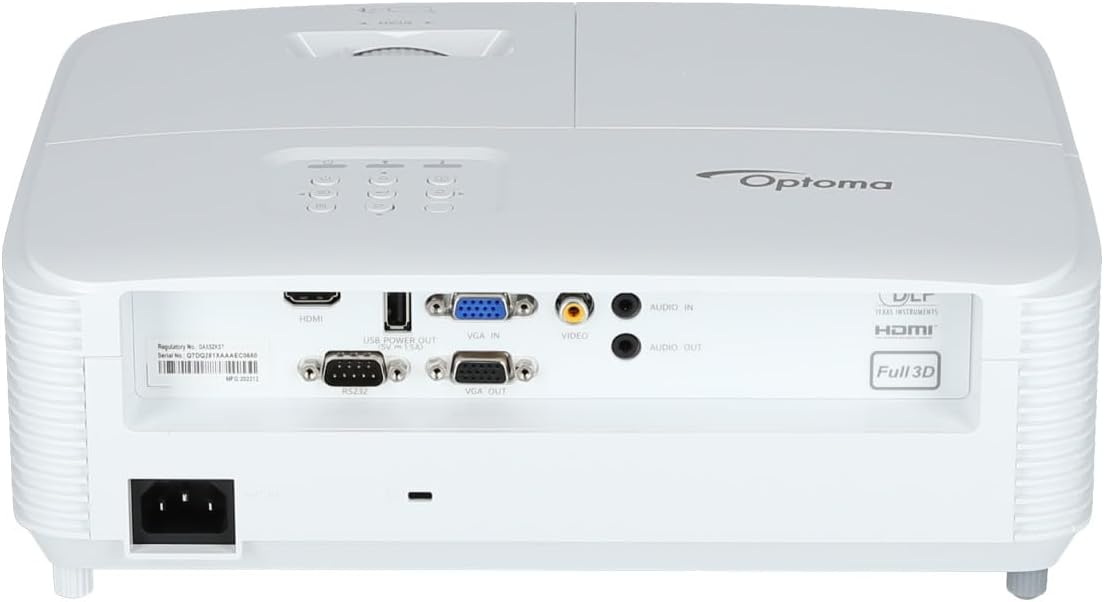
شکل 3.3: عقب view of the Optoma X309ST projector. This image highlights the various connectivity ports including HDMI, VGA In, VGA Out, USB Power Out, Audio In, Audio Out, Video (RCA Composite), and the RS-232 control port, along with the power input.
کنترل پنل
The control panel on the top of the projector allows for basic operation without the remote control. It includes buttons for:
- قدرت: پروژکتور را روشن یا خاموش می کند.
- منو: به منوی نمایش روی صفحه (OSD) دسترسی پیدا میکند.
- پیکان های ناوبری: برای پیمایش بین گزینههای منو و اعمال تنظیمات استفاده میشود.
- منبع: Selects the input source (HDMI, VGA, etc.).
- همگام سازی مجدد: Optimizes the image for analog sources.
4. راه اندازی
۴.۱ محل قرارگیری پروژکتور
The Optoma X309ST is a short-throw projector, designed to project large images from a short distance. Place the projector on a stable, flat surface or mount it securely. Ensure the projection surface (screen or wall) is flat and clear of obstructions.
- For optimal image quality, position the projector perpendicular to the screen.
- Maintain adequate ventilation space around the projector (at least 30 cm / 12 inches).
4.2 اتصال برق
- Connect the power cord to the AC inlet on the rear of the projector.
- سر دیگر سیم برق را به یک پریز برق متصل به زمین وصل کنید.
- The power LED on the projector will illuminate, indicating standby mode.
۵.۳ اتصال منابع ورودی
The projector supports various input sources. Choose the appropriate cable for your device.
- HDMI: For digital video and audio. Connect an HDMI cable from your source device (e.g., laptop, Blu-ray player) to the HDMI port on the projector.
- VGA: For analog video. Connect a VGA cable from your computer to the VGA IN port on the projector. For audio, connect a 3.5mm audio cable from your computer's audio output to the AUDIO IN port.
- RCA Composite Video: For standard definition analog video. Connect an RCA composite video cable (yellow connector) to the VIDEO port. For audio, connect RCA audio cables (red/white) to the AUDIO IN ports.
- خروجی برق USB: This port provides 5V power for external devices like streaming sticks, but does not transmit data.
۶. کار با پروژکتور
5.1 روشن/خاموش کردن
- روشن کردن: Press the Power button on the control panel or remote control. The power LED will change from red (standby) to blue (on).
- برای خاموش کردن: Press the Power button twice. The first press will display a confirmation message; press again to confirm shutdown. The power LED will return to red.
توجه: Allow the projector to cool down for a few minutes after powering off before unplugging it or moving it.
۵.۲ انتخاب منبع ورودی
را فشار دهید منبع button on the control panel or remote control repeatedly to cycle through available input sources (HDMI, VGA, Video). Alternatively, use the dedicated input buttons on the remote control.
۵.۲ تنظیم تصویر
- تمرکز: حلقه فوکوس روی لنز را بچرخانید تا تصویر واضح و شفاف شود.
- بزرگنمایی: Rotate the zoom ring on the lens to adjust the image size without moving the projector.
- تصحیح کیستون: If the image appears trapezoidal, use the Keystone Correction function in the OSD menu to square the image. Access via the منو دکمه
5.4 منوی نمایش روی صفحه (OSD).
را فشار دهید منو button to access the OSD. Use the navigation arrows to browse categories and options. Press وارد کنید or the right arrow to select an option, and the left arrow or منو again to go back or exit.
تنظیمات رایج OSD عبارتند از:
- تنظیمات تصویر: Brightness, Contrast, Color, Aspect Ratio, Picture Mode.
- تنظیمات نمایشگر: Keystone, Overscan, Wall Color.
- Setup Settings: Language, Auto Power Off, High Altitude Mode.
- Lamp تنظیمات: Lamp Hours, Lamp Mode (Bright, Eco).
6. تعمیر و نگهداری
نگهداری منظم، عملکرد بهینه را تضمین میکند و طول عمر پروژکتور شما را افزایش میدهد.
۷.۱ تمیز کردن پروژکتور
- نمای بیرونی: از پارچه نرم و بدون پرز استفاده کنیدampened with a mild, non-abrasive cleaner. Do not spray cleaner directly onto the projector.
- لنز: Use a lens cleaning cloth or lens paper with a specialized lens cleaning solution. Avoid touching the lens surface with your fingers.
- توری های تهویه: از یک برس نرم یا جاروبرقی با سری برسدار برای پاک کردن گرد و غبار از روی دریچههای تهویه استفاده کنید. قبل از تمیز کردن، مطمئن شوید که پروژکتور خاموش و از برق کشیده شده است.
6.2 Lamp جایگزینی
WARNING: Projector lamps operate at high temperatures and pressures. Allow the projector to cool completely before attempting lamp جایگزینی. برای جزئیات بیشتر به دفترچه راهنمای کامل خدمات مراجعه کنیدamp دستورالعملهای تعویض را مطالعه کنید یا با پرسنل خدمات واجد شرایط تماس بگیرید.
لamp life can vary depending on usage and lamp mode. A warning message will appear on screen when the lamp is nearing the end of its life. Only use genuine Optoma replacement lamps.
۶.۳ تمیز کردن/تعویض فیلتر هوا
The Optoma X309ST projector is designed with a sealed optical engine, which typically means it does not have user-serviceable air filters that require regular cleaning or replacement. However, ensure the ventilation grilles remain clear of dust and debris as described in section 6.1.
7 عیب یابی
اگر با پروژکتور خود با مشکلاتی مواجه شدید، به مشکلات و راهحلهای رایج زیر مراجعه کنید:
| مشکل | علت احتمالی | راه حل |
|---|---|---|
| تصویری روی صفحه نمایش داده نمیشود. |
|
|
| تصویر تار است. |
|
|
| تصویر ذوزنقهای است. |
|
|
| پروژکتور بیش از حد گرم میشود یا خاموش میشود. |
|
|
If the problem persists after trying these solutions, please contact Optoma customer support.
8. مشخصات
| ویژگی | جزئیات |
|---|---|
| شماره مدل | E9PD7DQ01EZ1 |
| روشنایی | 3700 ANSI لومنس |
| وضوح بومی | XGA (1024 x 768) |
| نسبت پرتاب | 0.617:1 Short Throw |
| فناوری اتصال | اچدیامآی، یواسبی، ویجیای |
| ورودی ها | HDMI, VGA, RCA Composite Video, Analog Audio (3.5mm) |
| خروجی ها | VGA Out (Loop-Through), Analog Audio (3.5mm) |
| ویژگی های خاص | USB Power Output, Built-In 10-Watt Speaker, RS-232 Controllable, IR Remote Control Included, Full 3D content support |
| وزن مورد | ۳.۷۴ پوند (تقریباً ۱.۷ کیلوگرم) |
| ابعاد محصول (L x W x H) | ۱۸.۵ در ۶.۸۱ در ۱.۱۸ اینچ (تقریباً ۴۷ در ۱۷.۳ در ۳ سانتیمتر) |
| موارد استفاده توصیه شده | Business presentations, Education, Multimedia, Full 3D content |
9. گارانتی و پشتیبانی
9.1 اطلاعات گارانتی
Your Optoma X309ST projector comes with a standard manufacturer's warranty. Please refer to the warranty card included in your product packaging for specific terms, conditions, and duration. Keep your proof of purchase for warranty claims.
The product includes 1 year technical support as part of the purchase.
9.2 پشتیبانی مشتری
For technical assistance, troubleshooting beyond this manual, or warranty inquiries, please contact Optoma customer support. Visit the official Optoma website for the most up-to-date contact information, FAQs, and driver downloads.
میتوانید اطلاعات بیشتر و منابع پشتیبانی را در اینجا بیابید فروشگاه اپتما در آمازون or the official Optoma webسایت


