1. مقدمه
Thank you for choosing the ANENG Q1 9999 Counts True RMS Digital Multimeter. This device is designed for safe and accurate measurement of various electrical parameters. It features True RMS measurement, Non-Contact Voltage (NCV) detection, auto/manual ranging, and an EBTN black display with an analog bar graph for enhanced readability. Please read this manual thoroughly before use to ensure proper operation and safety.
2. اطلاعات ایمنی
WARNING: To avoid possible electric shock, fire, or personal injury, please read all safety information before you use the product.
- Always ensure the multimeter is in the correct function and range for the measurement being performed.
- از حداکثر مقادیر ورودی برای هیچ تابعی تجاوز نکنید.
- قبل از استفاده، سیمهای تست را از نظر عایق آسیبدیده یا فلز در معرض دید بررسی کنید. در صورت آسیبدیدگی، آنها را تعویض کنید.
- Do not use the multimeter if it appears damaged or if it is not operating properly.
- هنگام کار با vol احتیاط کنیدtagولتاژهای بالاتر از 30 ولت AC RMS، 42 ولت پیک یا 60 ولت DC. این ولتاژهاtagاین یک خطر شوک است.
- همیشه قبل از تغییر عملکردها یا محدودهها، سیمهای تست را از مدار جدا کنید.
- Replace batteries as soon as the low battery indicator appears to avoid incorrect readings.
- قوانین ایمنی محلی و ملی را رعایت کنید.
3. محصول تمام شدview
The ANENG Q1 multimeter is a versatile tool for electrical measurements. Below is an image illustrating the device and its included accessories.

Image 3.1: ANENG Q1 Digital Multimeter and included accessories, including test leads, temperature probe, and storage bag.
The device features a large EBTN display, function buttons, and input jacks for test leads.

تصویر 3.2: جلو view of the ANENG Q1 Multimeter, highlighting the display, function buttons, and input terminals.
4. راه اندازی
4.1 نصب باتری
The ANENG Q1 multimeter requires two 1.5V AA batteries (not included). To install or replace batteries:
- مطمئن شوید که مولتیمتر خاموش است و تمام پرابهای تست را جدا کنید.
- پوشش محفظه باتری را در پشت دستگاه پیدا کنید.
- با استفاده از پیچگوشتی، پیچی که پوشش را محکم میکند، شل کنید.
- Remove the cover and insert two AA batteries, observing correct polarity (+/-).
- درپوش محفظه باتری را تعویض کرده و پیچ را محکم کنید.
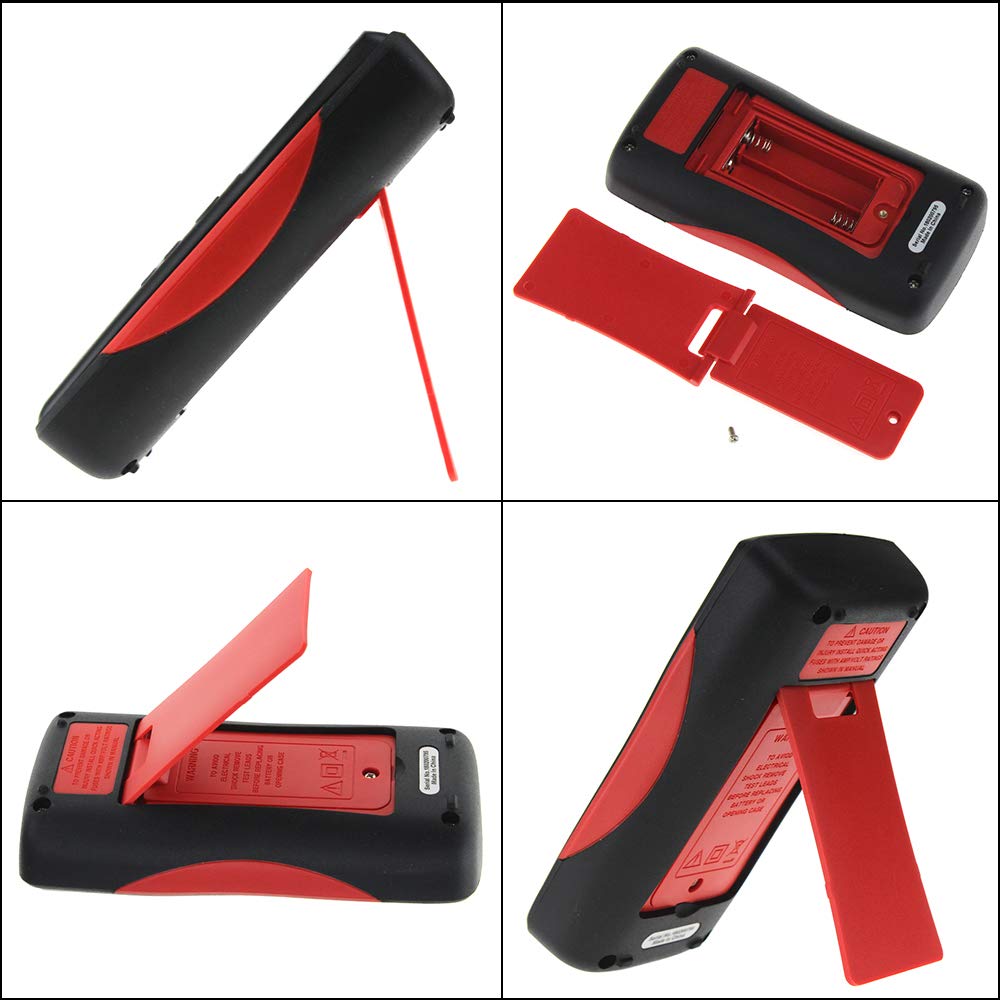
تصویر 4.1: عقب view of the multimeter, illustrating the battery compartment and the integrated kickstand.
۶.۲ اتصال سیمهای تست
The multimeter comes with two standard test probes and a 16-in-1 multifunctional test line set. Always connect the black test lead to the COM (Common) jack. Connect the red test lead to the appropriate input jack based on the measurement type:
- VΩHz-+ jack for Voltage, Resistance, Frequency, Diode, and Continuity measurements.
- mA jack for milliampاندازهگیریهای جریان وجود دارد.
- μA jack for microampاندازهگیریهای جریان وجود دارد.
- حداکثر 10 آمپر jack for high current measurements (up to 10A).

Image 4.2: Included test leads and various accessories, such as alligator clips and fine-point probes.
5. دستورالعمل های عملیاتی
The ANENG Q1 features both auto-ranging and manual-ranging capabilities. Press the RANGE button to switch between auto and manual modes. In manual mode, press RANGE repeatedly to cycle through available ranges.
5.1 روشن/خاموش
را فشار داده و نگه دارید قدرت button (red circle with line) for more than 2 seconds to turn the multimeter on or off. The device also features an Auto Power Off function to conserve battery life.
5.2 اندازه گیری AC/DC Voltage
- سرب تست سیاه را به COM جک و تست قرمز به ... منتهی میشوند VΩHz-+ جک
- Turn on the multimeter. The device will typically default to auto-ranging voltagاندازه گیری
- پروب های آزمایش را به نقاط مدار که در آن ولتاژ قرار دارد لمس کنیدtage باید اندازه گیری شود.
- جلد را بخوانیدtage value on the display. The multimeter automatically detects AC or DC voltage.
5.3 Measuring AC/DC Current
- مهم: Ensure the circuit is de-energized before connecting the multimeter in series.
- سرب تست سیاه را به COM جک. سیم تست قرمز را به آن وصل کنید mA, μA، یا حداکثر 10 آمپر jack depending on the expected current.
- Insert the multimeter in series with the circuit where current is to be measured.
- Re-energize the circuit.
- مقدار فعلی را روی صفحه نمایش بخوانید.
5.4 اندازه گیری مقاومت
- سرب تست سیاه را به COM جک و تست قرمز به ... منتهی میشوند VΩHz-+ جک
- قبل از اندازهگیری مقاومت، مطمئن شوید که مدار یا قطعه مورد نظر بدون برق است.
- Touch the test probes across the component to be measured.
- مقدار مقاومت روی صفحه را بخوانید.
5.5 اندازه گیری ظرفیت
- سرب تست سیاه را به COM جک و تست قرمز به ... منتهی میشوند VΩHz-+ جک
- Ensure the capacitor is fully discharged before measurement to avoid damage to the multimeter.
- پروبهای آزمایش را به ترمینالهای خازن وصل کنید.
- مقدار خازنی روی صفحه را بخوانید.
۵.۲.۴ اندازهگیری دما
- Connect the temperature sensor (thermocouple) to the VΩHz-+ و COM jacks, observing polarity if applicable.
- Place the tip of the temperature sensor on or near the object whose temperature is to be measured.
- Read the temperature value on the display. The unit can be switched between Celsius and Fahrenheit.
5.7 جلد غیر تماسیtage (NCV) تشخیص
تابع NCV امکان تشخیص ولتاژ AC را فراهم میکند.tagبدون تماس مستقیم با هادیها.
- را فشار دهید NCV button to activate the NCV mode.
- Move the top of the multimeter near the conductor or outlet.
- The display will show an increasing number of bars and an audible beep will indicate the presence and strength of AC voltage.

Image 5.1: The multimeter performing a Non-Contact Voltage (NCV) test near a power strip, indicated by the signal icon on the display.
۵.۸ تست دیود و بررسی پیوستگی
These functions are typically accessed through the VΩHz-+ jack and a dedicated button or range selection.
- تست دیود: Connect the red lead to the anode and the black lead to the cathode of the diode. The display will show the forward voltagافت ولتاژ. برای بررسی مدار باز، سیمها را برعکس کنید.
- تست تداوم: Touch the probes to the two points of the circuit. A continuous beep indicates a low resistance path (continuity).
6. تعمیر و نگهداری
6.1 تمیز کردن
پاک کردن مورد با آگهیamp پارچه و مواد شوینده ملایم. از مواد ساینده یا حلال استفاده نکنید. ترمینالهای ورودی را از آلودگی و رطوبت پاک کنید.
6.2 تعویض باتری
Refer to Section 4.1 for battery replacement instructions. Replace batteries promptly when the low battery indicator appears on the display.
6.3 تعویض فیوز
The multimeter is protected by internal fuses. If the current measurement function stops working, the fuse may need replacement. Fuse replacement should only be performed by qualified personnel. Refer to the specifications for fuse ratings.
7 عیب یابی
- بدون نمایش یا نمایش ضعیف: نصب و شارژ باتری را بررسی کنید. در صورت لزوم باتریها را تعویض کنید.
- قرائتهای نادرست: Ensure test leads are properly connected, the correct function/range is selected, and the batteries are not low.
- اندازهگیری جریان کار نمیکند: فیوز را بررسی کنید. در صورت سوختن، آن را با فیوزی با درجهبندی صحیح تعویض کنید.
- "OL" or "OVER" on display: Indicates an overload or out-of-range measurement. Select a higher range or ensure the input is within the device's limits.
8. مشخصات
| پارامتر | محدوده/مقدار |
|---|---|
| نوع نمایشگر | Digital Display, 9999 Counts, EBTN Black Display, Analog Bar Graph |
| ظرفیت | 9.99nF / 99.99nF / 999.9nF / 9.99µF / 99.99µF / 999.9µF / 9.999mF |
| جلدtage (AC/DC) | 99.99 میلی ولت / 999.9 میلی ولت / 9.999 ولت / 99.99 ولت / 999.9 ولت |
| جریان (AC/DC) | 99.99µA / 999.9µA / 99.99mA / 999.9mA / 9.999A |
| مقاومت | 99.99Ω / 999.9Ω / 9.999kΩ / 99.99kΩ / 999.9kΩ / 9.999MΩ / 99.99MΩ |
| فرکانس | 99.99Hz / 999.9Hz / 9.999kHz / 99.99kHz / 999.9kHz / 5MHz |
| دما | -20 درجه سانتی گراد ~ 1000 درجه سانتی گراد / -4 درجه فارنهایت تا 1832 درجه فارنهایت |
| تست دیود | بله |
| تداوم | بله |
| چرخه وظیفه | ۵۰٪ - ۷۵٪ |
| Sampنرخ لینگ | 3 بار در ثانیه |
| قدرت | 2 باتری قلمی 1.5 ولت AA |
| حالت عملیاتی | محدوده خودکار / دستی |
| دمای عملیاتی | 0-40 درجه سانتیگراد |
| رطوبت عملیاتی | ≤ 75٪ RH |
| شرایط نگهداری | -20 ~ 60 درجه سانتی گراد |
| رطوبت ذخیره سازی | ≤ 80٪ RH |
| رتبه بندی ایمنی | 600V CAT III, 1000V CAT II (inferred) |
9. گارانتی و پشتیبانی
Specific warranty information is not provided in the product details. For warranty claims or technical support, please contact the retailer or manufacturer directly. Keep your purchase receipt as proof of purchase.


