1. مقدمه
Thank you for choosing the Bestier Modern Crystal Raindrop Chandelier. This elegant lighting fixture is designed to enhance the ambiance of your dining room, bathroom, bedroom, or living room with its unique crystal glass design. This manual provides detailed instructions for safe installation, proper operation, and effective maintenance of your new chandelier.

Image 1.1: The Bestier Modern Crystal Raindrop Chandelier, showcasing its design and crystal elements.
2. اطلاعات ایمنی
Please read all instructions carefully before beginning installation. Failure to follow these instructions may result in electrical shock, fire, or other hazards that could cause injury or property damage.
- هشدار: Risk of electrical shock. Disconnect power at the circuit breaker or fuse box before installation or servicing.
- تمام اتصالات الکتریکی باید مطابق با قوانین محلی، آییننامهها یا قانون ملی برق (NEC) باشند. اگر با سیمکشی برق آشنایی ندارید، با یک برقکار واجد شرایط مشورت کنید.
- در حین نصب از عینک ایمنی و دستکش استفاده کنید.
- Ensure the mounting surface can support the weight of the fixture (approximately 16.61 pounds or 7.55 kg).
- از حداکثر وات تجاوز نکنیدtage specified for the bulbs (240 watts total, 6 E12 bulbs).
- مواد قابل اشتعال را از لامپ دور نگه دارید.
- این دستگاه فقط برای استفاده در محیط داخلی طراحی شده است.
3. محتویات بسته
Carefully unpack all components and check for any damage. Retain all packaging materials until you are certain the product is fully assembled and operational. If any parts are missing or damaged, contact customer support.
- Chandelier Frame (Metal)
- Crystal Elements (Various shapes and sizes)
- Mounting Hardware (Canopy, Chain, Screws, Wire Nuts)
- راهنمای دستورالعمل (این سند)
- توجه: لامپهای E12 شامل این محصول نمیشوند و باید جداگانه خریداری شوند.
4. مشخصات
| نام تجاری | بهترین |
| مدل | D17xH31 |
| ابعاد فیکسچر | Diameter 17 inches x Height 31 inches |
| ابعاد سایبان | Diameter 5 inches x Height 2 inches |
| زنجیر آویز قابل تنظیم | Max Length 40 inches |
| پایه لامپ | 6 x E12 (Bulbs not included) |
| حداکثر واتtage | 240 Watts (40W per bulb max) |
| جلدtage | 110 ولت |
| مواد | کریستال، فلز |
| نوع پایان | جلا داده شده |
| سایه رنگ | نقره ای |
| وزن مورد | 16.61 پوند (7.55 کیلوگرم) |
| نوع نصب | Hanging, Hung |
| روش کنترل | دکمه فشاری (از طریق کلید دیواری) |
| مونتاژ مورد نیاز است | بله |
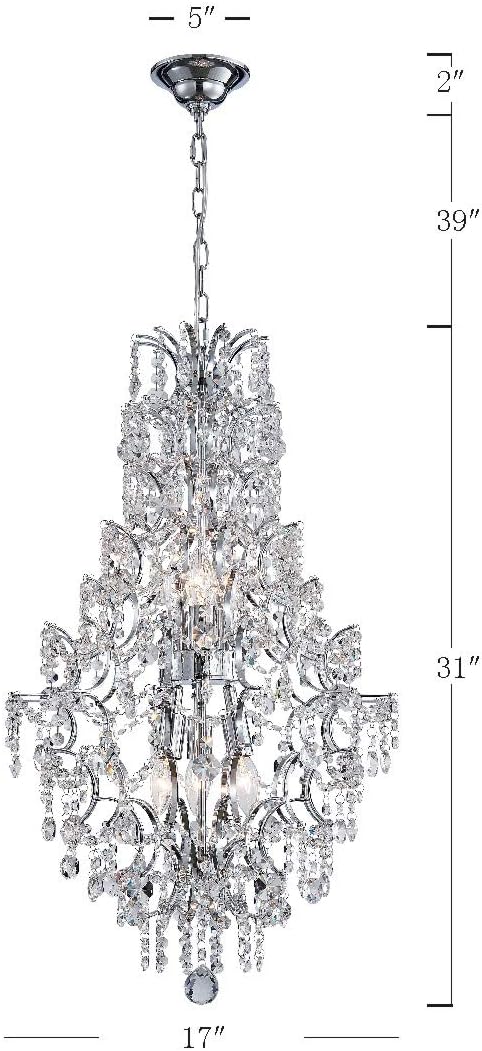
Image 4.1: Dimensional diagram of the chandelier, indicating its height, diameter, and canopy size.
5. راه اندازی و نصب
Professional installation is recommended. If you are performing the installation yourself, ensure you have the necessary tools and follow all safety precautions.
5.1 پیش نصب
- برق را خاموش کنید: Locate the circuit breaker or fuse box and turn off the power to the junction box where you will install the fixture.
- منطقه را آماده کنید: Clear the work area and ensure you have a stable ladder or platform.
- Unpack components: تمام قطعات را با دقت از بستهبندی خارج کنید. آنها را روی یک سطح تمیز و نرم قرار دهید تا از خراشیدگی جلوگیری شود.
- شناسایی قطعات: Refer to the package contents list to ensure all parts are present.
5.2 نصب فیکسچر
- براکت نصب را با استفاده از پیچهای ارائه شده به جعبه اتصال وصل کنید. مطمئن شوید که محکم بسته شده است.
- Determine the desired hanging height for the chandelier. Adjust the chain length by removing links as needed.
- سیمهای برق را از زنجیر و سایبان عبور دهید.
- Secure the chain to the mounting bracket.
5.3 اتصالات الکتریکی
- Connect the bare copper ground wire from the fixture to the ground wire from the junction box (usually green or bare copper) using a wire nut.
- سیم سفید را از دستگاه به سیم سفید (خنثی) از جعبه اتصال با استفاده از مهره سیم وصل کنید.
- Connect the black wire from the fixture to the black (hot) wire from the junction box using a wire nut.
- تمام سیم ها را با دقت در جعبه اتصال قرار دهید.
- Raise the canopy to the ceiling and secure it to the mounting bracket with the provided screws.
5.4 Attaching Crystal Elements
This step requires patience and care. It is often easier to attach the crystals after the main fixture is mounted but before bulbs are installed. Refer to the diagram provided with your specific crystal set for placement.
- Identify the different types and sizes of crystal elements.
- Attach each crystal strand or individual crystal to the designated hooks or loops on the chandelier frame.
- Handle crystals carefully to avoid fingerprints or damage. Wearing clean cotton gloves can help.
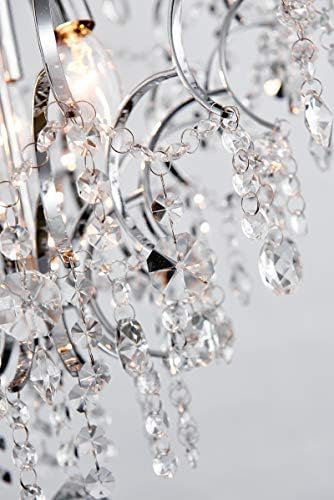
تصویر ۲.۱: جزئیات view of the crystal elements, showing their attachment points and intricate design.
۴.۴ نصب لامپ
- مطمئن شوید که برق هنوز قطع است.
- Screw six (6) E12 base bulbs into the sockets. Do not overtighten.
- بررسی کنید که کل واتtage از 240 وات تجاوز نمی کند.
- Compatible bulb types include Dimmable, Energy-saving, LED, and Halogen bulbs.
6. دستورالعمل های عملیاتی
Once installation is complete and all safety checks are performed:
- بازیابی برق: برق را از طریق قطع کننده مدار یا جعبه فیوز دوباره وصل کنید.
- روشن/خاموش کردن: Operate the chandelier using your standard wall switch.
- کم نور (اختیاری): If you have installed dimmable E12 bulbs and connected the fixture to a compatible dimmer switch, you can adjust the light intensity using the dimmer control.
7. تعمیر و نگهداری
نگهداری منظم به حفظ زیبایی و عملکرد لوستر شما کمک میکند.
- تمیز کردن:
- Always turn off power and allow the fixture to cool before cleaning.
- Dust the metal frame with a soft, dry cloth.
- For crystals, use a soft, lint-free cloth dampened with a mild glass cleaner or distilled water. Avoid abrasive cleaners or harsh chemicals.
- Do not spray cleaner directly onto the fixture; spray onto the cloth first.
- تعویض لامپ:
- برق را در قطع کننده مدار قطع کنید.
- قبل از لمس کردن، اجازه دهید لامپها کاملاً خنک شوند.
- Unscrew the old bulb and replace it with a new E12 base bulb of the correct wattage (max 40W per bulb).
- بازرسی: به طور دورهای تمام اتصالات و سختافزار نصب را بررسی کنید تا از ایمن بودن آنها اطمینان حاصل شود.
8 عیب یابی
اگر با لوستر خود با مشکل مواجه شدید، به مشکلات و راهحلهای رایج زیر مراجعه کنید:
| مشکل | علت احتمالی | راه حل |
|---|---|---|
| چراغ روشن نمی شود |
|
|
| چراغها سوسو میزنند. |
|
|
| Chandelier hangs unevenly. |
|
|
9. گارانتی و پشتیبانی
For warranty information or technical support, please refer to the contact details provided at the point of purchase or visit the official Bestier webرسید خرید خود را به عنوان مدرک خرید نگه دارید.
پشتیبانی مشتری: Please contact your retailer or visit www.bestier.net برای کمک


