1. مقدمه
This manual provides essential instructions for the safe and effective use of your Zoom H1n Handy Recorder. Please read this manual thoroughly before using the device to ensure proper operation and to prevent damage.
2. محصول تمام شدview
2.1 محتویات بسته
- Zoom H1n Handy Recorder (Blue Edition)
- 2 عدد باتری قلمی
Note: A microSD card and USB cable are not included and must be purchased separately.
2.2 شناسایی جزء
Familiarize yourself with the various parts of your H1n recorder.

شکل 1: جلو View of Zoom H1n Handy Recorder. This image displays the front of the blue Zoom H1n recorder, highlighting the built-in stereo microphones at the top, the LCD screen, the large red record button, and playback controls.

شکل ۲: زاویهدار View of Zoom H1n Handy Recorder. This image shows the Zoom H1n from an angled perspective, revealing the side controls such as the volume buttons, power switch, and various input/output ports.
- میکروفون های استریو داخلی: X/Y configuration for wide stereo imaging.
- Input Level Dial: Adjusts recording input sensitivity.
- نمایشگر LCD: Shows recording status, file اطلاعات و گزینههای منو.
- دکمه REC: ضبط را شروع و متوقف میکند.
- دکمه گزینه: Accesses menu settings.
- کنترل های پخش: Play/Pause, Stop, Fast Forward, Rewind.
- جک لاین این: ورودی استریوی 3.5 میلیمتری برای میکروفونهای خارجی یا دستگاههای line-level
- LINE OUT/HEADPHONE Jack: 3.5mm stereo output for monitoring or connecting to other devices.
- VOLUME Buttons: میزان صدای پخش را تنظیم میکند.
- پورت USB: Micro-USB port for data transfer and use as a USB microphone.
- اسلات کارت MicroSD: برای رسانه ضبط.
- محفظه باتری: دو باتری قلمی (AA) را در خود جای میدهد.
3. راه اندازی
3.1 نصب باتری ها
- درپوش محفظه باتری را که در پشت دستگاه قرار دارد، باز کنید.
- دو باتری قلمی (AA) را وارد کنید و از قطبیت صحیح (+/-) اطمینان حاصل کنید.
- درپوش محفظه باتری را محکم ببندید.
۲.۴ قرار دادن کارت حافظه MicroSD
The H1n requires a microSD or microSDHC card (up to 32 GB) for recording. Ensure the card is formatted correctly (FAT32).
- شیار کارت حافظه microSD را در کنار دستگاه پیدا کنید.
- کارت microSD را با اتصالات رو به پایین وارد کنید تا در جای خود قرار گیرد.
- To remove, push the card in gently until it clicks, then release to eject.
3.3 روشن/خاموش کردن
- روشن کردن: Slide the POWER switch (located on the side) downwards and hold until the display lights up.
- برای خاموش کردن: Slide the POWER switch downwards and hold until the display turns off.
4. دستورالعمل های عملیاتی
۵.۱ ضبط اولیه
- Power on the H1n.
- Adjust the input level using the dial at the top. Monitor the level meter on the LCD to avoid clipping (distortion).
- قرمز بزرگ را فشار دهید ضبط button once to enter record standby mode.
- را فشار دهید ضبط button again to start recording. The REC indicator will light up.
- برای توقف ضبط ، را فشار دهید ضبط دکمه این file به صورت خودکار ذخیره خواهد شد.
4.2 پخش
- Use the Fast Forward (>>) or Rewind (<<) buttons to select a file.
- پخش/مکث (>/II) دکمه) شروع پخش
- Adjust the playback volume using the VOLUME buttons on the side.
- Stop را فشار دهید (■دکمه ) برای توقف پخش.
4.3 تنظیمات منو
را فشار دهید OPTION button to access the menu and adjust various settings. Use the playback control buttons to navigate and select options.
- صوتی: Select recording format (WAV/MP3), sampنرخ و عمق بیت.
- LO CUT: Activates a low-cut filter to reduce unwanted low-frequency noise.
- LIMITER: Prevents input overload and distortion by compressing loud signals.
- AUTOLEVEL: Automatically adjusts the recording level.
- TONE GENERATOR: Produces a test tone for calibrating audio levels with cameras or other devices.
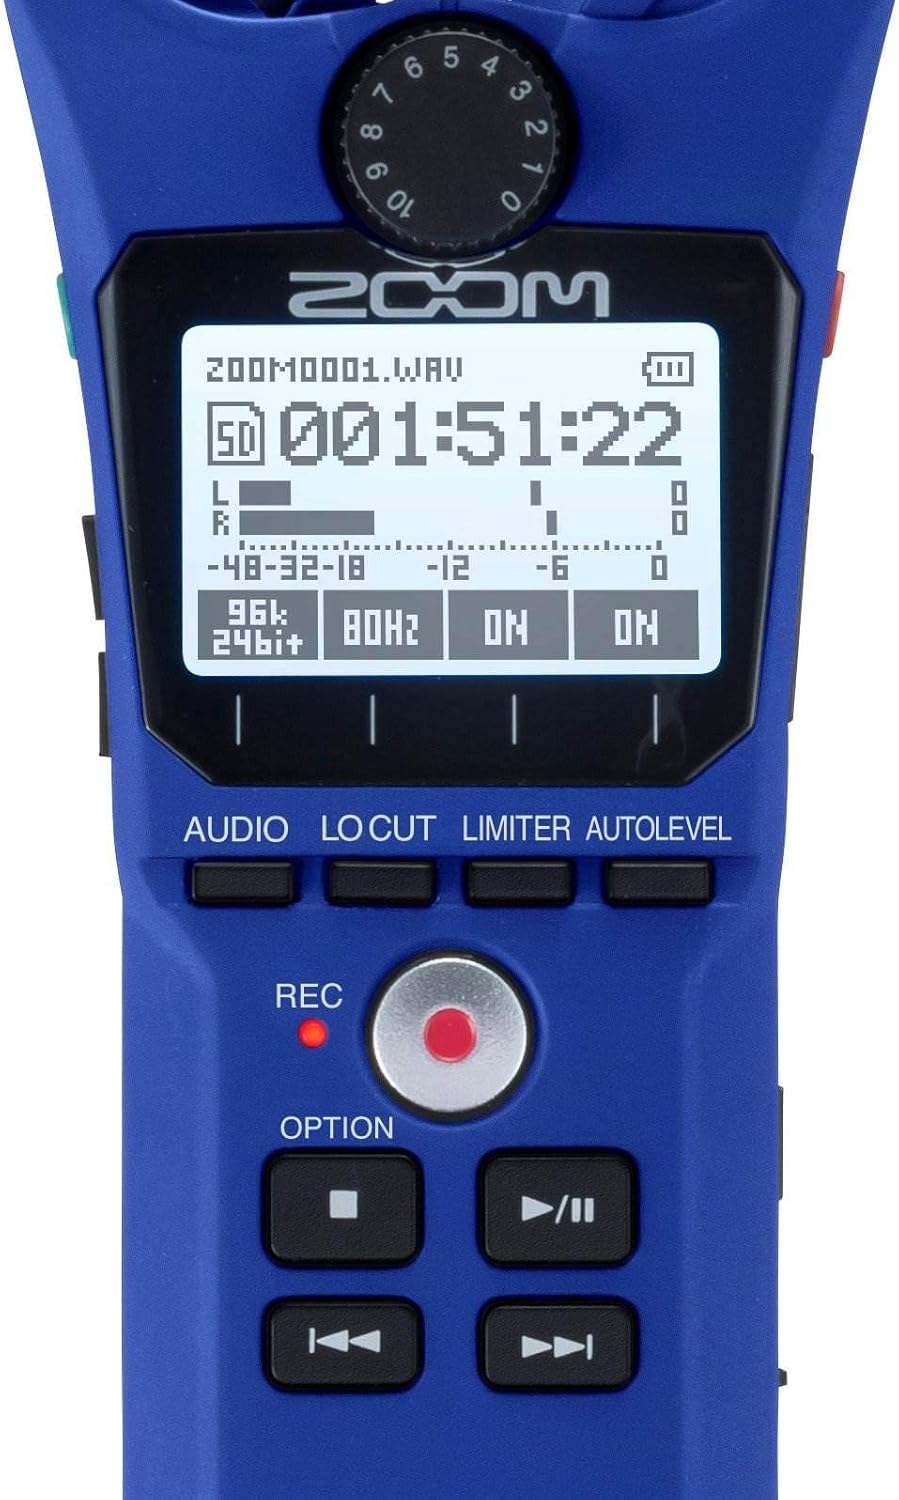
Figure 3: Close-up of H1n Display and Controls. این تصویر جزئیات دقیقی را ارائه میدهد view of the H1n's LCD screen, showing recording parameters, and the main control buttons including REC, OPTION, and playback controls.
۶.۶ عملکرد USB
Connect the H1n to a computer using a micro-USB cable (sold separately).
- USB Microphone: The H1n can function as a USB microphone for your computer.
- کارت خوان SD: دسترسی داشته باشید files on the microSD card directly from your computer.
5. تعمیر و نگهداری
- تمیز کردن: برای تمیز کردن دستگاه از یک پارچه نرم و خشک استفاده کنید. از پاک کننده های مایع یا حلال ها استفاده نکنید.
- ذخیره سازی: H1n را در جای خشک و خنک و دور از نور مستقیم خورشید و دمای شدید نگهداری کنید. در صورت نگهداری طولانی مدت، باتریها را از دستگاه خارج کنید.
- رسیدگی: The H1n is a precision instrument. Avoid dropping it or subjecting it to strong impacts.
6 عیب یابی
- دستگاه روشن نمیشود: نصب باتری را بررسی کنید و مطمئن شوید که باتری ها شارژ شده اند.
- Recording issues (no sound, distorted sound): Verify input level settings. Ensure microphones are not obstructed. Check if an external microphone is properly connected to the LINE IN jack.
- SD card errors: Ensure the microSD card is properly inserted and formatted. Try a different microSD card if issues persist.
- Rattling sound from volume rocker: This is a known characteristic of the design. To minimize noise during recording, avoid shaking the device or secure the rocker with a finger if recording while moving.
- Computer does not recognize H1n via USB: Ensure the USB cable is securely connected. Try a different USB port or cable. Select the correct USB mode on the H1n (Audio Interface or SD Card Reader).
7. مشخصات
| ویژگی | مشخصات |
|---|---|
| رسانه ضبط | microSD/microSDHC card (up to 32 GB) |
| فرمت های ضبط | WAV (16/24-bit, 44.1/48/96 kHz), MP3 (48-320 kbps) |
| میکروفون | 90° X/Y stereo condenser microphones |
| ورودی ها | 3.5mm stereo mini jack (LINE IN) |
| خروجی ها | 3.5mm stereo mini jack (LINE OUT/HEADPHONE) |
| پورت USB | Micro-USB (USB 2.0 High Speed) |
| قدرت | 2 x AAA batteries (Alkaline or NiMH) or AC adapter (AD-17, sold separately) |
| عمر باتری | Approximately 10 hours (Alkaline batteries, WAV 44.1 kHz/16-bit) |
| ابعاد | 1.5 سانتیمتر عمق × 5.5 سانتیمتر عرض × 1 سانتیمتر ارتفاع (تقریبی) |
| وزن | 0.5 Pounds (approximate, without batteries) |
8. گارانتی و پشتیبانی
برای اطلاعات گارانتی و پشتیبانی فنی، لطفاً به وبسایت رسمی زوم مراجعه کنید. website or contact your local Zoom distributor. Keep your purchase receipt as proof of purchase for warranty claims.


