1. مقدمه
This manual provides detailed instructions for the installation, programming, and operation of your Kanlux 18721 JVT3 16 AS Digital Programmable Time Switch. Please read this manual thoroughly before installation and use to ensure proper function and safety. Keep this manual for future reference.
2. محصول تمام شدview
The Kanlux JVT3 16 AS is a digital programmable time switch designed for controlling electrical circuits based on a set schedule. It features a digital display, control buttons, and terminal connections for power and load. This device also includes an astronomical function for advanced scheduling.

شکل 2.1: جلو view of the Kanlux JVT3 16 AS Digital Programmable Time Switch. This image shows the device with its protective cover open, revealing the digital display, the 'ON' indicator, and control buttons labeled 'P', 'D+', 'H+', 'M+', 'RESET', and 'MANUAL'. Below the buttons are the terminal connections.

شکل 2.2: جلو view of the Kanlux JVT3 16 AS. This image displays the device with its protective cover closed, clearly showing the "Kanlux JVT3-16AS" branding and the CE mark.
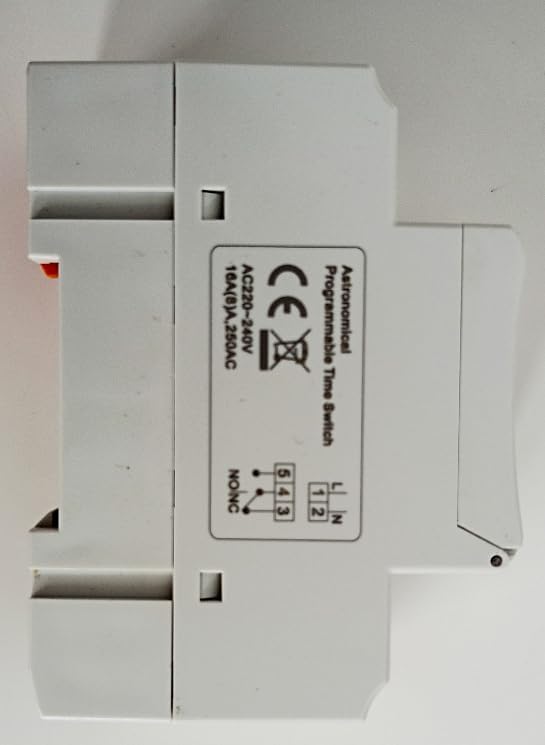
شکل 2.3: سمت view of the Kanlux JVT3 16 AS. This image shows the side of the timer with a label indicating "Astronomical Programmable Time Switch" and a wiring diagram for AC 220-240V, 16A (8)A, 250VAC connections (L, N, 1, 2, 3, 4, 5).
3. اطلاعات ایمنی
- نصب و نگهداری فقط باید توسط یک برقکار واجد شرایط انجام شود.
- قبل از هرگونه نصب یا سیمکشی، مطمئن شوید که منبع تغذیه قطع شده است.
- Do not exceed the maximum load ratings specified for the device.
- This device is designed for indoor use in dry environments. Avoid exposure to moisture or extreme temperatures.
- Verify all connections are secure to prevent electrical hazards.
4. راه اندازی و نصب
4.1 نصب
The Kanlux JVT3 16 AS is designed for DIN rail mounting. Securely attach the device to a standard DIN rail within an appropriate electrical enclosure.
4.2 سیم کشی
Refer to the wiring diagram on the side of the device (Figure 2.3) and the following instructions:
- Connect the Live (L) and Neutral (N) power supply wires to the corresponding input terminals (typically labeled 1 and 2).
- Connect the load (e.g., light fixture, appliance) to the output terminals. The common terminal is usually 3, with normally open (NO) and normally closed (NC) contacts labeled 4 and 5 respectively. Consult the specific diagram on your device for exact terminal assignments.
- Ensure all connections are tight and correctly insulated.
۵.۱ روشن کردن اولیه و تنظیم زمان
- After wiring, restore power to the circuit. The display should illuminate.
- If the display is blank, check power connections.
- را فشار دهید تنظیم مجدد button (small recessed button) using a pointed object (e.g., pen tip) to clear any previous settings and initialize the device.
- Set the current time and day:
- را فشار دهید P button repeatedly to cycle through day settings (e.g., MO, TU, WE...).
- استفاده کنید H+ دکمه تنظیم ساعت
- استفاده کنید M+ دکمه تنظیم دقیقه
5. دستورالعمل های عملیاتی
۵.۲ برنامهریزی چرخههای روشن/خاموش
The timer allows for multiple ON/OFF programs. Follow these steps to set a program:
- را فشار دهید P button once to enter program setting mode. The display will show "1 ON".
- استفاده کنید D+ button to select the day(s) for this program (e.g., individual days, weekdays, weekends, all days).
- استفاده کنید H+ برای تنظیم ساعت روشن بودن مورد نظر، دکمه را فشار دهید.
- استفاده کنید M+ برای تنظیم دقیقه روشن بودن مورد نظر، دکمه را فشار دهید.
- را فشار دهید P دوباره. صفحه نمایش "1 خاموش" را نشان خواهد داد.
- مراحل ۲ تا ۴ را برای تنظیم زمان خاموش شدن دلخواه برای برنامه اول تکرار کنید.
- به فشار دادن ادامه دهید P to set additional ON/OFF programs (e.g., "2 ON", "2 OFF", etc.).
- To exit program setting mode and return to the current time display, press the دفترچه راهنما دکمه
5.2 لغو دستی
را دفترچه راهنما button allows you to override the programmed settings temporarily or permanently:
- را فشار دهید دفترچه راهنما repeatedly to cycle through modes:
- AUTO ON: The timer is currently ON and will follow the next programmed OFF event.
- خاموش شدن به صورت خودکار: The timer is currently OFF and will follow the next programmed ON event.
- بر: The timer is forced ON, ignoring all programs.
- خاموش: The timer is forced OFF, ignoring all programs.
- انتخاب کنید خودکار روشن or خاموش شدن به صورت خودکار to resume automatic operation based on your programs.
5.3 Astronomical Function
The JVT3 16 AS includes an astronomical function, which can automatically adjust ON/OFF times based on sunrise and sunset times for your geographical location. Refer to the device's specific programming menu for setting up the astronomical function, which typically involves inputting your latitude and longitude or selecting a predefined region. This feature allows for energy-efficient control of lighting or other applications.
6. تعمیر و نگهداری
- تمیز کردن: دستگاه را با یک پارچه نرم و خشک پاک کنید. از پاک کننده ها یا حلال های ساینده استفاده نکنید.
- باتری: The device typically contains an internal battery to maintain settings during power outages. This battery is usually non-replaceable by the user and has a long lifespan. If the display frequently resets or loses time during power interruptions, the internal battery may need servicing by a qualified technician.
- بازرسی: اتصالات سیمکشی را به صورت دورهای از نظر سفتی و علائم فرسودگی بررسی کنید.
7 عیب یابی
- روشن نشدن دستگاه:
- Check the main power supply to the circuit.
- Verify that the Live (L) and Neutral (N) wires are correctly connected to the input terminals.
- Load not switching ON/OFF as programmed:
- Ensure the device is in "AUTO ON" or "AUTO OFF" mode (not forced ON/OFF).
- Review your programmed ON/OFF times for accuracy.
- Check the current time and day setting on the timer.
- Verify the load wiring (terminals 3, 4, 5) is correct and secure.
- Confirm the load is not exceeding the maximum current rating of the timer.
- صفحه نمایش خالی است یا سوسو میزند:
- منبع تغذیه را بررسی کنید.
- If power is stable, the internal battery may be low or faulty. Contact a qualified technician.
8. مشخصات
| ویژگی | مشخصات |
|---|---|
| نام تجاری | کانلوکس |
| شماره مدل | 18721 (JVT3 16 AS) |
| رنگ | سفید |
| جلدtage | 230 Volts (AC 220-240V) |
| رتبه بندی فعلی | 16A (8)A, 250VAC |
| وزن مورد | 120 گرم |
| ابعاد بسته بندی | 30 × 20 × 20 سانتی متر |
| سازنده | کانلوکس |
| تابع | Digital Programmable Time Switch with Astronomical Function |
9. گارانتی و پشتیبانی
Information regarding specific warranty terms and customer support contacts for the Kanlux 18721 JVT3 16 AS Digital Programmable Time Switch is not available in the provided product data. Please refer to the product packaging or the official Kanlux website for warranty details and support contact information.


