1. مقدمه
This manual provides essential information for the safe and efficient use of your Acer B326HK 32-inch UHD 4K monitor. Please read this manual thoroughly before operating the device and retain it for future reference.
The Acer B326HK monitor features a 32-inch Ultra HD (4K2K) display with a resolution of 3840 x 2160 pixels, offering detailed imagery. It includes an ergonomic stand and supports VESA mounting for flexible placement. Connectivity options include DVI, MHL, DisplayPort, Mini DisplayPort, and a 5-port USB 3.0 hub.
2. اطلاعات ایمنی
- همیشه مانیتور را روی یک سطح صاف و پایدار قرار دهید تا از افتادن آن جلوگیری شود.
- از تهویه مناسب در اطراف مانیتور اطمینان حاصل کنید. منافذ تهویه را مسدود نکنید.
- فقط از آداپتور برق و کابلهای ارائه شده توسط سازنده استفاده کنید.
- از قرار دادن مانیتور در معرض رطوبت، باران یا دمای شدید خودداری کنید.
- سعی نکنید خودتان مانیتور را سرویس کنید. تمام مراحل سرویس را به پرسنل متخصص بسپارید.
- قبل از تمیز کردن، مانیتور را از پریز برق جدا کنید.
- مانیتور را از میدانهای مغناطیسی قوی دور نگه دارید.
3. محتویات بسته
بررسی کنید که آیا همه اقلام در بسته موجود است یا خیر:
- Acer B326HK LED-backlit LCD monitor - 32"
- کابل DisplayPort
- کابل DVI
- کابل USB SuperSpeed
- سیم برق
- راهنمای کاربر (این سند)
4. راه اندازی
۴.۱ مونتاژ پایه مانیتور
Carefully remove the monitor and stand components from the packaging. Follow the instructions below to attach the stand to the monitor panel.

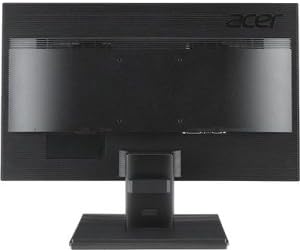
شکل 4.1: جلو view of the Acer B326HK monitor with its ergonomic stand.
- برای جلوگیری از خراشیدگی، پنل مانیتور را رو به پایین روی یک پارچه نرم و تمیز قرار دهید.
- Align the stand arm with the mounting slot on the back of the monitor.
- با استفاده از پیچهای ارائه شده، بازوی پایه را به مانیتور محکم کنید.
- Attach the base to the stand arm and tighten the thumb screw or screws from the bottom.
- Carefully lift the assembled monitor and place it on your desired surface.
The monitor also supports VESA compatible mounting (100x100mm) for wall mounts or alternative stands. Refer to your VESA mount's instructions for installation.
4.2 کابل های اتصال
کابلهای لازم را به پورتهای مربوطه در پشت مانیتور و رایانه خود وصل کنید.
شکل 4.2: عقب view of the Acer B326HK monitor, highlighting the various input ports.
- ورودی ویدئو: Connect one of the following video cables from your computer's graphics card to the monitor:
- DisplayPort cable (recommended for 4K resolution at 60Hz)
- Mini DisplayPort cable
- DVI cable (supports HDCP)
- MHL cable (for compatible mobile devices)
- USB Upstream: Connect the SuperSpeed USB cable from your computer to the monitor's USB upstream port to enable the monitor's USB 3.0 hub.
- USB Downstream: Use the 5 high-speed USB 3.0 ports on the monitor to connect peripherals like a mouse, keyboard, or for charging mobile devices.
- قدرت: سیم برق را به ورودی برق مانیتور وصل کنید، سپس سر دیگر آن را به پریز برق دارای اتصال زمین وصل کنید.
5. کار با مانیتور
5.1 روشن/خاموش
Press the power button, usually located on the bottom right bezel, to turn the monitor on or off. The power indicator light will illuminate when the monitor is on.
5.2 Adjusting the Display (OSD Menu)
The On-Screen Display (OSD) menu allows you to adjust various monitor settings such as brightness, contrast, color, input source, and more. Use the control buttons located on the monitor's bezel to navigate the OSD menu.
- برای فعال کردن منوی OSD، هر دکمه OSD را فشار دهید.
- Use the navigation buttons (usually arrows) to move through the menu options.
- برای ورود به یک زیرمنو یا تأیید یک تنظیم، دکمه انتخاب را فشار دهید.
- Use the navigation buttons to adjust values or select options.
- Press the exit button to leave the OSD menu.
۵.۲ انتخاب منبع ورودی
The monitor can automatically detect an active input source. If multiple sources are connected, you may need to manually select the desired input via the OSD menu. Navigate to the "Input" or "Source" section in the OSD and select your preferred input (e.g., DisplayPort, DVI, MHL).
۵.۹ تنظیمات ارگونومیک
پایه ارگونومیک امکان تنظیمات مختلف را برای بهینه سازی شما فراهم می کند viewراحتی:
- تنظیم ارتفاع: پنل مانیتور را به آرامی به بالا یا پایین فشار دهید یا بکشید.
- تنظیم شیب: Tilt the monitor panel forward or backward to find the optimal viewزاویه
- تنظیم چرخش: مانیتور را روی پایهاش به چپ یا راست بچرخانید.
- تنظیم محوری: Rotate the monitor 90 degrees for portrait mode (ensure sufficient clearance).
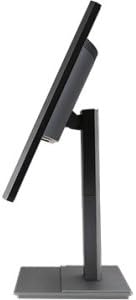
شکل 5.1: سمت view of the Acer B326HK monitor, demonstrating its tilt capability.
6. تعمیر و نگهداری
مراقبت مناسب، طول عمر مانیتور شما را تضمین میکند.
- تمیز کردن صفحه نمایش:
- مانیتور را خاموش کنید و سیم برق را جدا کنید.
- Use a soft, lint-free cloth (e.g., microfiber) slightly dampبا آب یا یک پاککننده صفحه نمایش بدون آمونیاک و بدون الکل رقیق شده باشد.
- Wipe the screen gently. Do not spray cleaner directly onto the screen.
- تمیز کردن سیasing:
- برای پاک کردن مانیتور از یک پارچه نرم و خشک استفاده کنید.asing.
- از استفاده از پاک کننده ها یا حلال های ساینده خودداری کنید.
- تهویه: Ensure the ventilation openings on the monitor are clear of dust and debris.
7 عیب یابی
اگر با مانیتور خود با مشکل مواجه شدید، به راهحلهای رایج زیر مراجعه کنید:
| مشکل | راه حل ممکن |
|---|---|
| بدون قدرت |
|
| No image / "No Signal" message |
|
| تصویر تار یا تحریف شده است |
|
| Color issues or incorrect display |
|
| هیچ صدایی از بلندگوها نمی آید |
|
8. مشخصات
Key technical specifications for the Acer B326HK monitor:
| ویژگی | جزئیات |
|---|---|
| شماره مدل | B326HK ymjdpphz |
| اندازه صفحه نمایش | 32 اینچ |
| حداکثر وضوح صفحه نمایش | ۳۸۴۰ در ۲۱۶۰ پیکسل (۴K UHD 2160p) |
| نسبت تصویر | 16:9 |
| زمان پاسخگویی | 6 میلیثانیه |
| نسبت کنتراست | 100,000,000:1 (پویا) |
| ورودی های سیگنال | 1 x DVI (w/HDCP), 1 x MHL, 1 x Display Port, 1 x Mini Display Port |
| پورت های USB | 5 x USB 3.0 (1 upstream, 4 downstream) |
| VESA Mount سازگار | بله |
| وزن مورد | 26.4 پوند |
| ابعاد محصول (LxWxH) | 10.49 x 29.05 x 18.63 اینچ |
| سازنده | Acer Computer |
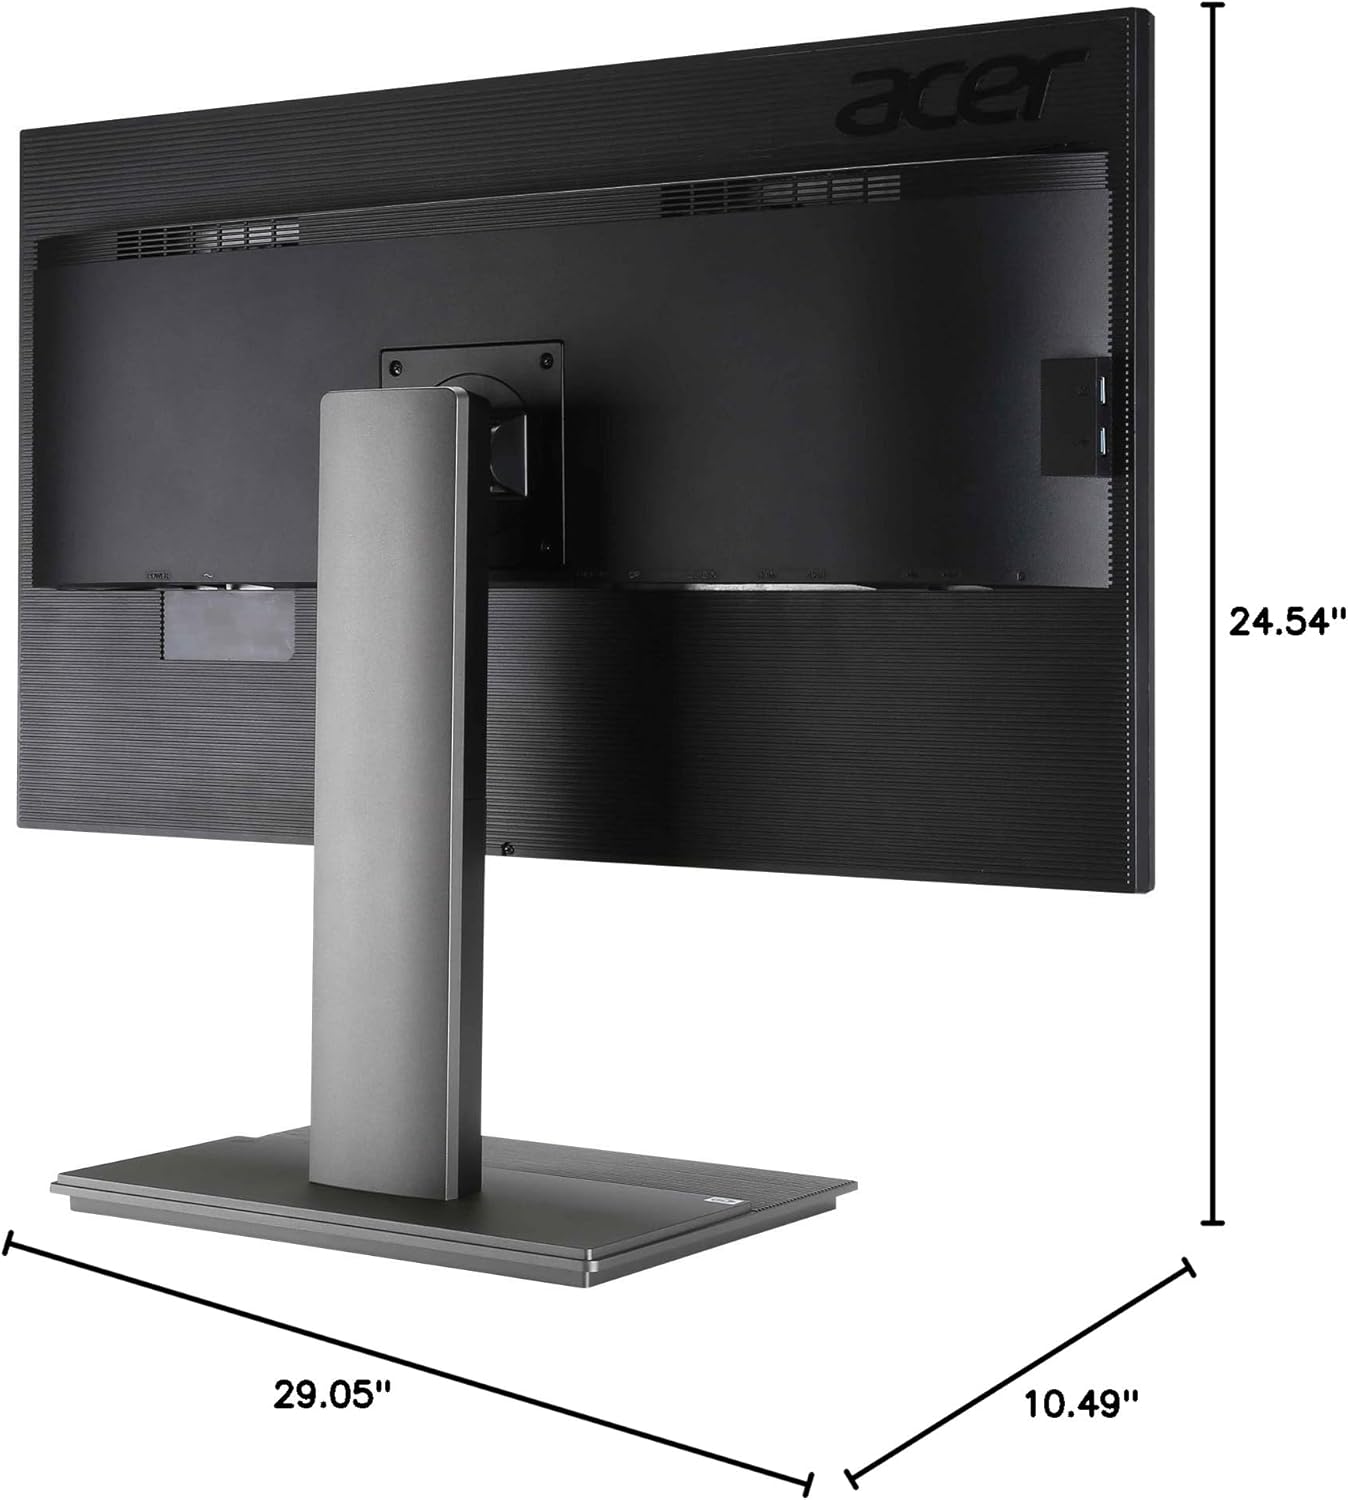
شکل ۴.۴: ابعاد view of the Acer B326HK monitor.
9. گارانتی و پشتیبانی
برای اطلاعات گارانتی و پشتیبانی فنی، لطفاً به کارت گارانتی ارائه شده همراه محصول خود مراجعه کنید یا از پشتیبانی رسمی ایسر دیدن کنید website. You may need your monitor's serial number, which is typically located on a label on the back of the monitor.
رسمی ایسر Webسایت: https://www.acer.com/support


