1. مقدمه
ممنون از خریدتونasing the Mastech MS8230B Digital Multimeter. This device is a compact, battery-operated, handheld digital multimeter designed for measuring DC and AC voltage, DC current, resistance, diode, and transistor (hFE) tests. It features a large LCD display for easy reading and is built to international safety standards.
Please read this instruction manual thoroughly before using the multimeter to ensure safe and proper operation. Keep this manual for future reference.
2. اطلاعات ایمنی
This multimeter is designed according to IEC 1010-1 international safety standards for electronic measuring instruments. It complies with CAT III 600V and CAT II 1000V overvoltage categories. Always adhere to the following safety precautions:
- Never exceed the maximum input limits for any function.
- Do not use the meter if the case is damaged or open.
- مطمئن شوید که سیمهای تست در وضعیت خوبی هستند و عایقبندی آنها آسیب ندیده است.
- همیشه برق مدار را قطع کنید و تمام بارهای با ولتاژ بالا را تخلیه کنید.tage capacitors before measuring resistance, diodes, or hFE.
- هنگام کار با voltagولتاژهای بالاتر از ۶۰ ولت DC یا ۳۰ ولت AC RMS، زیرا این ولتاژها خطر برق گرفتگی دارند.
- قبل از تغییر عملکرد یا محدوده، سیمهای تست را از مدار جدا کنید.
- برای اطمینان از خوانش دقیق، به محض ظاهر شدن نشانگر باتری کم، باتری را فوراً تعویض کنید.
- دستگاه را در محیطهای حاوی گاز، بخار یا گرد و غبار قابل انفجار کار نکنید.
3. محتویات بسته
مطمئن شوید که تمام موارد ذکر شده در زیر موجود و بدون آسیب هستند:
- Mastech MS8230B Digital Multimeter
- سیمهای تست (یک جفت)
- باتری ۹ ولتی (از پیش نصب شده یا جداگانه ارائه میشود)
- راهنمای کاربر
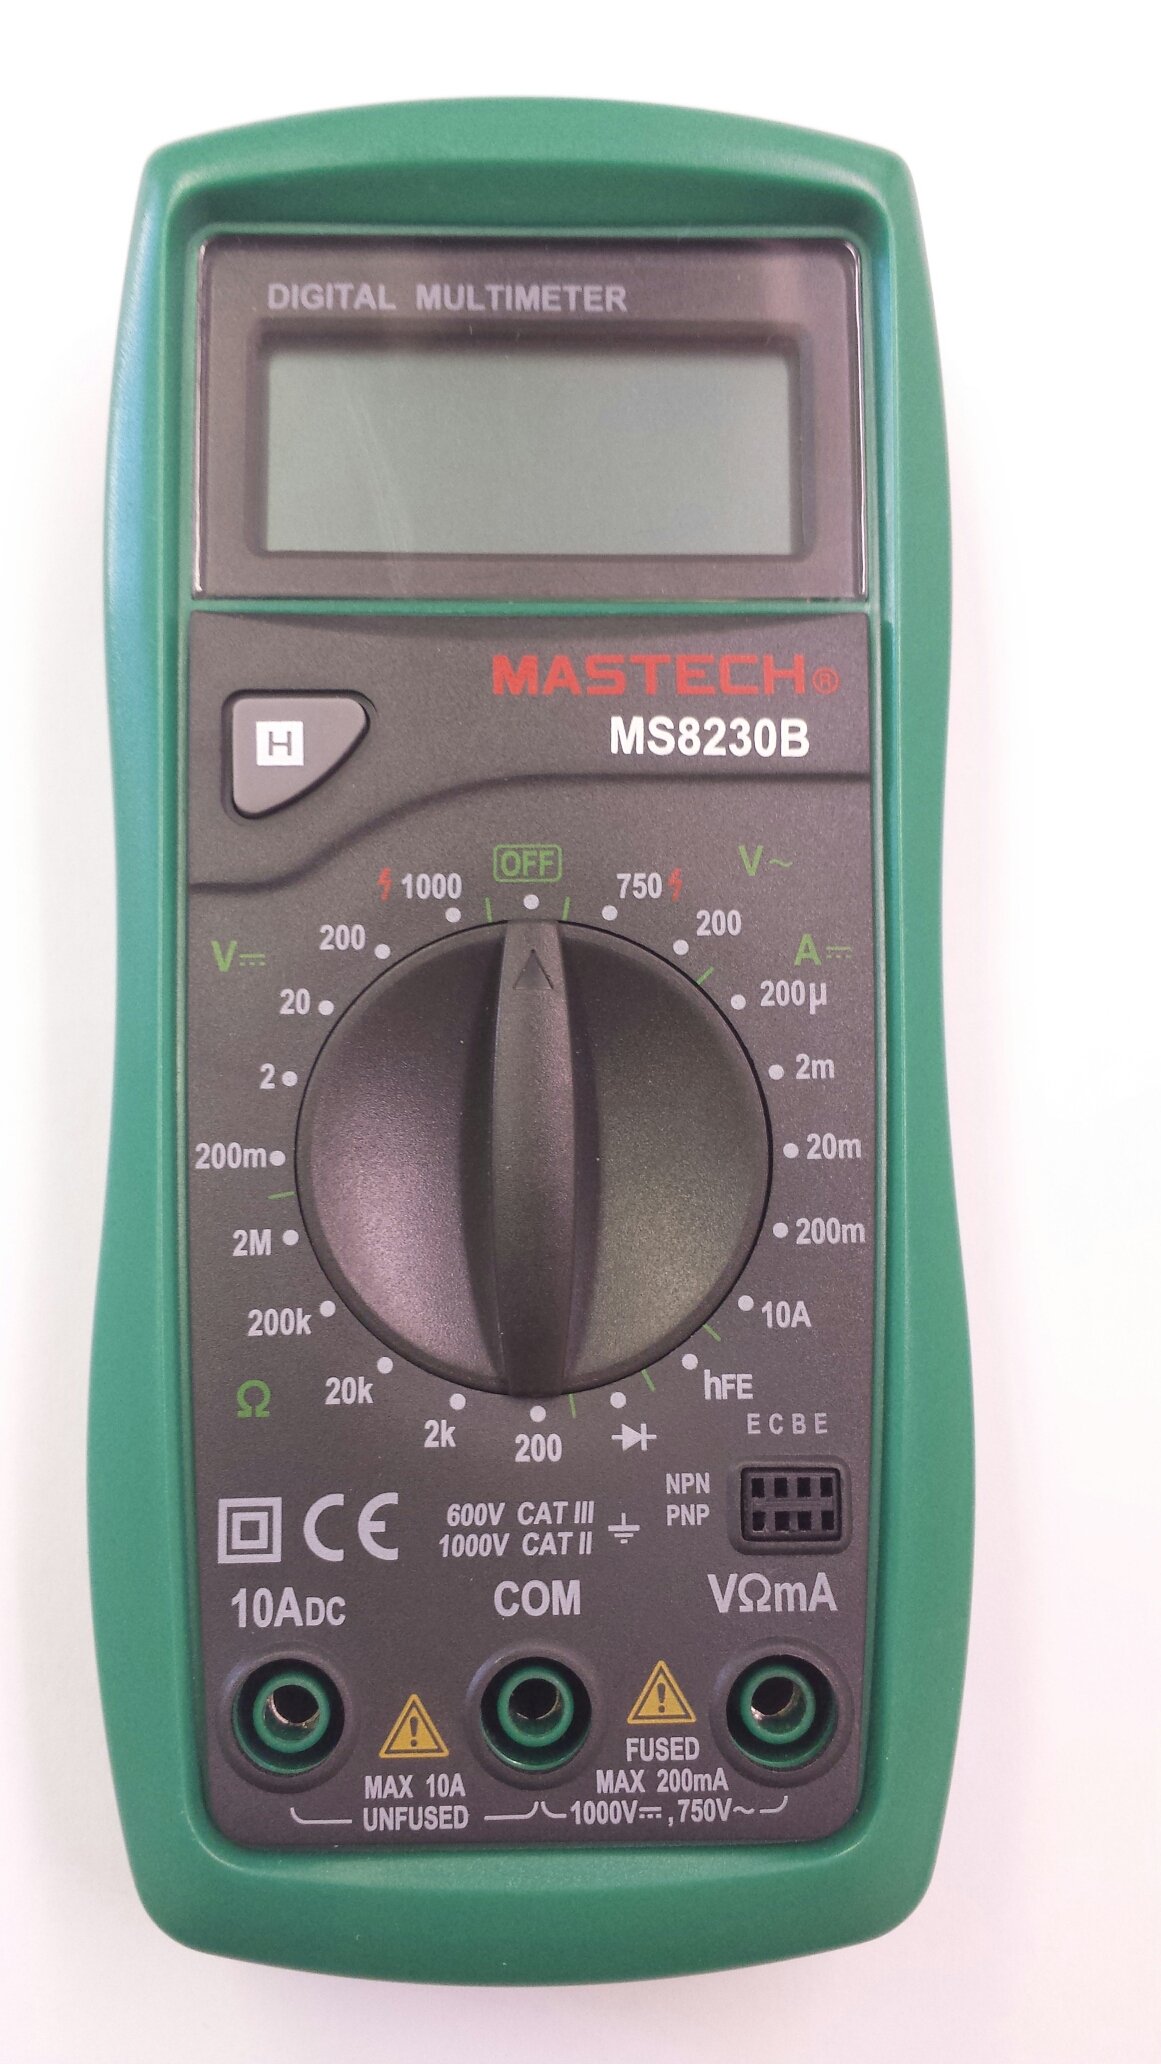
Image 1: Contents of the Mastech MS8230B package, including the multimeter, test leads, batteries, and user manual.
4. راه اندازی
4.1 نصب باتری
The MS8230B multimeter requires one 9V battery for operation. If the battery is not pre-installed or needs replacement:
- مطمئن شوید که مولتیمتر خاموش است و تمام پرابهای تست را جدا کنید.
- پوشش محفظه باتری را در پشت دستگاه پیدا کنید.
- Loosen the screw(s) on the battery cover and remove the cover.
- Connect the 9V battery to the battery connector, observing correct polarity.
- باتری را داخل محفظه قرار دهید و پوشش را دوباره نصب کنید و آن را با پیچ(ها) محکم کنید.
۶.۲ اتصال سیمهای تست
Always connect the test leads correctly for the desired measurement:
- Insert the red test lead into the "VΩmA" jack for voltage, resistance, and low current measurements.
- Insert the red test lead into the "10ADC" jack for high DC current measurements (up to 10A).
- Always insert the black test lead into the "COM" (common) jack.
5. دستورالعمل های عملیاتی
Before taking any measurement, ensure the test leads are correctly connected and the function switch is set to the appropriate range.
5.1 DC Voltagاندازه گیری الکترونیکی (DCV)
- Connect the red test lead to the "VΩmA" jack and the black test lead to the "COM" jack.
- Set the rotary switch to the desired DCV range (e.g., 200mV, 2V, 20V, 200V, 1000V). If the voltagاگر e نامعلوم باشد، با بالاترین محدوده شروع کنید و در صورت لزوم کاهش دهید.
- سیمهای تست را به قطعه یا مداری که قرار است اندازهگیری شود، وصل کنید.
- جلد را بخوانیدtage value on the LCD display. Observe the polarity indication.
5.2 AC Voltagاندازه گیری الکترونیکی (ACV)
- Connect the red test lead to the "VΩmA" jack and the black test lead to the "COM" jack.
- Set the rotary switch to the desired ACV range (e.g., 200V, 750V). Start with the highest range if the voltage ناشناخته است.
- سیمهای تست را به قطعه یا مداری که قرار است اندازهگیری شود، وصل کنید.
- جلد را بخوانیدtagمقدار e در صفحه نمایش LCD.
۵.۱ اندازهگیری جریان مستقیم (DCA)
احتیاط: Never attempt to measure current on a circuit with voltage present by connecting the meter in parallel. Always connect the meter in series with the load.
- Determine the expected current. For currents up to 200mA, connect the red lead to "VΩmA". For currents up to 10A, connect the red lead to "10ADC". The black lead always goes to "COM".
- Set the rotary switch to the appropriate DCA range (e.g., 200µA, 2mA, 20mA, 200mA, 10A).
- Turn off the power to the circuit. Open the circuit where the current is to be measured.
- مولتی متر را به صورت سری به مدار وصل کنید.
- مدار را به برق وصل کنید و مقدار جریان را روی صفحه نمایش LCD بخوانید.
5.4 اندازه گیری مقاومت
احتیاط: Ensure the circuit under test is completely de-energized and all capacitors are discharged before measuring resistance.
- Connect the red test lead to the "VΩmA" jack and the black test lead to the "COM" jack.
- Set the rotary switch to the desired Resistance (Ω) range (e.g., 200Ω, 2kΩ, 20kΩ, 200kΩ, 2MΩ).
- سیمهای تست را به قطعهای که قرار است اندازهگیری شود، وصل کنید.
- مقدار مقاومت را روی صفحه نمایش LCD بخوانید.
5.5 تست دیود
احتیاط: Ensure the circuit under test is completely de-energized and all capacitors are discharged before performing a diode test.
- Connect the red test lead to the "VΩmA" jack and the black test lead to the "COM" jack.
- Set the rotary switch to the Diode symbol (→|).
- سیم تست قرمز را به آند و سیم تست سیاه را به کاتد دیود وصل کنید. صفحه نمایش ولتاژ مستقیم را نشان میدهد.tagافت ولتاژ (معمولاً 0.5 تا 0.8 ولت برای دیودهای سیلیکونی).
- Reverse the test leads. The display should show "OL" (Open Loop) for a good diode. A reading in both directions or "0" indicates a shorted diode.
۶.۸ تست hFE ترانزیستور
احتیاط: Ensure the transistor is not connected to a live circuit.
- کلید چرخشی را در موقعیت "hFE" قرار دهید.
- تشخیص دهید که ترانزیستور NPN است یا PNP.
- Insert the transistor's emitter, base, and collector leads into the corresponding holes in the hFE socket on the multimeter.
- مقدار hFE (بهره جریان DC) را روی صفحه نمایش LCD بخوانید.
5.7 تابع نگه داشتن داده
Press the "H" button to hold the current reading on the display. Press it again to release the hold function and resume live readings.
6. تعمیر و نگهداری
6.1 تمیز کردن
پاک کردن مورد با آگهیamp cloth and mild detergent. Do not use abrasives or solvents. Keep the jacks free of dust and debris.
6.2 تعویض باتری
When the battery symbol appears on the LCD, the 9V battery needs to be replaced. Refer to section 4.1 for battery installation instructions.
6.3 تعویض فیوز
The multimeter is protected by a fuse. If the current measurement function stops working, the fuse may need replacement. This should only be performed by qualified personnel. The fuse specifications are typically printed near the fuse holder or in the specifications section.
7 عیب یابی
If the multimeter does not function correctly, check the following:
- بدون نمایش یا نمایش ضعیف: باتری را بررسی کنید. در صورت لزوم آن را تعویض کنید.
- قرائتهای نادرست: Ensure the test leads are properly connected, the function switch is on the correct range, and the battery is not low.
- نمایش "OL" (اضافه بار) مقدار اندازهگیری شده از محدوده انتخاب شده فراتر میرود. به محدوده بالاتری بروید.
- اندازهگیری جریان کار نمیکند: فیوز را چک کنید.
اگر مشکلات همچنان ادامه داشت، با پشتیبانی مشتری تماس بگیرید.
8. مشخصات
The Mastech MS8230B Digital Multimeter offers the following technical specifications:

Image 2: Detailed specifications for the Mastech MS8230B Multimeter, including display, range, and accuracy.
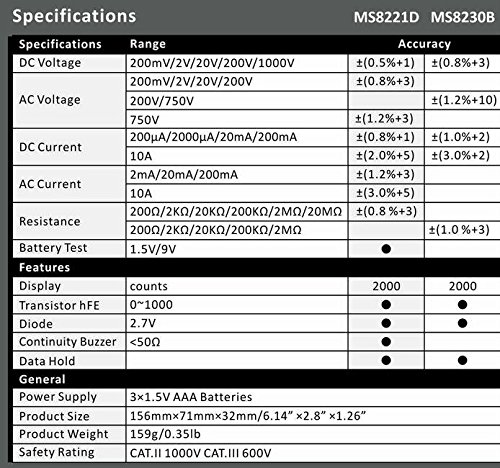
Image 3: Comparison table of specifications for Mastech MS8230B and MS8221D multimeters.
| مشخصات | ارزش |
|---|---|
| نمایش | 1999 counts, 15mm digit height |
| DC جلدtage (DCV) | 200mV, 2V, 20V, 200V, 1000V (Accuracy: 0.5% to 0.8%) |
| AC جلدtage (ACV) | 200V, 750V (Accuracy: 1.2%) |
| جریان DC (DCA) | 200µA, 2mA, 20mA, 200mA, 10A (Accuracy: 1.0% to 2.0%) |
| مقاومت (Ω) | 200Ω, 2kΩ, 20kΩ, 200kΩ, 2MΩ (Accuracy: 0.8% to 1.0%) |
| تست دیود | جلو جلدtage قطره |
| تست ترانزیستور hFE | 1 تا 1000 |
| نگه داشتن داده ها | بله |
| نشانگر کم بودن باتری | بله |
| حفاظت از اضافه بار | بله |
| منبع تغذیه | باتری 1 x 9 ولت |
| ابعاد (L x W x H) | ۱۳.۹۷ × ۲.۴۹ × ۱۱.۵۱ سانتیمتر (تقریباً ۵.۵ × ۰.۹۸ × ۴.۵۳ اینچ) |
| وزن | تقریبا 158.76 گرم (5.6 اونس) |
| رتبه بندی ایمنی | IEC 1010-1 CAT III 600V, CAT II 1000V |
| دمای عملیاتی | 0 درجه سانتی گراد تا 40 درجه سانتی گراد (32 درجه فارنهایت تا 104 درجه فارنهایت) |
| دمای ذخیره سازی | -10 درجه سانتی گراد تا 50 درجه سانتی گراد (14 درجه فارنهایت تا 122 درجه فارنهایت) |
9. گارانتی و پشتیبانی
Mastech products are designed for reliability and performance. For specific warranty details, please refer to the warranty card included with your product or contact your local Mastech distributor.
For technical support or service inquiries, please contact Mastech customer service through their official webسایت یا اطلاعات تماس ارائه شده همراه با اسناد خرید شما.


