مقدمه
This manual provides essential information for the proper setup, operation, and maintenance of your Hitachi Touro Desk Dx3 2TB External Hard Drive. Please read these instructions carefully before using the device to ensure optimal performance and longevity.
محتویات بسته
بررسی کنید که آیا همه اقلام در بسته موجود است یا خیر:
- Hitachi Touro Desk Dx3 2TB External Hard Drive
- کابل داده USB 3.0
- AC Power Adapter (EURO plug)
- راهنمای شروع سریع (در صورت وجود)
محصول تمام شده استview
The Hitachi Touro Desk Dx3 is a 2TB external desktop hard drive designed for reliable data storage and backup. It features a stylish, stackable design and SuperSpeed USB 3.0 connectivity for fast data transfers, while also being backwards compatible with USB 2.0.

شکل 1: جلو view of the Hitachi Touro Desk Dx3. This image displays the sleek, black, vertically ribbed casing of the external hard drive. A small, rectangular indicator light is visible towards the bottom center of the front panel, signifying power or activity status.
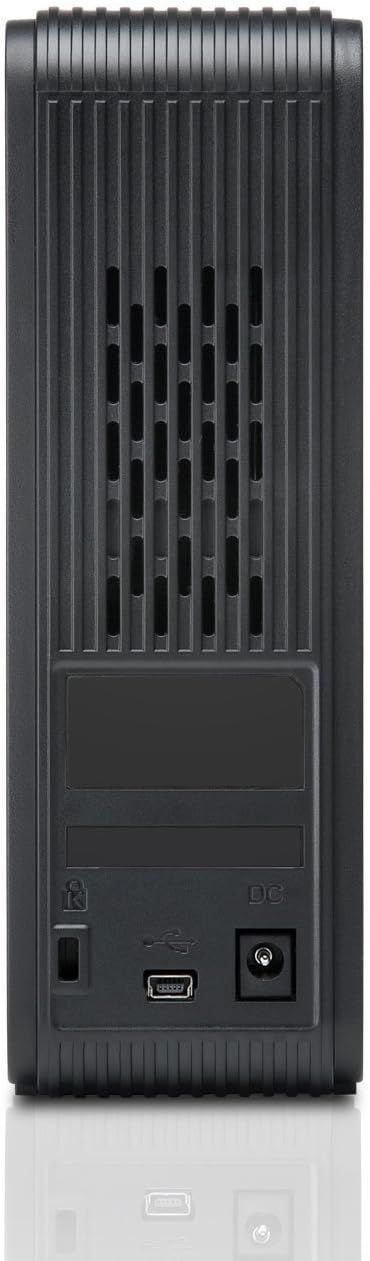
شکل 2: برگشت view of the Hitachi Touro Desk Dx3. This image shows the rear panel of the hard drive, which includes the DC power input port on the right, the USB 3.0 data port in the center, and a security lock slot on the left. Ventilation grilles are visible across the top portion of the back panel.
راه اندازی
Follow these steps to set up your external hard drive:
- آداپتور برق را وصل کنید: Plug the AC power adapter into the DC power input port on the back of the Touro Desk Dx3. Then, plug the other end of the power adapter into a wall outlet. The drive will power on automatically.
- کابل USB را وصل کنید: Connect one end of the supplied USB 3.0 data cable to the USB port on the back of the Touro Desk Dx3. Connect the other end of the USB cable to an available USB port on your computer. For optimal performance, use a USB 3.0 port.
- تشخیص سیستم عامل: Your computer's operating system (Windows or macOS) should automatically detect and install the necessary drivers for the hard drive. The drive will appear as a new storage device in 'My Computer' (Windows) or 'Finder' (macOS).
- قالببندی اولیه (اختیاری): The drive comes pre-formatted. If you wish to reformat the drive or partition it, refer to your operating system's disk management tools. نکته: فرمت کردن مجدد، تمام اطلاعات موجود در درایو را پاک میکند.
عملیاتی
Once connected, your Touro Desk Dx3 is ready for use.
- انتقال داده: بکشید و رها کنید files or folders to and from the Touro Desk Dx3 icon on your desktop or in your file explorer. The USB 3.0 interface allows for rapid data transfer speeds.
- پشتیبان گیری: Use your operating system's built-in backup utilities or third-party software to create backups of your important files on the external drive.
- حذف ایمن: Always safely eject the hard drive before disconnecting it from your computer. In Windows, right-click the drive icon in the system tray and select 'Eject'. In macOS, drag the drive icon to the Trash or click the Eject button next to the drive in Finder. This prevents data corruption.
تعمیر و نگهداری
Proper maintenance ensures the longevity of your device.
- تمیز کردن: برای تمیز کردن قسمت بیرونی درایو از یک پارچه نرم، خشک و بدون پرز استفاده کنید. از پاک کننده های مایع یا اسپری استفاده نکنید.
- شرایط محیطی: Store and operate the drive in a cool, dry environment, away from direct sunlight, extreme temperatures, and high humidity. Avoid placing the drive near strong magnetic fields.
- مدیریت فیزیکی: Handle the drive with care. Avoid dropping it or subjecting it to strong impacts, as this can damage the internal components.
عیب یابی
اگر با مشکلی مواجه شدید، به راهحلهای رایج زیر مراجعه کنید:
- درایو شناسایی نشد:
- مطمئن شوید که آداپتور برق به طور ایمن به درایو و پریز برق فعال متصل شده است.
- Verify the USB cable is firmly connected to both the drive and your computer. Try a different USB port or cable.
- کامپیوتر خود را مجددا راه اندازی کنید.
- Check Disk Management (Windows) or Disk Utility (macOS) to see if the drive is detected but not assigned a drive letter or mounted.
- سرعت انتقال پایین:
- Ensure you are connected to a USB 3.0 port on your computer for SuperSpeed performance. USB 2.0 ports will operate at slower speeds.
- از انتقال تعداد زیادی قطعه کوچک خودداری کنید files simultaneously; large files transfer more efficiently.
- برنامههای دیگری را که ممکن است از منابع سیستم یا گذرگاه USB استفاده کنند، ببندید.
- چراغ رانندگی روشن نیست:
- اتصال آداپتور برق به درایو و پریز برق را بررسی کنید.
- یک پریز برق دیگر را امتحان کنید.
مشخصات
| ظرفیت ذخیره سازی دیجیتال | 2 ترابایت |
| رابط هارد دیسک | USB 3.0 |
| فناوری اتصال | USB |
| نام تجاری | هیتاچی |
| ضریب فرم هارد دیسک | 3.5 اینچ |
| دستگاه های سازگار | کامپیوترهای رومیزی |
| نوع نصب | رومیزی |
| رنگ | مشکی |
اطلاعات گارانتی
This product is covered by a limited warranty. For detailed information regarding warranty terms, conditions, and duration, please refer to the warranty card included in your product packaging or visit the official Hitachi support webسایت. فاکتور خرید خود را برای موارد گارانتی نگه دارید.
پشتیبانی مشتری
For further assistance, technical support, or to inquire about service, please visit the official Hitachi support webبه سایت مراجعه کنید یا با بخش خدمات مشتریان آنها تماس بگیرید. اطلاعات تماس معمولاً در وبسایت سازنده موجود است. webسایت یا در مستندات محصول


