1. Sarrera eta Overview
The frient Electricity Meter Interface 2, LED is designed to provide easy and accurate tracking of your electricity consumption. By monitoring the flashing LED on your electricity meter, this device helps you identify consumption peaks, reduce overall usage, and save on energy costs. It allows you to become more aware of your energy consumption habits directly on your smartphone via a compatible smart home hub. The installation process is straightforward and can be performed by the user without professional assistance.

Image: Banner highlighting the product name and its purpose.
2. Produktuaren ezaugarriak
- Energy Consumption Awareness: Gain insight into your energy usage through remote meter readings.
- Kostuen aurrezpena: Monitor consumption, identify peaks, and reduce usage to save money.
- Ingurumena babestea: Optimize consumption by shifting usage to off-peak periods.
- Easy Self-Installation: Designed for user installation on electricity meters with a flashing LED.
- Hub Requirement: Requires a Zigbee-compatible smart home hub (e.g., Homey, SmartThings, and other Zigbee certified hubs) for network connection. Not all functionalities are supported by all hubs. Visit frient.com gainditze osoa lortzekoview of compatible hubs.
- Edge Drivers: For SmartThings compatibility, specific edge drivers are required, available for download from frient.com under 'compatible hubs' > 'frients with SmartThings Edge'.
- Bateragarritasuna: Works with meters equipped with a flashing LED indicator and a standard output rate of 1,000 pulses/kWh. Configurable pulse rates may be available with certain hubs.
- Ohar garrantzitsua: This product is not compatible with photovoltaic systems or other energy production systems.
3. Konfigurazioa eta instalazioa
The frient Electricity Meter Interface 2, LED is designed for simple self-installation. It connects to your smart home system via a compatible Zigbee hub.
3.1 Bateragarritasun-egiaztapena
- Ensure your electricity meter has a flashing LED indicator for consumption.
- Verify the meter's output rate is typically 1,000 pulses per kWh.
- Confirm you have a Zigbee-compatible smart home hub (e.g., Homey, SmartThings).
- Gailu hau da ez bateragarriak with photovoltaic systems or other energy production systems.
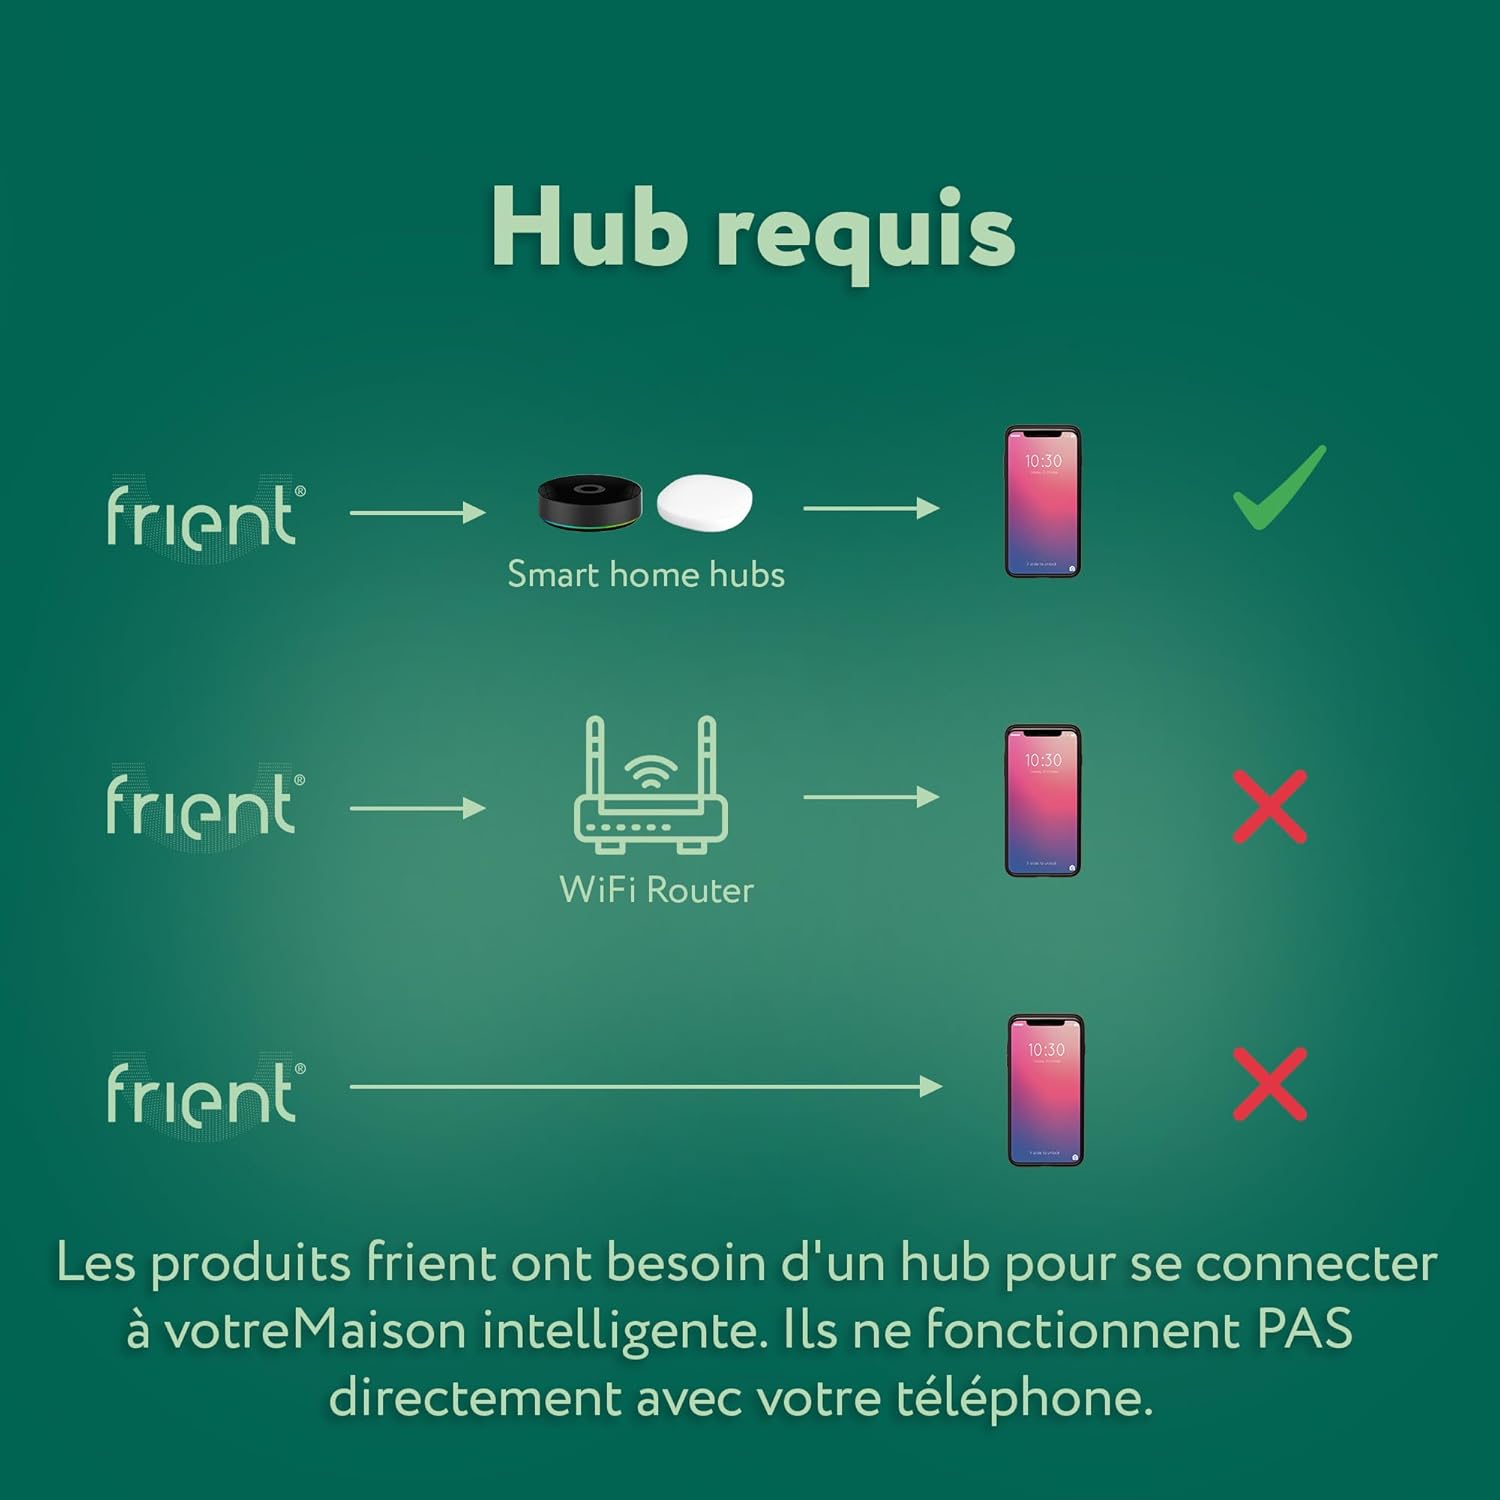
Image: Illustration of the necessity of a smart home hub for connectivity.

Image: Compatible smart home ecosystems and Zigbee certification.
3.2 Instalazio-urratsak
- Prestatu gailua: The frient Electricity Meter Interface 2, LED comes with 2 AA batteries included. Ensure they are correctly inserted.
- Kokatu sentsorea: Carefully place the optical probe of the device directly over the flashing LED indicator on your electricity meter. The device is designed for easy attachment.
- Piztu: The device will power on once batteries are inserted.
- Pair with Hub: Initiate the pairing process on your Zigbee smart home hub. Refer to your hub's specific instructions for adding new Zigbee devices. The frient device should be discovered and connected.
- Configure (if necessary): If your hub allows, confirm the pulse rate is set to 1,000 pulses/kWh. If using SmartThings, ensure the necessary edge drivers are installed.

Image: The device correctly installed on an electricity meter.

Image: Demonstrating the ease of handling for installation.

Image: No tools are required for installation.
4. Funtzionamendu-argibideak
Once installed and connected to your smart home hub, the frient Electricity Meter Interface 2, LED will continuously monitor the flashing LED on your electricity meter. This allows it to count pulses, which are then converted into real-time electricity consumption data.
4.1 Datuetara sartzea
Your electricity consumption data will be accessible through your smart home hub's application on your smartphone or tablet. This application will display current consumption, historical data, and potentially allow for setting up alerts or automations based on your energy usage.

Irudia: Adibample of energy consumption data displayed on a smartphone.
4.2 Monitoring and Optimization
- Denbora errealeko jarraipena: View your electricity usage as it happens to identify high-consumption periods or devices.
- Peak Identification: Pinpoint times when your energy consumption is highest, allowing you to adjust habits or schedule energy-intensive tasks during off-peak hours.
- Kostuen aurrezpena: By understanding your consumption patterns, you can make informed decisions to reduce overall energy use and lower your electricity bills.
- Ingurumen-eragina: Contribute to environmental protection by optimizing your energy consumption, especially by shifting usage to periods with lower grid demand or higher renewable energy availability.

Image: The device measures 1000 pulses per kWh by default.

Irudia: Adibample of a smartphone notification for energy consumption.
5. Mantentzea
The frient Electricity Meter Interface 2, LED requires minimal maintenance to ensure continuous and accurate operation.
5.1 Bateria ordezkatzea
The device is powered by 2 AA batteries. When the battery level is low, your smart home hub application should notify you. Replace batteries promptly to ensure continuous monitoring. Use alkaline batteries for optimal performance.
5.2 Garbiketa
Gently wipe the device with a dry, soft cloth. Do not use liquid cleaners or abrasive materials, as they may damage the device or its optical sensor.
5.3 Sentsoreen kokapena
Periodically check that the optical probe remains securely positioned over the electricity meter's flashing LED to ensure accurate readings.
6. Arazoak
If you encounter issues with your frient Electricity Meter Interface 2, LED, please refer to the following common troubleshooting steps:
6.1 No Data / Device Offline
- Egiaztatu bateriak: Ziurtatu bateriak ez daudela agortuta. Ordeztu itzazu beharrezkoa bada.
- Hub Connection: Verify that your smart home hub is powered on and functioning correctly.
- Zigbee Network: Ensure the device is within range of your Zigbee hub or a strong Zigbee repeater. Obstacles like thick walls can interfere with the signal.
- Berriro parekatzea: If the device was previously working and is now offline, try re-pairing it with your smart home hub according to your hub's instructions.
6.2 Irakurketa zehaztugabeak
- Sentsorearen lerrokatzea: Confirm that the optical probe is precisely aligned over the flashing LED on your electricity meter. Any misalignment can lead to incorrect pulse counting.
- Neurgailu mota: Ensure your electricity meter is compatible with the device (i.e., has a flashing LED with a standard output rate of 1,000 pulses/kWh).
- Hub-aren konfigurazioa: Check your smart home hub's settings to ensure the correct pulse rate (1,000 pulses/kWh by default) is configured for the device. Some hubs may allow for configurable pulse rates.
6.3 Device Not Pairing
- Hub bateragarritasuna: Double-check that your hub is Zigbee certified and listed as compatible on the frient webgunea.
- Hurbiltasuna: Bring the device closer to the hub during the pairing process.
- Fabrikaren berrezarpena: If all else fails, perform a factory reset on the frient device (refer to the frient website or specific product documentation for reset instructions). After resetting, attempt pairing again.
Warning: This device is not designed for use with photovoltaic systems or other energy production systems. Using it with such systems may lead to inaccurate data or device malfunction.
7. Zehaztapenak
| Atributua | Balioa |
|---|---|
| Fabrikatzailea | frient |
| Produktuaren neurriak (L x W x H) | 9.5 x 6.5 x 2.23 cm |
| Pisua | 112.3 gramo |
| Pilak | 2 AA (barne) |
| Bateriaren konposizioa | Alkalinoa |
| Modelo zenbakia | EMIZB-141 |
| Kolorea | Zuria |
| Dakarten osagaiak | frient Electricity Meter Interface 2 LED, optical probe, installation manuals |
| ASIN | B0CGVB6LGC |
| Jatorrizko Herrialdea | Danimarka |
8. Bermea eta Laguntza
8.1 Bermearen informazioa
For details regarding the product warranty, please refer to the documentation included with your purchase or visit the official frient webgunea.
8.2 Bezeroarentzako laguntza
If you require further assistance or have questions not covered in this manual, please contact frient customer support through their official webgunea edo zure produktuarekin emandako harremanetarako informazioa.
8.3 Sareko baliabideak
For the latest information, compatible hub lists, edge drivers, and FAQs, please visit frient.com.

Image: Compatible smart home platforms.


