Sarrera
The Fluance RT85 Turntable is designed to deliver a pure analog listening experience with exceptional musical accuracy. Featuring an Ortofon 2M Blue elliptical cartridge, a high-density acrylic platter, and precise speed control, this turntable ensures high-fidelity audio reproduction. Its high-mass MDF wood plinth and vibration isolation feet provide superior stability and sound clarity.

Image: Fluance RT85 Turntable in Piano Black, showcasing its elegant design and high-quality components.
Zer sartzen da
Your Fluance RT85 Turntable package includes the following components:
- Plinth (Turntable Base)
- Akrilikozko platera
- Gomazko Gerrikoa
- Headshell & Ortofon 2M Blue Cartridge
- Dust Cover & 2 Hinges
- 3ft Ground Cable
- 3ft RCA Cables
- Cotton Gloves (for handling components)
- Motor polea estalkia
- 45 Egokitzailea
- Kontrapisua
- Burbuila Maila
- 5ft Power Adapter
- Erabiltzailearen eskuliburua (dokumentu hau)

Image: A visual representation of all items included in the Fluance RT85 Turntable package.
Konfigurazioa
Follow these steps to set up your Fluance RT85 Turntable for optimal performance.
1. Kutxa irekitzea eta hasierako kokapena
Carefully remove all components from the packaging. Place the turntable on a stable, level surface away from direct sunlight, heat sources, and vibrations.
2. Plater eta gerrikoaren instalazioa
- Place the acrylic platter onto the spindle in the center of the turntable.
- Place the motor pulley cap over the motor pulley. Ensure it locks into place.
- Lift the rubber belt, which is pre-installed around the platter, and carefully place it around the motor pulley.
- Rotate the platter a few times clockwise to ensure the belt is properly seated.

Irudia: Goitik behera view of the Fluance RT85 turntable with the acrylic platter and drive belt in place.
3. Counterweight and Headshell Installation
- Ensure the tonearm is locked in its rest.
- Slide the counterweight onto the end of the tonearm with the numbers facing forward.
- Install the headshell (with the Ortofon 2M Blue Cartridge pre-attached) onto the tonearm and tighten the locking nut until it is secure.

Irudia: Xehetasun handikoa view of the Ortofon 2M Blue elliptical cartridge, highlighting its precision.
4. Leveling the Turntable
Use the included bubble level to ensure the turntable is perfectly level. Adjust the turntable's adjustable feet as needed until the bubble is centered.

Image: The high-mass MDF wood plinth and adjustable sound isolation feet of the Fluance RT85.
5. Balancing the Tonearm and Setting Tracking Force
- Kendu arkatza babeslea.
- Unlock the tonearm, lift the cueing lever, and position the tonearm over the platter.
- Hold the headshell and gently lower the cueing lever completely. Do not let the stylus touch the platter.
- Turn the counterweight until the tonearm is balanced and floats horizontally when released.
- Move only the counterweight indicator ring to zero (without turning the entire counterweight).
- Rotate the entire counterweight until the ring is set to the recommended tracking force for the Ortofon 2M Blue cartridge, which is 1.8 gramo.
- Adjust the anti-skating dial to the same number as the tracking force (1.8).
6. Dust Cover Installation
Attach the hinges to the dust cover, then carefully install the dust cover onto the turntable.
7. Konektatzea Ampbiziagoa / hartzailea
The Fluance RT85 does not have a built-in phono preamp. You will need an external phono preamp edo bat amplifier/receiver with a dedicated phono input.
- Connect the RCA cables from the turntable's audio output to the phono input on your receiver/preamp.
- Connect the ground wire from the turntable to the grounding post on your receiver/preamp to minimize hum.
For a visual guide on setup, please watch the official Fluance setup video:
Video: "Fluance Reference Series Turntable First Time Setup" - A comprehensive guide to setting up your Fluance Reference Series Turntable, including platter, tonearm, and dust cover installation.
Video: "How to Connect a Fluance Turntable to a Stereo Amplifier" - This video demonstrates the correct way to connect your Fluance turntable to a stereo ampargitzaile edo hargailua.
Funtzionamendu-argibideak
Once your turntable is set up, follow these steps to play your vinyl records.
- Place a record on the acrylic platter.
- Select the desired speed (33 1/3 RPM or 45 RPM) using the speed selector knob. For 45 RPM records, place the 45 adapter on the spindle if the record has a large center hole.
- Astiro-astiro altxa besoa seinaleztapen palanka erabiliz.
- Jarri besoa diskoaren hasierako ildo nahi duzunaren gainean.
- Slowly lower the cueing lever to allow the stylus to gently descend onto the record.
- At the end of the record, the auto-stop feature will stop the platter rotation. Lift the tonearm and return it to its rest.
Gainerakoview of the Fluance Reference Series turntables, watch this video:
Video: "Meet The Reference Series: RT82, RT83, RT84, RT85 and RT85N" - An introduction to the various models within the Fluance Reference Series, highlighting their features and differences.
Mantentzea
Proper maintenance will ensure the longevity and optimal performance of your turntable.
- Hauts-estalkia: Keep the dust cover closed when not in use to protect the turntable from dust and debris. Clean with a soft, dry cloth.
- Larrua: Garbitu boligrafoa aldizka astiro-astiro boligrafoa garbitzeko diseinatutako eskuila leun bat erabiliz, atzetik aurrera eskuilatuz.
- Platter and Plinth: Wipe the acrylic platter and MDF wood plinth with a soft, lint-free cloth. Avoid abrasive cleaners.
- Gerrikoa: Inspect the drive belt periodically for wear or stretching. Replace if necessary.
Arazoak konpontzea
Arazoren bat izanez gero, jo ezazu arazoak konpontzeko aholku ohiko hauetara:
| Arazoa | Kausa posiblea | Irtenbidea |
|---|---|---|
| Ez dago soinurik edo bolumen baxurik | Incorrect input selection on receiver; Phono preamp not connected or switched to wrong setting; Loose RCA cables. | Ensure receiver is set to the correct input (e.g., PHONO, CD, TV). Verify phono preamp is connected and set to 'LINE' if using an external preamp, or 'PHONO' if using receiver's built-in preamp. Check all RCA connections. |
| Zurrumuda Zarata | Ground wire not connected; Interference from other electronics. | Connect the ground wire between the turntable and receiver/preamp. Move turntable away from other electronic devices. |
| Skipping or Distortion | Improper tracking force/anti-skating; Unlevel turntable; Dirty stylus/record. | Re-balance tonearm and adjust tracking force/anti-skating. Ensure turntable is level. Clean stylus and record. |
| Incorrect Speed | Incorrect speed setting; Belt issues. | Verify speed selector is set to 33 1/3 or 45 RPM. Check if the drive belt is properly seated or needs replacement. |
Zehaztapenak
- Eredua: RT85T
- Marka: Fluentzia
- Produktuaren neurriak: 13.75 x 16.5 x 5.5 hazbete
- Elementuaren pisua: 16.76 kilo
- Materiala: MDF Egurra
- Platerua: High Density Acrylic
- Kartutxoa: Ortofon 2M Blue elliptical cartridge
- Motor mota: AC Motor with Speed Control Mechanism
- Wow/Flutter: %0.07
- Konektibitate Teknologia: Kableatua
- Jatorrizko herrialdea: Taiwan
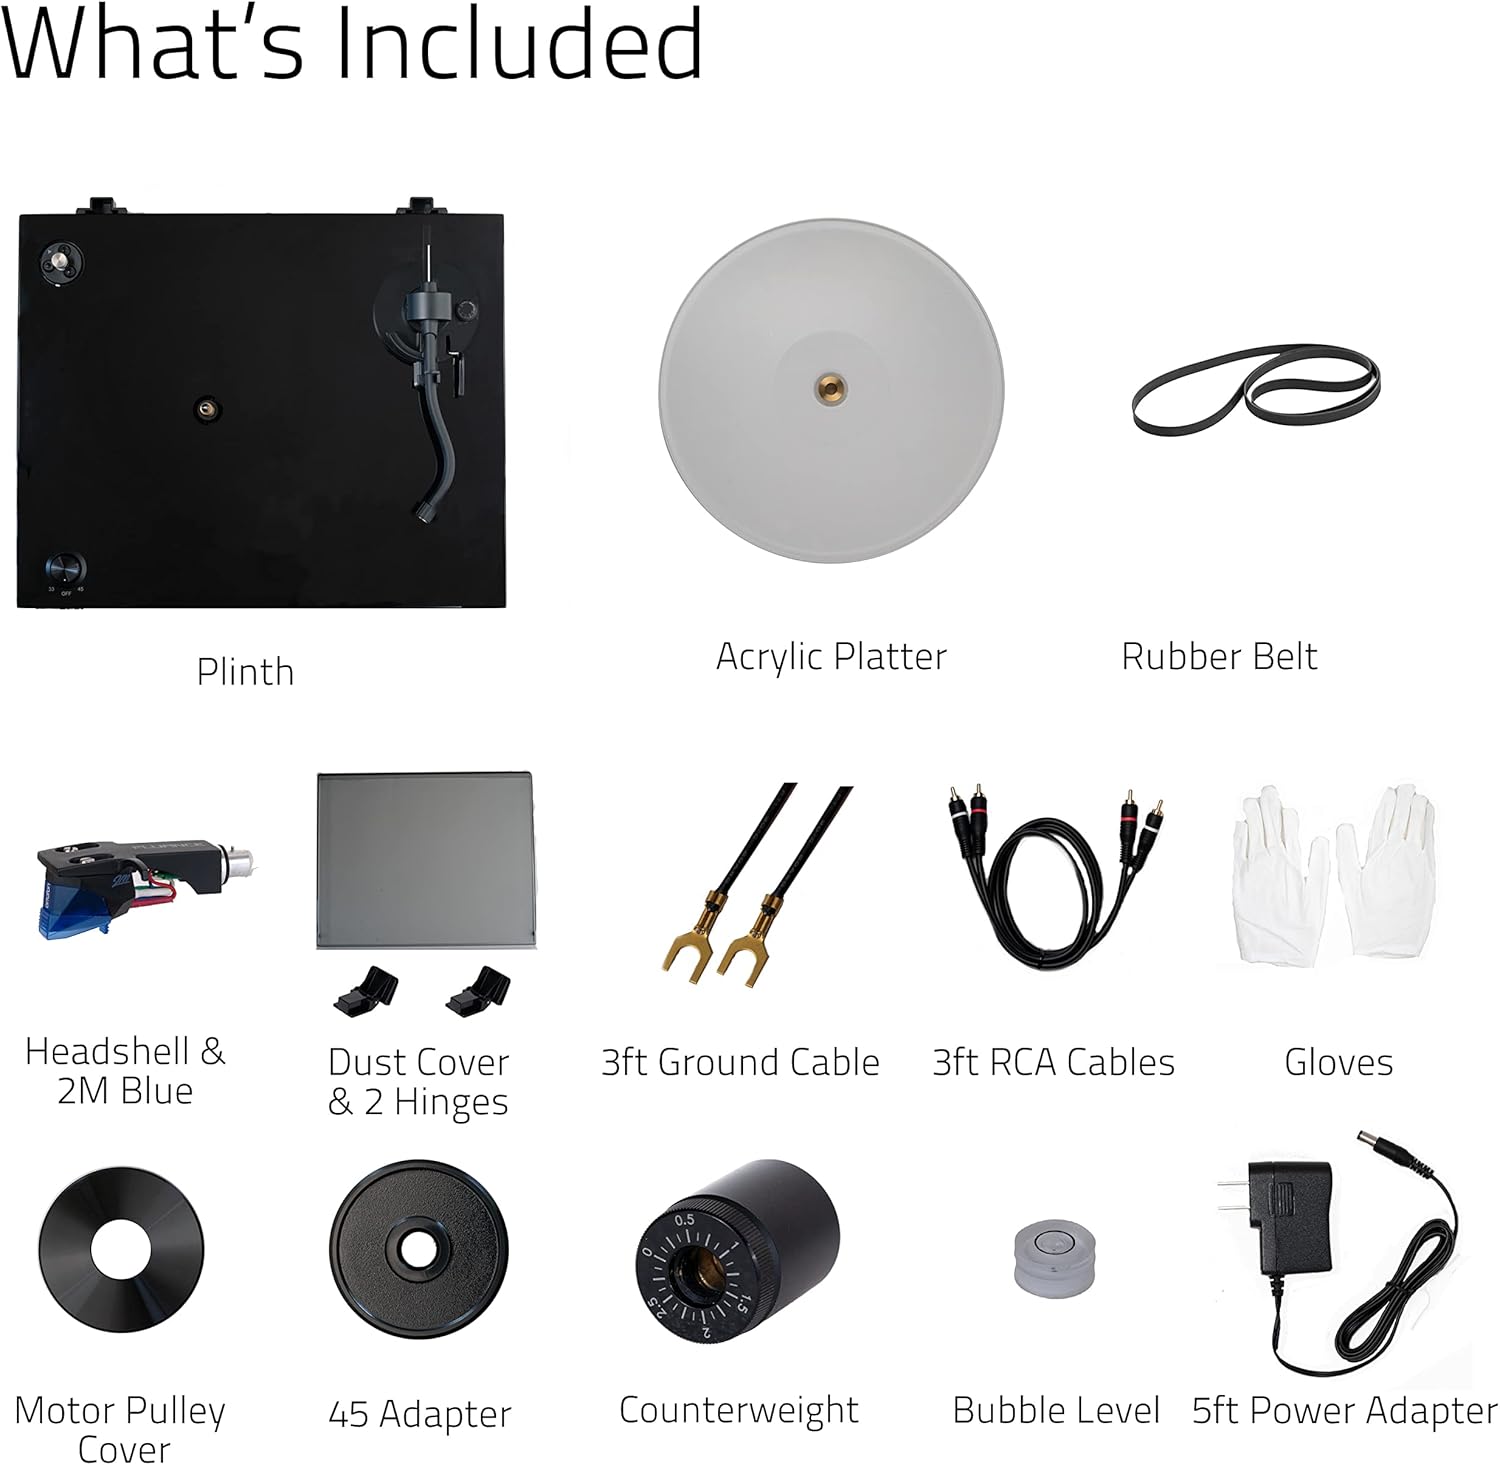
Image: Key dimensions of the Fluance RT85 Turntable.
Video: "Fluance Reference High Fidelity Vinyl Turntable Record Players" - A promotional video showcasing the features and design of the Fluance Reference Series turntables.
Bermea eta Laguntza
Fluance offers a 2-year manufacturer's direct warranty and lifetime customer support for your RT85 Turntable.
For additional support, FAQs, and international manuals, please visit the official Fluance support page:

Image: QR code and text indicating support resources for Fluance products.


