1. Introducción
Thank you for choosing the Gevi 20 Bar Compact Professional Espresso Coffee Machine. This manual provides essential information for the safe and efficient operation, maintenance, and troubleshooting of your new espresso machine. Please read this manual thoroughly before first use and keep it for future reference.

Figure 1.1: Gevi GECME418E-U Espresso Machine with accessories.
This image displays the Gevi 20 Bar Compact Professional Espresso Coffee Machine in stainless steel finish, accompanied by two espresso cups, a milk frothing pitcher, a coffee scoop, and two filter baskets. The machine is actively brewing espresso into the cups.
2. Instrucciones de seguridad importantes
Al utilizar aparatos eléctricos, siempre se deben seguir precauciones básicas de seguridad para reducir el riesgo de incendio, descarga eléctrica y/o lesiones a las personas, incluidas las siguientes:
- Lea todas las instrucciones.
- No toque superficies calientes. Utilice asas o perillas.
- Para protegerse contra incendios, descargas eléctricas y lesiones personales, no sumerja el cable, los enchufes o el aparato en agua u otro líquido.
- Es necesaria una estrecha supervisión cuando cualquier aparato sea utilizado por niños o cerca de ellos.
- Desenchufe el aparato del tomacorriente cuando no lo utilice y antes de limpiarlo. Deje que se enfríe antes de colocar o quitar piezas y antes de limpiarlo.
- No opere ningún aparato con un cable o enchufe dañado o después de que el aparato funcione mal o haya sufrido algún daño de cualquier tipo.
- El uso de accesorios no recomendados por el fabricante del aparato puede provocar incendios, descargas eléctricas o lesiones personales.
- No utilizar en exteriores.
- No deje que el cable cuelgue del borde de la mesa o mostrador, ni que toque superficies calientes.
- No lo coloque sobre o cerca de un quemador de gas o eléctrico caliente, ni dentro de un horno caliente.
- Siempre conecte primero el enchufe al aparato y luego el cable a la toma de corriente. Para desconectarlo, apague cualquier control y desenchúfelo de la toma de corriente.
- No utilice el aparato para ningún fin distinto del previsto.
- Este aparato es sólo para uso doméstico.

Figure 2.1: Smart and Safe Design Features.
This image highlights the safety and smart features of the espresso machine, including a water shortage reminder, cleaning reminder, ETL listing for safety, and an auto shut-off function, emphasizing user convenience and safety.
3. Componentes del producto
Familiarize yourself with the parts of your Gevi espresso machine:

Figure 3.1: Main Components of the Espresso Machine.
Este diagrama proporciona un despiece view of the Gevi espresso machine, clearly labeling its key components: Water tank, Steam/water knob, Pressure gauge, Manual, Removable cup shelf, Drip tray, Steam wand, One-cup filter, Two-cup filter, Froth nozzle, Ground Coffee Portafilter, and Spoon & Tampes.
- Tanque de agua: Desmontable para fácil llenado y limpieza.
- Panel de control: Botones de encendido, disparo único, disparo doble y vapor.
- Manómetro: Indica la presión de preparación para una extracción óptima.
- Portafiltro: Holds ground coffee or capsules.
- Cestas de filtro: Includes one-cup and two-cup filters for ground coffee.
- Varilla de vapor: Para espumar leche y dispensar agua caliente.
- Bandeja de goteo: Recoge el exceso de líquido y es extraíble para su limpieza.
- Parrilla calentadora de tazas: Located on top to pre-heat cups.
- Cuchara y Tampes: Para medir y tampcafé molido.
4. Configuración y primer uso
Antes de utilizar su máquina de café expreso por primera vez, siga estos pasos:
- Deshacer: Retire con cuidado todos los materiales de embalaje y asegúrese de que todos los componentes estén presentes.
- Limpio: Lave el depósito de agua, el portafiltro, las cestas del filtro y la bandeja de goteo con agua tibia y jabón. Enjuáguelos bien y séquelos.
- Llena el tanque de agua: Llene el depósito de agua extraíble con agua fresca y fría hasta la línea MÁX. Vuelva a colocarlo firmemente.
- Preparar la máquina:
- Conecte la máquina a una toma de corriente con conexión a tierra.
- Coloque una taza grande debajo del cabezal de preparación.
- Presione el botón de encendido para encender la máquina.
- Once the machine is heated (indicator light solid), press the single shot button to run water through the brew head until water flows out. Repeat for the steam wand by turning the steam knob to release hot water. This primes the pump and removes any air.
5. Instrucciones de funcionamiento
5.1 Preparación de café expreso (café molido)
- Precalentar: Ensure the machine is pre-heated. The cup warmer grill on top can be used to warm your espresso cups.
- Preparar el portafiltro: Inserte el filtro deseado (de una o dos tomas) en el portafiltro.
- Agregar café: Use the measuring spoon to add finely ground espresso coffee into the filter basket. For a single shot, use one level scoop; for a double shot, use two.
- Tamp Café: Utilice la tampPresione el café molido firme y uniformemente. Asegúrese de que la superficie esté nivelada.
- Coloque el portafiltro: Alinee el portafiltro con el cabezal de preparación y gírelo firmemente hacia la derecha hasta que quede bien bloqueado.
- Coloque la(s) copa(s): Place one or two pre-heated espresso cups under the portafilter spouts.
- Preparar espresso: Press the single shot or double shot button. The machine will automatically dispense the programmed volume of espresso (25-60ml for single, 60-130ml for double).
- Quitar el portafiltro: Una vez finalizada la preparación, retire con cuidado el portafiltro girándolo hacia la izquierda. Deseche los posos de café usados.
Figure 5.1: 2-in-1 Powder and Nespresso Capsules Extraction System.
This image illustrates the process for both ground coffee and Nespresso capsules. For ground coffee, it shows fixing the filter, adding powder, tamping, inserting the portafilter, and brewing. For capsules, it shows inserting the capsule, closing the capsule box, putting it into the portafilter, inserting the portafilter, and brewing.

Figure 5.2: Extraction Guide with Built-in Pressure Gauge.
This image displays the espresso machine with a prominent pressure gauge, indicating the optimal "Espresso Range" for brewing. It visually guides the user on correct extraction versus under or over extraction, helping to achieve barista-quality results.
5.2 Making Espresso (Nespresso Capsules)
Your Gevi machine is compatible with Nespresso capsules (capsule portafilter accessories not included, but compatible).
- Prepare Capsule Portafilter: If you have the compatible capsule portafilter accessory, insert it into the machine.
- Insertar cápsula: Place a Nespresso capsule into the designated slot in the capsule portafilter.
- Cerrar y bloquear: Close the capsule box and insert the portafilter into the machine, twisting to lock it securely.
- Copa del lugar: Coloque su taza debajo del pico.
- Preparar espresso: Press the single shot or double shot button to brew.
- Quitar la cápsula: After brewing, carefully remove the portafilter and dispose of the used capsule.
5.3 Espumar leche con varilla de vapor
- Preparar leche: Llene una jarra de acero inoxidable para espumar con leche fría (láctea o no láctea) hasta justo debajo del pico.
- Activar vapor: Press the steam button on the control panel. Wait for the steam indicator light to become solid, indicating the machine is ready.
- Varilla de vapor de purga: Position the steam wand over the drip tray and briefly turn the steam/water knob to release any condensed water. Turn the knob off.
- Leche espumosa: Immerse the tip of the steam wand just below the surface of the milk. Slowly turn the steam/water knob to release steam.
- Create Microfoam: Keep the tip near the surface to create a swirling motion and incorporate air, producing a fine microfoam. As the milk heats and expands, lower the pitcher to keep the tip just below the surface.
- Monitorizar temperatura: Continue frothing until the milk reaches the desired temperature (around 140-150°F or 60-65°C). The pitcher will be hot to the touch.
- Detener el vapor: Turn the steam/water knob off, then remove the pitcher.
- Varilla de vapor limpia: Limpie inmediatamente la varilla de vapor con un paño.amp cloth to remove any milk residue. Briefly turn the steam/water knob on again to purge any milk from inside the wand.
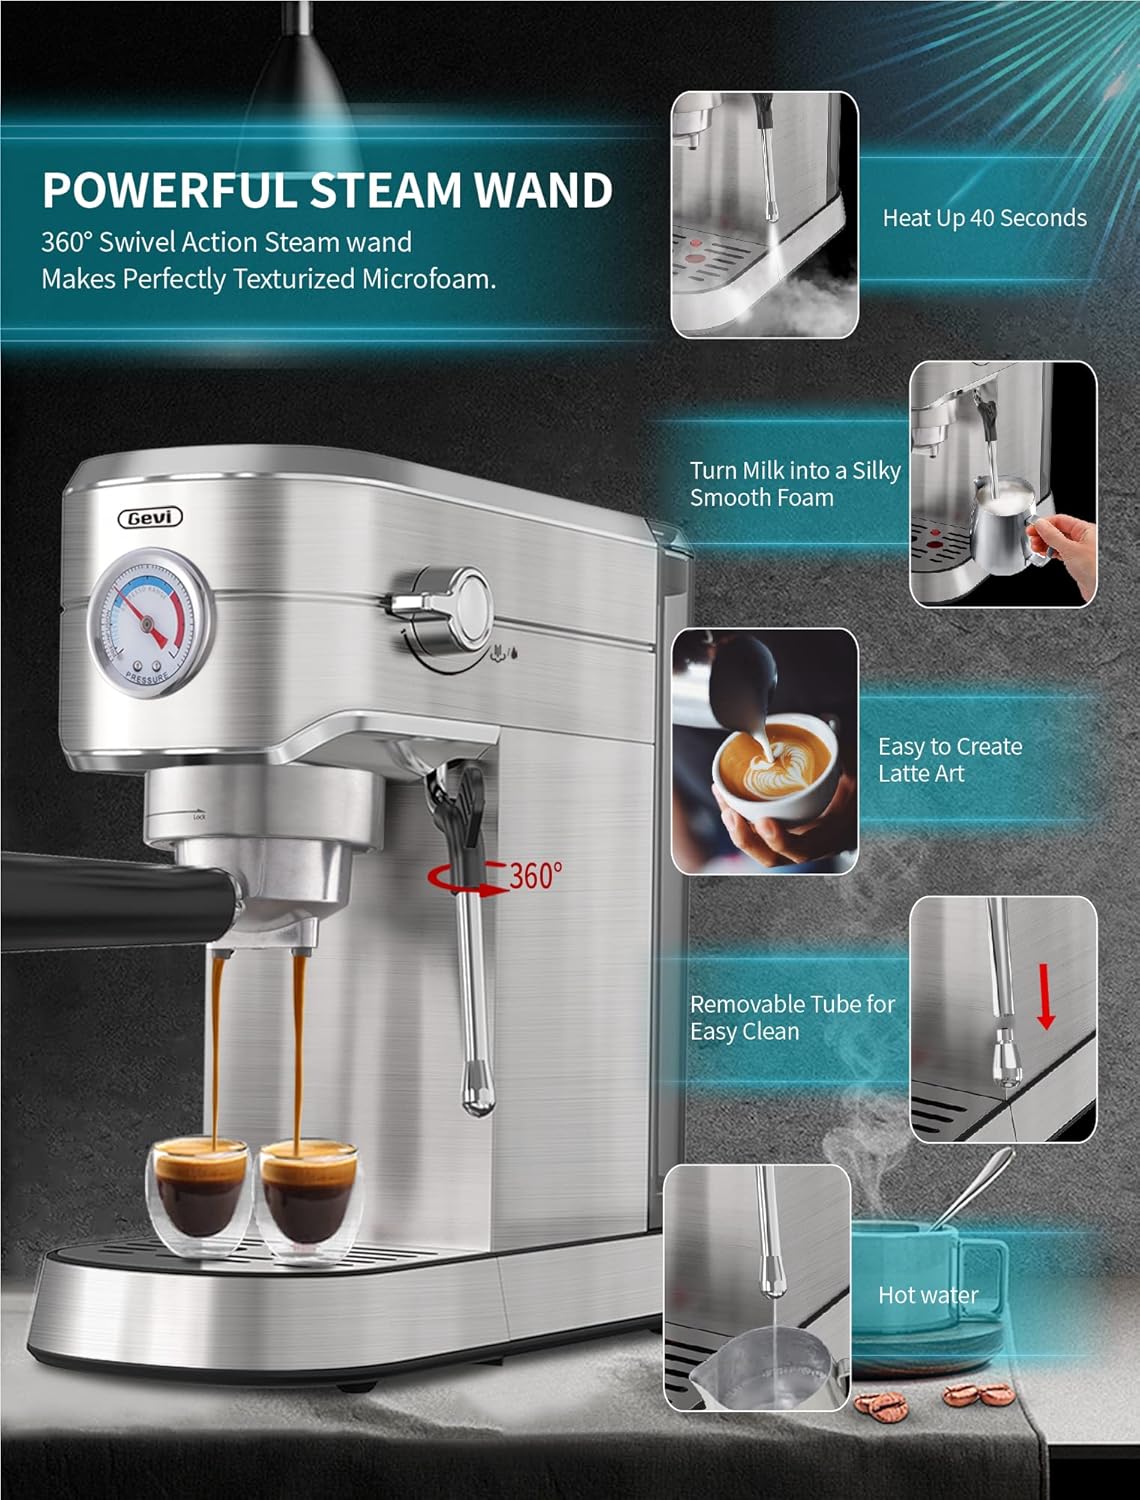
Figure 5.3: Powerful Steam Wand Features.
This image demonstrates the versatility of the 360° swivel action steam wand. It shows the wand heating up, turning milk into silky smooth foam, enabling latte art creation, and its removable tube for easy cleaning. It also highlights the hot water dispensing function.
6. Mantenimiento y limpieza
La limpieza y el mantenimiento regulares garantizarán la longevidad y el rendimiento óptimo de su máquina de café expreso.
- Limpieza diaria:
- Bandeja de goteo: Vacíe y enjuague la bandeja de goteo diariamente.
- Portafiltros y cestas de filtro: Después de cada uso, retire los posos de café y enjuague el portafiltro y las cestas del filtro con agua tibia.
- Varilla de vapor: Always wipe and purge the steam wand immediately after frothing milk to prevent milk residue from drying inside.
- Exterior: Limpie el exterior de la máquina con un paño suave yamp paño.
- Limpieza semanal:
- Tanque de agua: Remove and wash the water tank with mild detergent and rinse thoroughly.
- Cabezal de preparación: Utilizar anuncioamp Paño para limpiar la rejilla y la junta del cabezal de preparación.
- Descalcificar:
Depending on water hardness and usage, descaling should be performed every 2-3 months. Use a commercial descaling solution designed for coffee machines and follow the product's instructions. The machine also features a cleaning reminder.
7. Solución de problemas
Si tiene problemas con su máquina, consulte la siguiente tabla para ver problemas y soluciones comunes.
| Problema | Posible causa | Solución |
|---|---|---|
| No dispensa café. | No water in tank; Tank not seated correctly; Clogged filter basket; Machine not heated. | Fill water tank; Re-seat tank; Clean filter basket; Wait for machine to heat up. |
| Coffee flows too slowly or not at all. | Café molido demasiado fino; Demasiado café en el filtro; Café tamped demasiado fuerte; Filtro obstruido. | Utilice una molienda más gruesa; reduzca la cantidad de café; Tamp lighter; Clean filter basket. |
| Coffee flows too quickly, weak espresso. | Coffee ground too coarse; Not enough coffee; Coffee not tamped lo suficiente. | Utilice una molienda más fina; Aumente la cantidad de café; Tamp con más firmeza. |
| La varilla de vapor no produce vapor. | Machine not hot enough for steam; Steam wand clogged; No water in tank. | Wait for steam indicator; Clean steam wand; Fill water tank. |
| Fuga de agua de la máquina. | Tanque de agua no está colocado correctamente; Bandeja de goteo llena; Problema con la junta. | Re-seat water tank; Empty drip tray; Contact customer support if gasket is damaged. |
8. Especificaciones
- Modelo: GECME418E-U
- Marca: Gevi
- Presión: 20 barra
- Fuerza: 1350 W
- Dimensiones: 7.1 x 15.9 x 13.4 pulgadas
- Peso del artículo: 10.21 libras
- Tipo de filtro: Reusable (compatible with Nespresso capsules with optional accessory)
- Modo de operación: Completamente automático
- Características especiales: Milk Frother, Removable Tank, Pressure Gauge, Low Pressure Pre-infusion, NTC Precise Temperature Control, Auto Shut-off, Water Shortage Reminder, Cleaning Reminder.
- Código postal: 738530367200
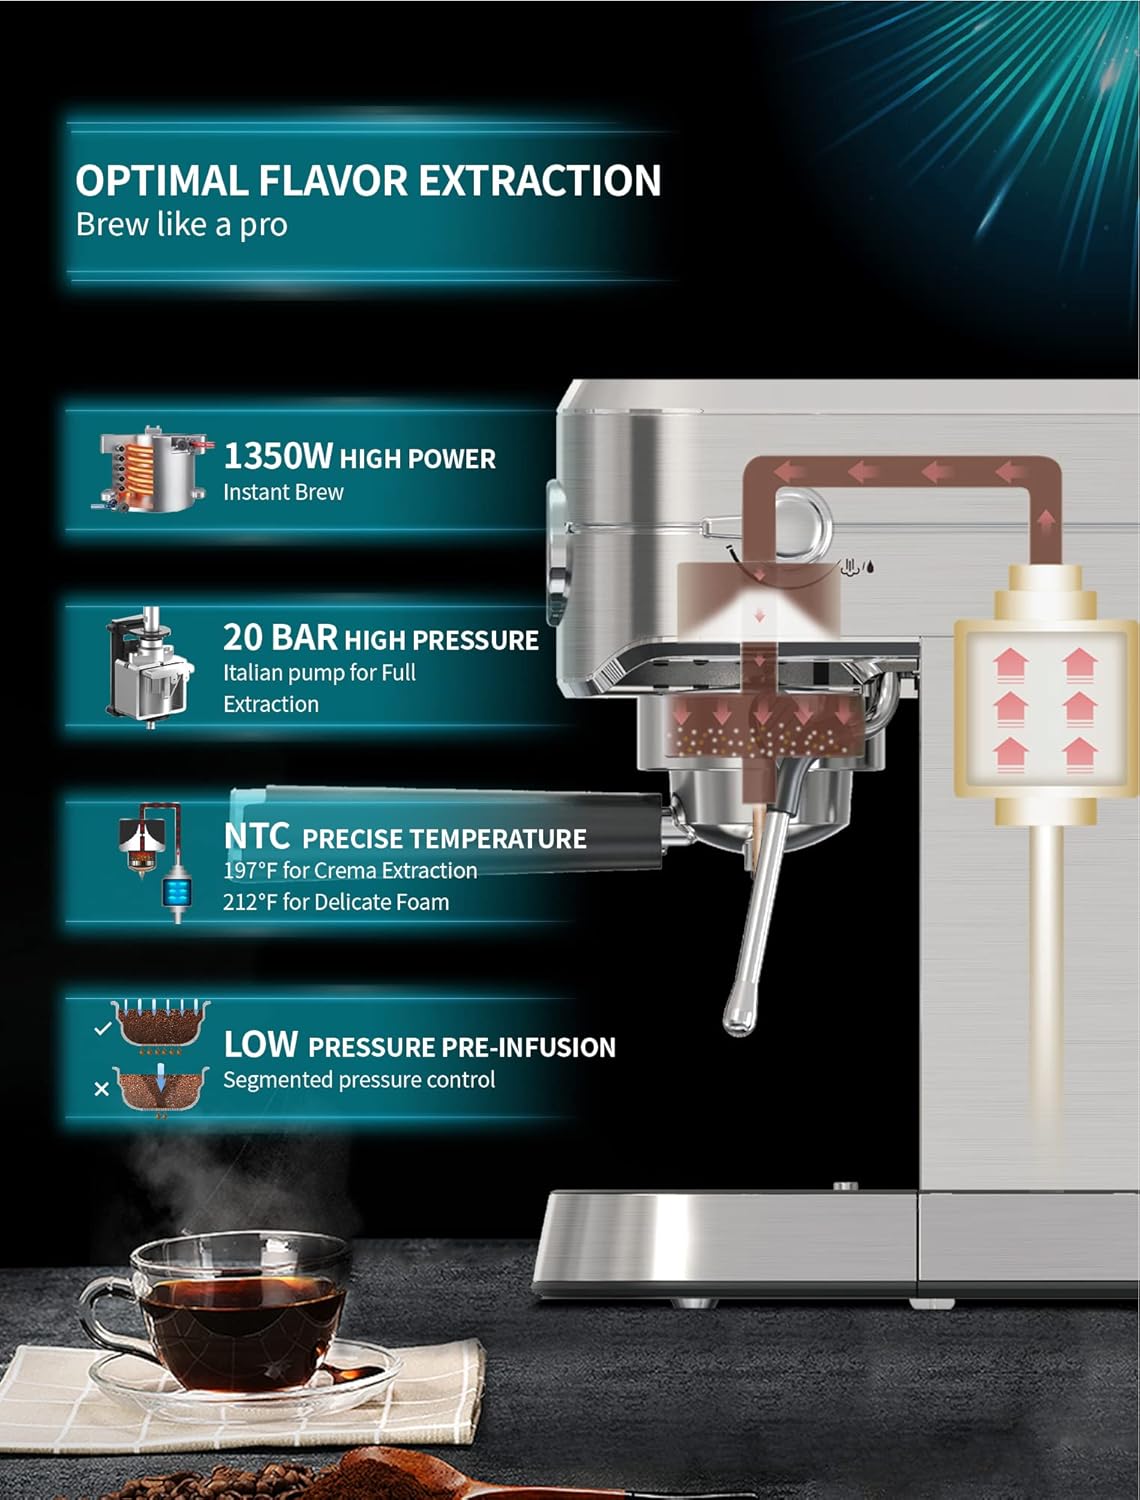
Figure 8.1: Optimal Flavor Extraction Technologies.
This image details the advanced technologies within the Gevi espresso machine designed for optimal flavor extraction. It highlights the 1350W high power for instant brew, 20 BAR high pressure Italian pump, NTC precise temperature control (197°F for crema, 212°F for foam), and low pressure pre-infusion for segmented pressure control.
9. Garantía y soporte
Gevi products are manufactured to the highest quality standards. For warranty information, technical support, or service inquiries, please refer to the warranty card included with your product or visit the official Gevi websitio.
Gevi Official Store: Visit the Gevi Store on Amazon


