1. Introducción
Thank you for choosing an Indesit appliance. This user manual provides essential information for the safe and efficient operation, installation, and maintenance of your Indesit TWE 71252 S EU front-loading washing machine. Please read these instructions carefully before using the appliance and keep them for future reference. Proper use and maintenance will ensure optimal performance and extend the lifespan of your washing machine.
2. Información de seguridad
Seguridad general:
- Este aparato está destinado únicamente para uso doméstico.
- Do not allow children to play with the appliance. Supervise children to ensure they do not climb into the drum.
- Desenchufe siempre el aparato antes de limpiarlo o realizar cualquier mantenimiento.
- Do not operate the washing machine if the power cord or plug is damaged, or if the appliance itself is faulty. Contact qualified service personnel.
- Asegúrese de que el aparato esté correctamente conectado a tierra.
Seguridad de la instalación:
- Remove all transit bolts and packaging materials before use. Failure to do so can cause severe damage.
- Install the appliance on a firm, level floor. Adjust the feet to ensure stability.
- Asegúrese de que haya una ventilación adecuada alrededor del aparato.
- Conecte la manguera de entrada de agua a un grifo de agua fría. Asegúrese de que todas las conexiones estén bien ajustadas para evitar fugas.
- The drain hose must be securely fixed to prevent displacement during operation.
3. Producto terminadoview
Your Indesit TWE 71252 S EU washing machine features a user-friendly design with essential components for efficient laundry care.

Figura 3.1: Frente view of the Indesit TWE 71252 S EU washing machine. This image shows the overall design, including the control panel at the top, the detergent dispenser on the left, and the main loading door in the center.
Componentes clave:
- Panel de control: Located at the top, featuring digital touch controls, push buttons, and a rotary knob for program selection.
- Dispensador de detergente: A pull-out drawer for adding detergent and fabric softener.
- Puerta de carga: Puerta de carga frontal para agregar y sacar ropa.
- Tambor: Interior en acero inoxidable donde se lava la ropa.
- Filtro de drenaje: Ubicado en la parte inferior frontal, accesible para limpieza.

Figura 3.2: Close-up of the detergent dispenser and control panel. This view highlights the various compartments within the dispenser for pre-wash, main wash, and softener, along with the program selection knob and digital display.

Figura 3.3: Interior view of the stainless steel drum. This image shows the perforated surface of the drum, designed for effective washing and rinsing, and the agitator paddles.
4. Instalación y configuración
La instalación adecuada es crucial para el rendimiento y la longevidad de su lavadora.
4.1 Desembalaje:
- Retire con cuidado todos los materiales de embalaje, incluida la base de poliestireno y cualquier película protectora.
- Remove the transit bolts located at the rear of the machine. These bolts secure the drum during transport and must be removed before operation. Keep them for future transport if needed.
4.2 Posicionamiento:
- Place the washing machine on a flat, stable surface, away from direct sunlight or heat sources.
- Adjust the adjustable feet at the bottom of the machine to ensure it is perfectly level. Use a spirit level to verify.
- Ensure there is sufficient space around the machine for ventilation and ease of access.
4.3 Conexión de agua:
- Connect the supplied water inlet hose to the cold water tap. Hand-tighten the connection, then use a wrench for a quarter turn.
- Conecte el otro extremo de la manguera de entrada a la válvula de entrada de agua en la parte posterior de la lavadora.
- Position the drain hose into a standpipe or over the edge of a sink, ensuring it is securely fixed to prevent it from falling out during draining. The height of the drain point should be between 65 cm and 100 cm from the floor.
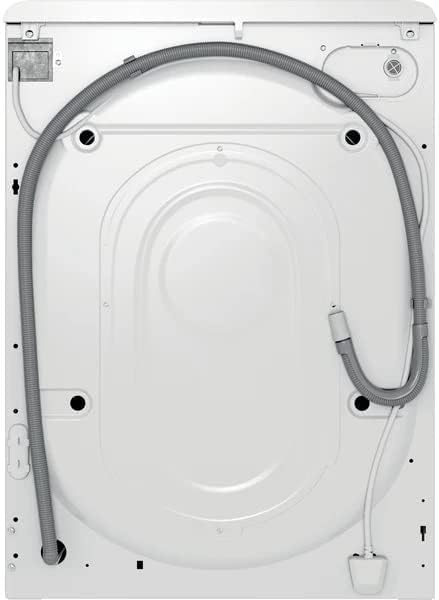
Figura 4.1: Trasero view of the washing machine. This image illustrates the connections for the water inlet hose (typically blue or white) and the drain hose, along with the power cable.
4.4 Conexión eléctrica:
- Conecte el cable de alimentación a una toma eléctrica con conexión a tierra adecuada.
- No utilice cables de extensión ni enchufes múltiples.
4.5 First Wash Cycle:
- Before washing clothes, run an empty wash cycle to clean the drum and remove any manufacturing residues.
- Agregue una pequeña cantidad de detergente al compartimento de lavado principal.
- Select a short, hot wash program (e.g., 60°C cotton cycle) and start the machine.
5. Instrucciones de funcionamiento
Siga estos pasos para un funcionamiento eficaz y seguro de su lavadora.
5.1 Carga de ropa:
- Abra la puerta de carga.
- Clasifique la ropa por tipo de tela, color y grado de suciedad.
- Load laundry loosely into the drum, ensuring not to overload. The 7kg capacity refers to dry laundry weight.
- Cierre la puerta firmemente hasta que haga clic.
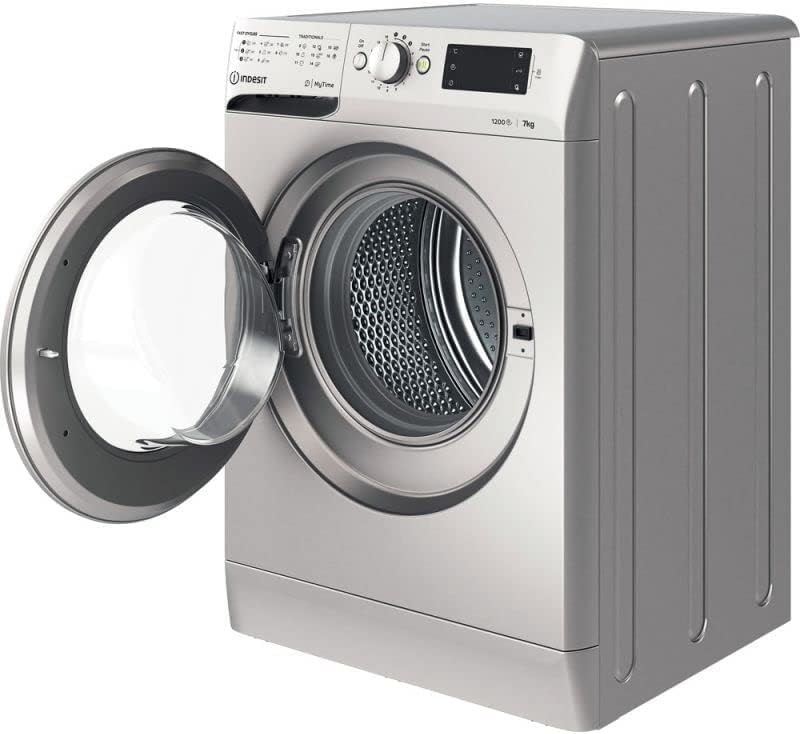
Figura 5.1: Frente view of the washing machine with the door open. This image shows the wide opening for easy loading and unloading of laundry into the drum.
5.2 Adding Detergent and Additives:
- Saque el cajón dispensador de detergente.
- Add the appropriate amount of detergent to the main wash compartment (usually marked 'II' or 'Main Wash').
- If using fabric softener, pour it into the designated compartment (usually marked with a flower symbol or 'Softener'). Do not exceed the 'MAX' level.
- Cierre el cajón dispensador suavemente.
5.3 Selecting a Program:
- Turn the rotary knob on the control panel to select the desired wash program. The machine offers various programs for different fabric types and soil levels, including a 'Quick Wash' option.
- Use the digital touch controls and push buttons to adjust additional settings such as temperature, spin speed (up to 1200 RPM), or delay start, if available for the selected program.
5.4 Starting a Cycle:
- Press the 'Start/Pause' button to begin the wash cycle. The indicator light will illuminate.
5.5 Pausing/Canceling a Cycle:
- To pause a cycle, press the 'Start/Pause' button. The indicator light will flash.
- To cancel a cycle, press and hold the 'Start/Pause' button for a few seconds, or turn the program selector knob to 'Off' and then back to a new program.
5.6 Fin del ciclo:
- The machine will signal the end of the cycle (e.g., with an audible alert or a specific display message).
- Abra la puerta y saque la ropa rápidamente para evitar que se enrede.asing y olores.
- Deje la puerta ligeramente entreabierta para permitir que el tambor se seque al aire.
6. Mantenimiento y limpieza
El mantenimiento regular garantiza un rendimiento e higiene óptimos.
6.1 Cleaning the Detergent Dispenser:
- Extraiga completamente el cajón dispensador.
- Retire todas las piezas desmontables y enjuáguelas con agua corriente.
- Limpie la carcasa del cajón con un cepillo.
- Vuelva a montar y vuelva a insertar el cajón.
6.2 Cleaning the Drum:
- Run a maintenance wash cycle (e.g., a hot cycle with a drum cleaning agent or white vinegar) every few months to prevent odor and residue buildup.
6.3 Cleaning the Door Seal:
- Wipe the rubber door seal after each wash to remove lint, dirt, and moisture. This prevents mold and odors.
6.4 Cleaning the Drain Filter:
- Periodically clean the drain filter to prevent blockages and ensure proper drainage.
- Open the cover at the bottom front of the machine.
- Coloque un recipiente poco profundo debajo para recoger el agua residual.
- Desenrosque lentamente el filtro, dejando que el agua se drene.
- Retire cualquier pelusa, monedas u objetos extraños del filtro y su alojamiento.
- Enjuague el filtro con agua corriente y vuelva a enroscarlo firmemente. Cierre la tapa.

Figura 6.1: Close-up of the drain filter access. This image shows the removable cap that covers the drain filter, which needs to be regularly cleaned to prevent blockages.
6.5 External Cleaning:
- Limpie el exterior de la máquina con un paño suave yamp Paño. No utilice limpiadores abrasivos ni disolventes.
7. Solución de problemas
Before contacting customer service, try these simple solutions for common issues.
| Problema | Posible causa | Solución |
|---|---|---|
| La máquina no arranca | No hay energía; Puerta no cerrada; Programa no seleccionado; Botón de Inicio/Pausa no presionado. | Verifique la fuente de alimentación; Asegúrese de que la puerta esté bien cerrada; Seleccione un programa; Presione Inicio/Pausa. |
| El agua no se llena | Grifo de agua cerrado; manguera de entrada doblada; presión de agua demasiado baja. | Abra el grifo de agua; enderece la manguera; verifique la presión del agua de la casa. |
| El agua no drena | Manguera de drenaje doblada o bloqueada; filtro de drenaje bloqueado. | Straighten or clear drain hose; Clean the drain filter (see Section 6.4). |
| Vibración / ruido excesivo | Pernos de transporte no retirados; Máquina no nivelada; Carga desigual. | Remove transit bolts (if not already); Adjust feet to level machine; Redistribute laundry evenly. |
| Residuos de detergente en la ropa | Too much detergent; Detergent dispenser blocked; Insufficient rinse. | Reduce detergent amount; Clean dispenser; Select an extra rinse option if available. |
8. Especificaciones
Detailed technical specifications for the Indesit TWE 71252 S EU washing machine.
| Característica | Especificación |
|---|---|
| Modelo | TWE 71252 S EU |
| Marca | Indesit |
| Capacidad | 7 kilogramos |
| Velocidad máxima de centrifugado | 1200 RPM |
| Dimensiones (alto x ancho x profundidad) | 85 cm x 59.5 cm x 54 cm |
| Peso | 66.5 kilogramos |
| Eficiencia energética | A+++ 90% |
| Material del tambor | Acero inoxidable |
| Tipo de control | Digital Touch, Push Button, Rotary Knob |
| Tipo de instalación | Freestanding |
| Color | Plata |
| Características especiales | Durable, Quick Wash Option |
| Componentes incluidos | Lavadora |
9. Garantía y soporte
For warranty information, please refer to the warranty card provided with your appliance or contact your retailer. Keep your proof of purchase (receipt or invoice) as it will be required for any warranty claims.
If you encounter issues that cannot be resolved using the troubleshooting guide, please contact Indesit customer service or an authorized service center. Do not attempt to repair the appliance yourself, as this may void your warranty and pose safety risks.


