1. Introducción
This manual provides essential information for the safe and efficient operation of your Einhell Cordless Impact Drill TE-ID 18 Li Solo. This tool is a high-performance member of the Einhell Power X-Change family, designed for drilling and impact drilling tasks. Please read these instructions carefully before first use and keep them for future reference.

Figure 1: Einhell Cordless Impact Drill TE-ID 18 Li Solo. This image shows the main drill unit with an auxiliary handle and depth stop installed, ready for use. A battery is shown faded in the background, indicating it is not included.
2. Instrucciones generales de seguridad
Always observe the following safety precautions when using power tools to reduce the risk of electric shock, fire, and serious injury.
- Seguridad en el área de trabajo: Mantenga su área de trabajo limpia y bien iluminada. Las áreas desordenadas u oscuras pueden provocar accidentes. No opere herramientas eléctricas en atmósferas explosivas, como en presencia de líquidos, gases o polvo inflamables.
- Seguridad eléctrica: Evite el contacto del cuerpo con superficies conectadas a tierra, como tuberías, radiadores, estufas y refrigeradores. Existe un mayor riesgo de descarga eléctrica si su cuerpo está conectado a tierra.
- Seguridad personal: Always wear eye protection. Use hearing protection when operating impact drills. Wear a dust mask if drilling generates dust. Dress properly; avoid loose clothing or jewelry.
- Uso y cuidado de herramientas: No fuerce la herramienta eléctrica. Utilice la herramienta eléctrica correcta para su aplicación. Desconecte la batería de la herramienta eléctrica antes de realizar ajustes, cambiar accesorios o guardarla.
- Uso y cuidado de la herramienta a batería: Recargue únicamente con el cargador especificado por el fabricante. Utilice herramientas eléctricas únicamente con baterías específicamente diseñadas.
3. Componentes del producto
Familiarize yourself with the various parts of your Einhell Cordless Impact Drill for proper and safe operation.
- Portabrocas sin llave: Para cambios de broca rápidos y sencillos.
- Interruptor selector de modo: To switch between drilling and impact drilling.
- Speed Control Trigger: For variable speed adjustment.
- Interruptor de avance/retroceso: To change rotation direction.
- Mango auxiliar: Proporciona agarre y control adicionales.
- Parada de profundidad: Para un control preciso de la profundidad de perforación.
- Interfaz de la batería: For connecting Power X-Change batteries (sold separately).
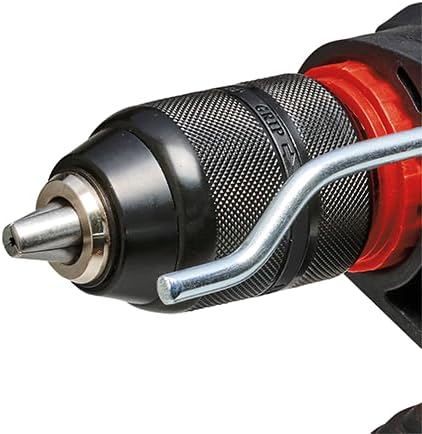
Figura 2: Primer plano view of the 13 mm quick-change chuck. This component allows for tool-free bit changes.
4. Configuración
4.1 Instalación de la batería (batería y cargador no incluidos)
The Einhell TE-ID 18 Li Solo is part of the Power X-Change family and requires an 18V Power X-Change battery and charger, which are sold separately. Ensure the battery is fully charged before use.
- Align the charged Power X-Change battery with the battery interface on the base of the drill.
- Deslice la batería en su lugar hasta que haga clic de forma segura.
- Para quitarla, presione el botón de liberación de la batería y deslícela hacia afuera.

Figure 3: Illustration indicating that the battery and charger are not included with the drill unit. These items must be purchased separately as part of the Einhell Power X-Change system.

Figura 4: Sobreview of the Einhell Power X-Change system, demonstrating the wide range of compatible tools that can use the same battery. This highlights the modularity of the system.
4.2 Auxiliary Handle and Depth Stop Installation
- Afloje el mango auxiliar girándolo en sentido antihorario.
- Deslice el mango sobre la parte delantera del cuerpo del taladro.
- Inserte el tope de profundidad en el orificio designado en el mango auxiliar.
- Adjust the auxiliary handle to a comfortable position and tighten it by rotating clockwise.
- Ajuste el tope de profundidad a la profundidad de perforación deseada deslizándolo hacia adentro o hacia afuera.
4.3 Instalación de brocas
- Asegúrese de que el taladro esté apagado y que la batería esté extraída por seguridad.
- Gire el mandril en sentido antihorario para abrir las mordazas.
- Inserte la broca completamente en el mandril.
- Rotate the chuck clockwise to securely tighten the jaws around the drill bit. Ensure the bit is centered and firmly gripped.
5. Instrucciones de funcionamiento
5.1 Encendido/apagado y control de velocidad
The drill is activated by pressing the speed control trigger. The speed is variable, increasing with greater pressure on the trigger. To turn off, release the trigger.

Figure 5: Close-up of the drill's trigger and forward/reverse switch. The trigger provides variable speed control, and the switch above it controls the direction of rotation.
5.2 Rotación hacia adelante/atrás
The forward/reverse switch, located above the trigger, controls the direction of rotation. Push it to the left for forward rotation (drilling) and to the right for reverse rotation (removing screws or jammed bits). Ensure the switch is in the central position to lock the trigger for safety when not in use.
5.3 Drilling and Impact Drilling Mode
The mode selector switch allows you to choose between standard drilling and impact drilling. For drilling into wood, metal, or plastic, select the drilling mode (drill bit symbol). For drilling into masonry or concrete, select the impact drilling mode (hammer symbol).

Figure 6: Close-up of the mode selector switch on the top of the drill. The left symbol indicates drilling mode, and the right symbol indicates impact drilling mode.
5.4 General Drilling Tips
- Always secure your workpiece.
- Start drilling at a low speed and gradually increase.
- Aplique una presión constante y uniforme. No fuerce el taladro.
- Para agujeros profundos, retire periódicamente la broca para limpiar los residuos.
- Use appropriate drill bits for the material.

Figure 7: A person demonstrating the use of the Einhell cordless impact drill for drilling into a wall. Proper grip and posture are shown, emphasizing safe operation.
6. Mantenimiento
El mantenimiento regular garantiza la longevidad y el rendimiento óptimo de su taladro.
- Limpieza: Keep the ventilation slots clean to prevent overheating. Use a soft brush or compressed air to remove dust and debris. Do not use water or chemical cleaners.
- Almacenamiento: Store the drill in a dry, secure place out of reach of children. Remove the battery pack before storage.
- Mantenimiento del mandril: Limpie periódicamente las mordazas del mandril para garantizar un agarre adecuado de las brocas.
7. Solución de problemas
| Problema | Posible causa | Solución |
|---|---|---|
| El taladro no arranca. | La batería no está insertada correctamente o está descargada. | Asegúrese de que la batería esté completamente insertada. Cargue o reemplace la batería. |
| Potencia o velocidad reducida. | Battery low or drill bit dull. | Charge battery. Replace or sharpen drill bit. |
| Drill bit jams. | Excessive pressure or incorrect bit for material. | Reduce pressure. Use appropriate bit. Use reverse rotation to free. |
| Calentamiento excesivo. | Ranuras de ventilación bloqueadas o uso intensivo continuo. | Limpie las ranuras de ventilación. Deje que el taladro se enfríe. |
8. Especificaciones técnicas
| Característica | Valor |
|---|---|
| Modelo | TE-ID 18 Li Solo (Part No. 4513960) |
| Marca | Un infierno |
| Fuente de poder | Battery Powered (Power X-Change 18V Li-Ion) |
| Volumentage | 18 voltios |
| Velocidad máxima de rotación | 260 RPM |
| Tamaño máximo de mandril | 13 milímetros |
| Capacidad de perforación de madera | 25 milímetros |
| Capacidad de perforación de metal | 10 milímetros |
| Peso del artículo | 1.65 kilogramos (3.63 libras) |
| Dimensiones del producto (L x An x Al) | 11.14" x 2.64" x 7.87" |
| Características especiales | Adjustable, Wireless, Speed Electronics, Forward/Reverse Rotation |
9. Garantía y soporte
For warranty information and customer support, please refer to the documentation included with your purchase or visit the official Einhell webSitio. Conserve su comprobante de compra para cualquier reclamación de garantía.
Einhell Official Websitio: www.einhell.com


