Introducción
This manual provides comprehensive instructions for the installation, operation, and maintenance of your SDX Audio Bluetooth Car Stereo Receiver. Please read this manual thoroughly before using the product to ensure proper function and to prevent damage. Keep this manual for future reference.
Información de seguridad
Para garantizar un funcionamiento seguro y evitar daños, observe las siguientes precauciones:
- No opere la unidad de forma que le distraiga de la conducción. Priorice siempre la seguridad vial.
- Ensure proper wiring and connections to avoid short circuits or electrical hazards. Consult a professional if unsure about installation.
- Do not expose the unit to extreme temperatures, direct sunlight, or excessive moisture.
- Evite desmontar o modificar la unidad. Esto podría anular la garantía y suponer riesgos de seguridad.
- Mantenga el volumen a un nivel que le permita escuchar sonidos externos, como los de los vehículos de emergencia.
Contenido del paquete
Verifique que todos los artículos estén presentes en el paquete:
- SDX Audio Bluetooth Car Stereo Receiver Unit
- Mazo de cables
- Herrajes de montaje (tornillos, soportes)
- Mando a distancia
- Manual de usuario (este documento)
Producto terminadoview
Familiarize yourself with the main components and controls of your car stereo receiver.

Figura 1: Front panel of the SDX Audio Bluetooth Car Stereo Receiver. This image displays the main unit with its digital LCD display, two rotary knobs on either side, and various control buttons below the display. A USB port is visible on the left, and an AUX-in port on the right. The model number RUSXi167 is printed on the right side of the display.
Controles del panel frontal:
- Perilla de encendido/volumen: Gire para ajustar el volumen, presione para encender/apagar.
- Botón de modo: Cycles through available audio sources (FM, Bluetooth, USB, AUX).
- Band/APS Button: In FM mode, selects radio band (FM1, FM2, FM3) or performs automatic preset scanning.
- Play/Pause/Preset Buttons (1-6): Controls playback for USB/Bluetooth, or selects preset radio stations.
- Botones de avance/retroceso: Salta pistas o sintoniza frecuencias de radio.
- DIS/Clock Button: Displays clock or other information.
- USB Port (Charging): Dedicated USB port for charging mobile devices (5V/1.5A output).
- USB Port (MP3 Playback): Dedicated USB port for MP3 music playback from a USB drive.
- Entrada auxiliar: Entrada de 3.5 mm para dispositivos de audio externos.
- Micrófono incorporado: Para llamadas manos libres.
Configuración e instalación
Una instalación correcta es crucial para un rendimiento óptimo. Si no está familiarizado con el cableado del sistema de audio para automóviles, le recomendamos buscar ayuda profesional.
Diagrama de cableado:
Refer to the provided wiring harness for connections. Common connections include:
- Alambre amarillo: 12 V constantes (batería)
- Cable rojo: 12 V conmutados (Encendido/ACC)
- Cable negro: Suelo
- Alambre azul: Antena de poder/Amplifier Remote Turn-on
- Cables de altavoz: Generalmente codificados por colores (por ejemplo, blanco/blanco-negro para delantero izquierdo, gris/gris-negro para delantero derecho, verde/verde-negro para trasero izquierdo, morado/morado-negro para trasero derecho).
Pasos de instalación:
- Desconecte el terminal negativo de la batería del vehículo para evitar cortocircuitos eléctricos.
- Remove the existing car stereo unit from the dashboard.
- Connect the SDX Audio receiver's wiring harness to your vehicle's wiring harness, matching colors and functions. Use crimp connectors or solder for secure connections.
- Conecte el cable de la antena al receptor.
- Slide the receiver into the dashboard opening and secure it using the provided mounting hardware.
- Vuelva a conectar el terminal negativo de la batería del vehículo.
- Test the unit's functions (power, radio, USB, Bluetooth, AUX, speaker output).

Figura 2: The SDX Audio receiver seamlessly integrated into a classic car dashboard, demonstrating its compact and retro-compatible design. The unit's display shows "104.1" indicating FM radio mode.

Figura 3: The SDX Audio receiver installed in a modern vehicle's dashboard, demonstrating its versatile fit across different car interiors. The display shows "104.1" indicating FM radio mode.
Instrucciones de funcionamiento
Operación básica:
- Encendido/apagado: Presione la perilla de volumen para encender o apagar la unidad.
- Control de volumen: Gire la perilla de volumen para ajustar el nivel de sonido.
- Selección de modo: Presione el MODO button to cycle through available sources: FM Radio, Bluetooth Audio, USB Playback, AUX Input.
- Pantalla del reloj: Presione el DIS Botón para mostrar la hora actual.
Funcionamiento de la radio FM:
- Prensa MODO hasta que aparezca "FM".
- Prensa BANDA/APS para seleccionar la banda FM1, FM2 o FM3.
- Presione el Adelante/Atras Botones para sintonizar frecuencias manualmente.
- Mantenga pulsado el Adelante/Atras buttons for automatic seek tuning.
- To store a station: Tune to the desired station, then press and hold one of the preset buttons (1-6) until you hear a beep.
- To recall a preset station: Briefly press the corresponding preset button (1-6).

Figura 4: The receiver's digital LCD display showing "87.5", indicating it is in FM Radio Mode and tuned to 87.5 MHz.
Operación de Bluetooth:
- Prensa MODO until "BT" or "Bluetooth" is displayed. The unit will enter pairing mode.
- En su dispositivo móvil, habilite Bluetooth y busque dispositivos disponibles.
- Select "SDX Audio" (or similar name) from the list. If prompted for a password, enter "0000".
- Una vez emparejado, puede transmitir audio desde su dispositivo al receptor.
- Llamadas manos libres: When a call comes in, the unit will display "CALL". Press the Respuesta button (green phone icon) to answer, or the Finalizar llamada button (red phone icon) to reject/end.
Reproducción USB:
- Inserte una unidad flash USB que contenga audio MP3 files into the dedicated USB playback port.
- The unit will automatically switch to USB mode and begin playing the first compatible track.
- Utilice el Adelante/Atras Botones para saltar pistas.
- Utilice el Reproducir/Pausa botón para pausar o reanudar la reproducción.
- The unit supports Repeat, Random, and Intro playback modes (refer to specific button functions on the unit).

Figura 5: Un primer plano view of the SDX Audio receiver's front panel, clearly labeling the "USB charging port" on the left and the "Music playback port" on the right. A smartphone is shown connected to the charging port, and a USB flash drive is inserted into the music playback port.
Entrada auxiliar:
- Connect an external audio device (e.g., MP3 player, smartphone) to the 3.5mm AUX-In jack on the front panel using an audio cable.
- Prensa MODO hasta que se muestre "AUX".
- Audio from the connected device will now play through the car speakers. Control playback from the external device.
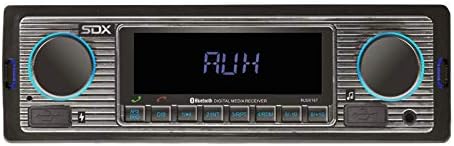
Figura 6: The receiver's digital LCD display showing "AUX", indicating it is in Auxiliary Input Mode, ready to receive audio from an external device.
Configuración de sonido:
- The unit features electronic control for Volume, Bass, Treble, Balance, and Fade.
- Preset EQ modes (FLAT, CLASSIC, ROCK, POP) are available for quick sound adjustments.
- Refer to the remote control or specific button combinations on the unit for accessing these settings.
Mantenimiento
To ensure the longevity and optimal performance of your SDX Audio receiver, follow these maintenance guidelines:
- Limpieza: Utilice un paño suave y seco para limpiar el panel frontal. Para la suciedad difícil, dampen the cloth slightly with water. Avoid using harsh chemicals, abrasive cleaners, or solvents.
- Conexiones: Revise periódicamente todas las conexiones del cableado para asegurarse de que estén seguras y libres de corrosión.
- Ambiente: Evite exponer la unidad a temperaturas extremas, alta humedad o luz solar directa durante períodos prolongados.
- Puertos USB: Mantenga los puertos USB libres de polvo y residuos.
Solución de problemas
If you encounter issues with your receiver, consult the following table before seeking professional service:
| Problema | Posible causa | Solución |
|---|---|---|
| Sin poder | Cableado incorrecto (alimentación/tierra), fusible quemado, problema con la batería del vehículo. | Check all power and ground connections. Inspect the fuse on the unit's wiring harness and replace if necessary. Verify vehicle battery voltage. |
| Sin sonido | Volume too low, Mute function active, incorrect speaker wiring, incorrect source selected. | Increase volume. Deactivate Mute. Check speaker connections. Ensure correct audio source (FM, BT, USB, AUX) is selected. |
| Bluetooth no se conecta | Unit not in pairing mode, device not discoverable, interference. | Ensure unit is in Bluetooth mode. Make sure Bluetooth is enabled on your mobile device and it's in pairing mode. Try restarting both devices. Clear previous pairings. |
| Error de reproducción USB | Sin soporte file format, corrupted USB drive, drive too large. | Asegurar files are in MP3 format. Try a different USB drive. Format the USB drive to FAT32. |
| Mala recepción de radio | Antena no conectada, antena dañada, área de señal débil. | Check antenna connection. Inspect antenna for damage. Try tuning to stronger stations or move to an area with better signal. |
Presupuesto
| Característica | Detalle |
|---|---|
| Número de modelo | RUSXi167 |
| Dimensiones del producto | 8.5 x 6.4 x 3.1 pulgadas |
| Peso del artículo | 1 libras |
| Tecnología de conectividad | Bluetooth, USB, Auxiliar |
| Potencia de salida | 100W (25W x 4CH) |
| Salida de carga USB | 5 V/1.5 A |
| Preajustes de radio FM | Estaciones 18 |
| Tipo de pantalla | LCD digital |
| Presets de ecualización | FLAT, CLASSIC, ROCK, POP |
| Micrófono | Built-in for Hands-free Calls |
Garantía y soporte
For warranty information and technical support, please contact SONDPEX customer service. Details regarding warranty coverage and duration are typically provided with your purchase documentation or can be found on the official SONDPEX websitio.
When contacting support, please have your product model number (RUSXi167) and purchase date available.
Para obtener más ayuda, visite el SONDPEX Store on Amazon.


