1. Producto terminadoview
The Radiolink R9DS is a 10-channel 2.4GHz RC receiver designed for reliable long-range control of various remote-controlled models, including airplanes, cars, and multirotors. It supports both PWM and SBUS signal outputs, offering flexibility for different control systems. Featuring DSSS&FHSS pseudo-random algorithm technology, the R9DS provides excellent anti-interference capabilities for stable operation.
Características principales
- Excelente antiinterferencia: Utiliza el algoritmo pseudoaleatorio DSSS y FHSS para una integridad de señal robusta.
- 9/10 Canales: Supports PWM/SBUS signal output, compatible with Radiolink AT9/AT9S/AT9S Pro/AT10/AT10II transmitters.
- Respuesta rápida: High resolution ratio of 4096 and stability of 0.5us ensure quick, low-latency connections.
- Control de largo alcance: Offers an outstanding control range of up to 2.1 miles in optimal environments.
- Quick to Bind and Anti-polarity Protection: No complex settings required for binding. Features reverse polarity protection to prevent damage from incorrect power connection.
2. Contenido del paquete
- 1 receptor Radiolink R9DS
3. Guía de configuración
3.1. Binding the R9DS Receiver
Follow these steps to bind your R9DS receiver with a compatible Radiolink transmitter:
- Place the transmitter and receiver close to each other, within 30-50 centimeters.
- Turn on the transmitter, then power on the R9DS receiver.
- Press the binding button on the R9DS receiver for 1 second and release. The LED indicator on the receiver will flash quickly during the binding process.
- For AT10II transmitters, ensure the SYSTEM channel selection is set to 10ch mode for proper operation.
Descripción del vídeo: This video demonstrates the correct procedure for binding the Radiolink R9DS receiver with your radio transmitter, ensuring a stable connection for your RC model.
3.2. Signal Output Modes (PWM/SBUS)
The R9DS receiver supports two signal output modes: PWM and SBUS. The mode is indicated by the color of the LED on the receiver.
- PWM (Red LED): Provides 9 channels of Pulse Width Modulation output.
- SBUS (Blue LED): Provides 10 channels of Serial Bus output.
To switch between modes, short press the binding button twice within one second. The LED color will change to indicate the active mode.

Descripción de la imagen: This image illustrates the two signal output modes of the R9DS receiver. The top diagram shows PWM output with 9 channels, indicated by a red LED. The bottom diagram shows SBUS output with 10 channels, indicated by a blue LED, along with the corresponding wiring for each mode.
3.3. Vol.tage Telemetry Connection
Para habilitar vol.tage telemetry and display your airplane's battery voltage on your transmitter screen, the R9DS receiver must be equipped with a telemetry module like the PRM-01 or PRM-03. Connect one end of the PRM-01 module to the telemetry port of the R9DS receiver, and the other end to the airplane's battery.

Descripción de la imagen: This diagram details the connection for voltage telemetry. It shows the R9DS receiver, a PRM-01 Telemetry Module, an ESC (Electronic Speed Controller), and an airplane battery, illustrating how to wire them to display external battery voltage on the transmitter.
Descripción del vídeo: This video demonstrates how to set up and view the telemetry data, specifically the airplane's battery voltage, directly on the screen of a Radiolink AT9S Pro transmitter using the R9DS receiver and a PRM-01 telemetry module.
4. Instrucciones de funcionamiento
4.1. Transmitter Channel Selection
When using the R9DS receiver with a 12-channel transmitter like the AT10II, it is crucial to set the transmitter's system channel selection to 10-channel mode. Failure to do so may result in improper functionality or unstable servo control.

Descripción de la imagen: This image displays the system menu of Radiolink AT9S Pro and AT10/AT10II transmitters, highlighting the 'CH-SELECT' option. It instructs users to set this option to '10CH' to ensure proper compatibility and operation with the R9DS receiver.
Descripción del vídeo: This video explains how to configure a Radiolink AT9S Pro transmitter to work correctly with a 12-channel receiver, demonstrating the necessary channel selection adjustments within the transmitter's system menu.
Descripción del vídeo: This video guides users on how to make a 10-channel receiver function properly with a 12-channel Radiolink AT10II transmitter, detailing the critical channel selection settings to ensure stable control.
4.2. Receiver Installation Guide
For optimal signal reception and range, ensure the receiver's antenna is kept straight and positioned away from metal objects or carbon fiber structures that could interfere with the signal. Secure the receiver firmly within your model to prevent movement during operation.

Descripción de la imagen: This image provides a visual guide for installing the R9DS receiver in an RC airplane. It emphasizes keeping the antenna straight and properly positioned for maximum signal reception and reliability.
5. Compatibilidad
5.1. Compatible Transmitters
The R9DS receiver is compatible with the following Radiolink transmitters:
- Radiolink AT9
- Radiolink AT9S
- Radiolink AT9S Pro
- Radiolink AT10
- Radioenlace AT10II
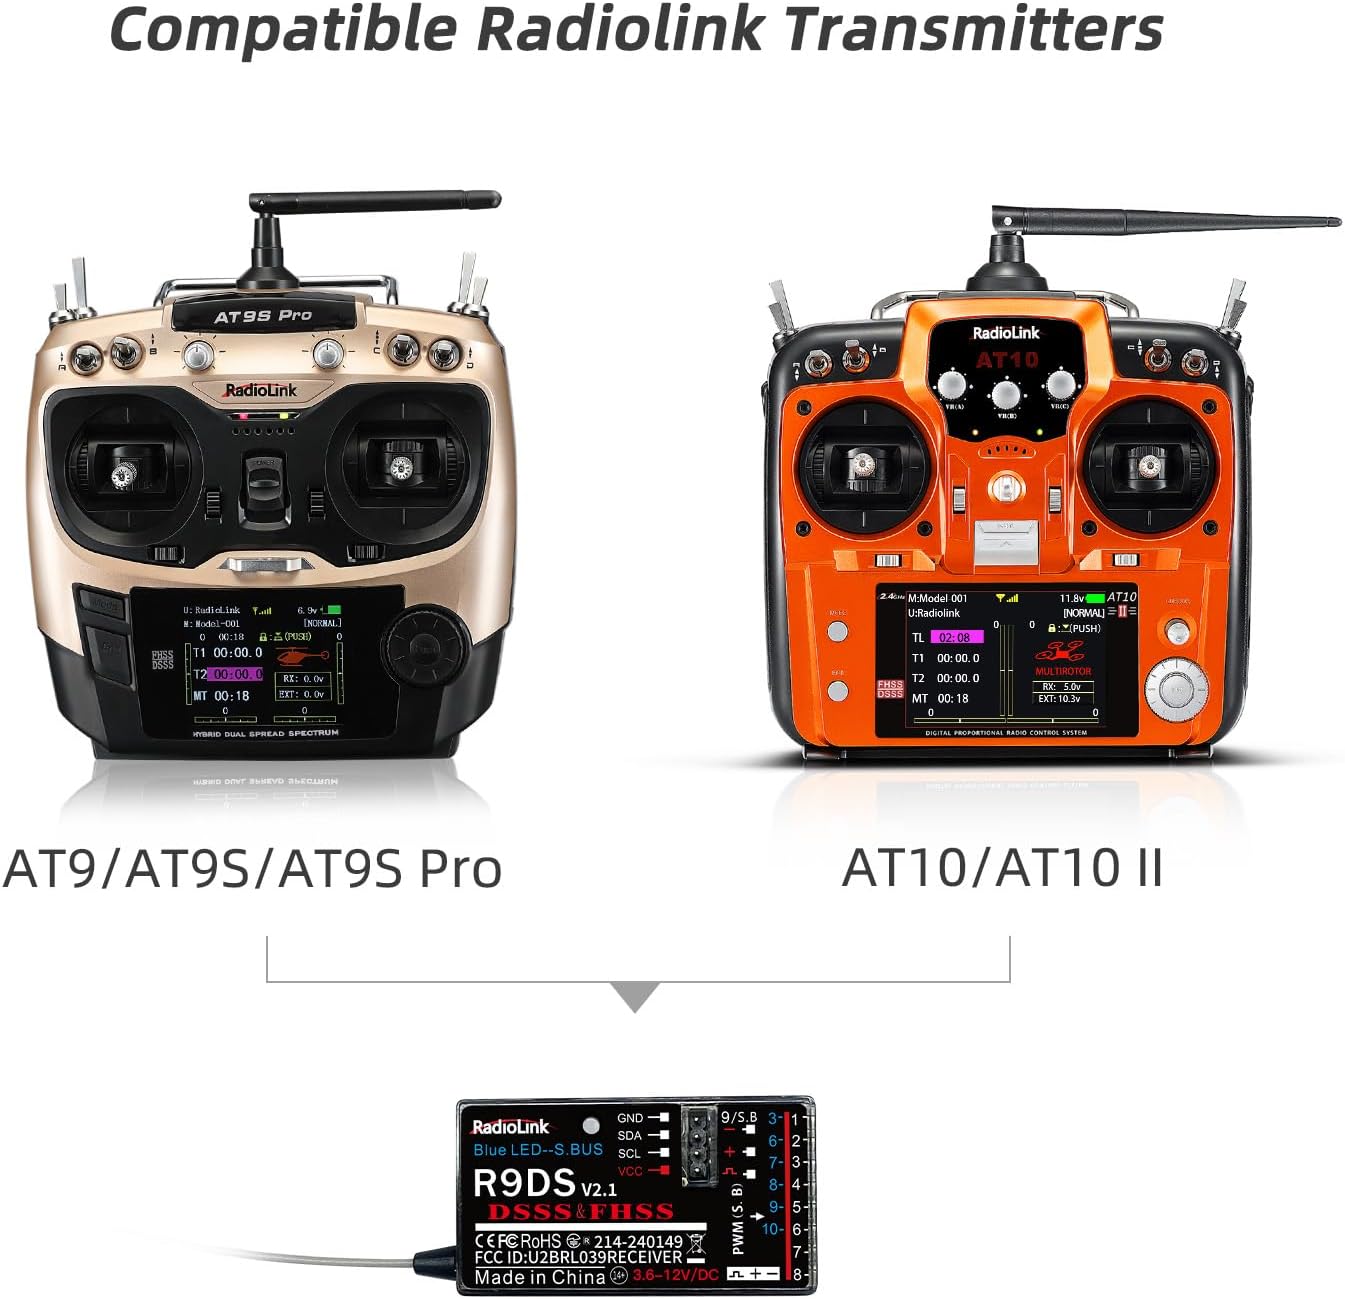
Descripción de la imagen: This image displays two compatible Radiolink transmitters, the AT9S Pro and the AT10/AT10II, highlighting their compatibility with the R9DS receiver for various RC applications.
5.2. Suitable Models
The R9DS receiver is suitable for a wide range of RC models, including:
- Aviones
- Coches
- Multirotors (Drones)
- Helicópteros
- Barcos

Descripción de la imagen: This image showcases a selection of RC models, including a helicopter, airplane, drone, car, and boat, all of which are suitable for use with the Radiolink R9DS receiver.
6. Especificaciones del producto
| Característica | Valor |
|---|---|
| Dimensiones del producto | 1.69 x 0.94 x 0.59 pulgadas |
| Peso del artículo | 0.352 onzas |
| Número de modelo del artículo | R9DS |
| Fabricante | Radiolink |
| Vol de funcionamientotage | 4.8-10V DC |
| Signal Output Modes | PWM (9 Channels) / SBUS (10 Channels) |
| Rango de control | Hasta 2.1 millas (dependiendo del entorno) |

Descripción de la imagen: Esta imagen proporciona una visión clara view of the R9DS receiver with its key dimensions labeled, showing its compact size for easy integration into various models.

Descripción de la imagen: A detailed comparison table showcasing various Radiolink receiver models, including the R9DS, with information on channels, signal output, voltage telemetry, control range, dimensions, weight, and compatible transmitters.
7. Cuidado y mantenimiento
- Mantenga el receptor seco y alejado de la humedad.
- Evite exponer el receptor a temperaturas extremas o a la luz solar directa.
- Regularly inspect antenna connections for any damage or loose contacts.
- Clean the receiver gently with a soft, dry cloth if necessary. Do not use harsh chemicals.
- Ensure proper ventilation when installed in a model to prevent overheating.
8. Consejos para solucionar problemas
- Sin problemas de señal/vinculación: Ensure the transmitter is powered on and the binding procedure is followed correctly (transmitter and receiver within 30-50cm). Check that the transmitter's RF mode is enabled and the channel selection matches the receiver (e.g., 10CH for R9DS).
- Unstable Servo Control: Verify that the transmitter's channel selection matches the receiver's capabilities. Incorrect channel settings can lead to erratic servo behavior.
- Sin datos de telemetría: Confirm that the PRM-01/PRM-03 telemetry module is correctly connected to both the R9DS receiver and the model's battery. Ensure the transmitter's firmware supports telemetry display.
- Rango reducido: Check for any obstructions or damage to the receiver's antenna. Ensure the antenna is positioned straight and away from carbon fiber or metal components.
- El receptor no se enciende: Check the power supply to the receiver. The R9DS operates between 4.8-10V DC. Ensure correct polarity; the receiver has anti-polarity protection but always double-check connections.
9. Garantía y atención al cliente
Radiolink products are manufactured to high-quality standards and are covered by a manufacturer's warranty against defects in materials and workmanship. For specific warranty details, technical assistance, or troubleshooting not covered in this manual, please refer to the official Radiolink website or contact Radiolink customer support directly. Online user instructions, FAQs, and troubleshooting resources are also available on the product's sales page.


