1. Introducción
This manual provides detailed instructions for the installation, operation, and maintenance of your Planet Audio AC1200.2 2-Channel Car Amplifier. The AC1200.2 is a Class A/B amplifier designed to deliver high output audio performance for your vehicle's sound system. Please read this manual thoroughly before attempting installation or operation to ensure proper use and to prevent damage.

Imagen 1.1: Frente view of the Planet Audio AC1200.2 2-Channel Car Ampmás duradero.
2. Información de seguridad
Instalación o uso incorrecto de este amplifier can result in serious injury or damage to the unit or vehicle. Always adhere to the following safety guidelines:
- Instalación profesional recomendada: For optimal performance and safety, professional installation by an authorized Planet Audio dealer is strongly recommended.
- Conexiones de energía: Ensure all power connections are secure and properly fused. Incorrect wiring can cause fire or electrical shock.
- Impedancia del altavoz: Verifique que la impedancia del altavoz coincida con la amplifier's specifications (2 Ohm stable). Connecting speakers with lower impedance can damage the ampmás duradero.
- Ventilación: Montar el ampColoque el ventilador en un lugar que permita una circulación de aire adecuada para evitar el sobrecalentamiento. No bloquee las aletas de refrigeración.
- Evite la humedad: No exponga el ampprotector contra la humedad o el agua.
- Desconecte la batería: Desconecte siempre el terminal negativo de la batería del vehículo antes de iniciar cualquier trabajo eléctrico.
3. Características del producto
El Planet Audio AC1200.2 amplifier incorporates several features designed for enhanced audio performance and reliability:
- Potencia de salida: Delivers 600 Watts Max x 2 @ 2 Ohms, 300 Watts Max x 2 @ 4 Ohms, and 1200 Watts Max Bridged x 1 @ 4 Ohms.
- Topología de clase A/B: Utilizes Class A/B amplifier design, balancing efficiency and sound quality.
- Full Range Operation: Capable of powering both full-range speakers and subwoofers.
- Control de ganancia variable: Allows adjustment of the input signal level to match the output of your head unit.
- Low & High Level Inputs: Supports both RCA (low-level) and speaker wire (high-level) input signals.
- Crossover de paso alto variable: Filters out low frequencies to protect speakers and improve sound clarity.
- Puenteable: Enables combining two amplifier channels for increased power output to a single speaker or subwoofer.
- Fuente de alimentación MOSFET: Features a robust MOSFET power supply for efficient and stable power delivery.
- 2 ohmios estables: Designed to operate safely with speaker loads down to 2 Ohms per channel.
- Protección corta: Built-in circuitry protects the amplifier from short circuits.
- Switchable Input Sensitivity: Provides flexibility for matching various head unit output levels.
- Control remoto del nivel del subwoofer: Allows convenient adjustment of subwoofer output from the driver's seat.

Fuente de alimentación MOSFET

Variable LP Filter

Refuerzo de graves variable

2 ohmios estable

Protección corta

Switchable Input Sensitivity

Remote Sub Control

Puenteable
4. Instalación
4.1 Lista de verificación previa a la instalación
- Asegúrese de que la batería del vehículo esté desconectada.
- Gather all necessary tools and wiring materials (power wire, ground wire, remote turn-on wire, speaker wire, RCA cables, fuse holder, fuse).
- Planificar el amplifier mounting location, ensuring adequate ventilation and protection from moisture.
4.2 Montaje del Ampmás vivaz
Choose a secure, dry location with sufficient airflow. Avoid mounting on carpet or in enclosed spaces without ventilation. Use the provided mounting hardware to secure the ampfije firmemente a una superficie sólida en el vehículo.
4.3 conexiones de cableado
Refer to the wiring diagram below for proper connection of power, ground, remote turn-on, and speaker wires.

Imagen 4.1: Másview of ampconexiones más duraderas.
4.3.1 Conexión de alimentación (+12 V)
- Connect a heavy gauge power cable (e.g., 4-gauge) directly from the positive terminal of the vehicle's battery to the +12V terminal on the ampmás duradero.
- Install an in-line fuse holder with an appropriate fuse (e.g., 75 Amps) within 18 inches (45 cm) of the battery.
4.3.2 Conexión a tierra (GND)
- Connect a heavy gauge ground cable (e.g., 4-gauge) from the GND terminal on the amplificador a una superficie metálica limpia y sin pintar del chasis del vehículo.
- Ensure the ground point is free of paint, rust, or dirt for a good electrical connection.
4.3.3 Conexión de encendido remoto (REM)
- Connect a smaller gauge wire (e.g., 18-gauge) from the remote turn-on output of your head unit to the REM terminal on the ampmás duradero.
- Este cable señala la ampLificador para encender y apagar con la unidad principal.
4.3.4 Conexiones de altavoces
- Connect your speakers to the SPEAKER CONNECTIONS terminals.
- For stereo operation, connect one speaker to the L+ and L- terminals and another to the R+ and R- terminals.
- For bridged mode (mono operation for a subwoofer), connect the subwoofer to the L+ and R- terminals. Ensure the subwoofer impedance is 4 Ohms for bridged mode.
4.3.5 Conexiones de entrada (RCA o de alto nivel)
- Entradas RCA (nivel bajo): Connect RCA cables from the head unit's RCA outputs to the INPUTS R and L jacks on the ampmás duradero.
- Entradas de alto nivel: If your head unit does not have RCA outputs, use the HIGH LEVEL INPUTS. Connect the speaker wires from the head unit to the corresponding terminals.
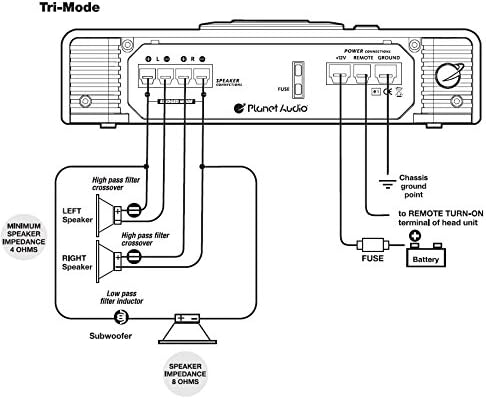
Image 4.2: Tri-Mode wiring diagram for speaker and subwoofer connections.
5. Controles operativos
The AC1200.2 amplifier features several controls for fine-tuning your audio system. These controls are located on the amplifier's input panel.

Imagen 5.1: Amplifier control panel showing input and crossover adjustments.
5.1 Controles de entrada
- SENSITIVITY (Gain Control): Esta perilla ajusta la sensibilidad de entrada del ampLificador para que coincida con el volumen de salidatage of your head unit. Start with the gain at minimum and slowly increase it until the desired volume is achieved without distortion. This is not a volume control.
- REFUERZO DE GRAVES: Adjusts the bass level at a specific frequency. Use sparingly to avoid distortion.
5.2 Controles de cruce
- MODE Switch (FULL/HPF/LPF): Selects the operating mode for the crossover filter.
- LLENO: La señal de audio de rango completo pasa.
- HPF (filtro de paso alto): Permite el paso de frecuencias superiores al punto de ajuste. Útil para altavoces de rango completo para evitar la distorsión de baja frecuencia.
- LPF (filtro de paso bajo): Permite el paso de frecuencias inferiores al punto de ajuste. Esencial para subwoofers.
- HIGH PASS FREQ: Adjusts the cutoff frequency for the High Pass Filter.
- LOW PASS FREQ: Adjusts the cutoff frequency for the Low Pass Filter.
5.3 Control remoto del nivel del subwoofer
The included remote subwoofer level control allows you to adjust the subwoofer output from your listening position. Connect it to the 'REMOTE SUBWOOFER LEVEL CONTROL' port on the amplificador utilizando el cable proporcionado.

Image 5.2: Remote Subwoofer Level Control unit.
6. Especificaciones
The following table outlines the technical specifications for the Planet Audio AC1200.2 ampmás duradero:
| Especificación | Valor |
|---|---|
| Dimensiones del artículo (largo x ancho x alto) | 12 x 10 x 2.4 pulgadas |
| Volumentage | 16 voltios |
| Tipo de montaje | Montaje en superficie |
| Número de canales | 2 |
| Potencia de salida | 1200 vatios (máximo) |
| Corriente de suministro | 75 Amps |
| Material | Aleación de aluminio |
| Peso del artículo | 7.5 libras |
| Color | Negro |
7. Solución de problemas
Si tiene problemas con su amplifier, consulte la siguiente guía de solución de problemas:
- Sin energía:
- Revise el fusible en línea cerca de la batería. Reemplácelo si está fundido.
- Verify all power, ground, and remote turn-on connections are secure and properly wired.
- Ensure the remote turn-on wire is receiving +12V from the head unit when it is on.
- Sin sonido:
- Confirmar el amplifier is powered on (power indicator light is illuminated).
- Check all RCA or high-level input connections from the head unit to the ampmás duradero.
- Verifique las conexiones de los cables de los altavoces en ambos amplifier y los altavoces.
- Adjust the gain control. Ensure it is not set to minimum.
- Check head unit settings (volume, fader, balance).
- Sonido distorsionado:
- Reduce the gain control setting. Excessive gain can cause distortion.
- Compruebe la impedancia de los altavoces. Asegúrese de que esté dentro de los límites amprango aceptable del lificador.
- Verifique que los cables de los altavoces no estén en cortocircuito ni toquen el chasis del vehículo.
- Adjust Bass Boost settings. High bass boost can cause distortion.
- Amplifier Overheating / Protection Mode:
- Asegúrese de que amplifier has adequate ventilation. Clear any obstructions around the cooling fins.
- Check speaker impedance. Running speakers below the minimum recommended impedance (e.g., below 2 Ohms stereo or 4 Ohms bridged) can cause overheating.
- Verifique que el calibre del cable de alimentación y de tierra sea suficiente para amppotencia de salida del amplificador.
- Reducir la configuración de ganancia.
8. Mantenimiento
To ensure the longevity and optimal performance of your Planet Audio AC1200.2 amplifier, siga estas sencillas pautas de mantenimiento:
- Limpieza: Limpie periódicamente el ampLimpie el exterior del elevador con un paño suave y seco. Evite el uso de productos químicos agresivos o limpiadores abrasivos.
- Ventilación: Compruebe periódicamente que el amplifier's cooling fins are free from dust, dirt, or obstructions. Ensure proper airflow around the unit.
- Comprobaciones de conexión: Occasionally inspect all wiring connections (power, ground, remote, speaker, RCA) to ensure they remain tight and free from corrosion.
- Protección ambiental: Mantener el amplifier away from direct sunlight, extreme temperatures, and moisture.
9. Garantía y soporte
Planet Audio ofrece una Garantía Platinum de distribuidor en línea de 6 años for this product when purchased through Amazon.com. This warranty covers defects in materials and workmanship under normal use.
For technical support, warranty claims, or further assistance, please contact Planet Audio customer service or visit their official website. It is recommended to have your purchase details and product model number (AC1200.2) available when seeking support.


