![]()
INSTRUCTION MANUAL
———- Duo-battery charging solar controller, For RVs, Caravans, and boats
———-EPIPDB-COM series
EPIPDB-COM 10A Duo Battery Charging Solar Controller

RATINGS (12/24VDC Auto)
EPIPDB-COM, 10A, 12/24VDC Auto
EPIPDB-COM, 20A, 12/24VDC Auto
NOTES: For use with solar panels only
TECHNICAL INFORMATION
| Setpoint | Sealed battery |
Gel battery |
Flooded battery |
| Equalize charging voltage | 14.6V | – | 14.8V |
| Boost charging voltage | 14.4V | 14.2V | 14.6V |
| Float charging voltage | 13.8V | 13.8V | 13.8V |
| Maximum solar voltage | 30V ( 12V System ) 55V ( 24V System ) |
||
| Battery voltage range | 8 15V | ||
| Boost time | 120 minutes | ||
| Self-consumption | 4mA at night. 10mA at charging | ||
| Meterbus connection | 8- PIN RJ-45 | ||
| Temp. compensation | -5mV/ c /2V | ||
| Terminals | 4mm2 | ||
| Temperature | -35 C +55 C | ||
| Net weight | 250g | ||
Note: all the data is for 12V, for 24V, please use 2x.
Major feature of duo-battery controller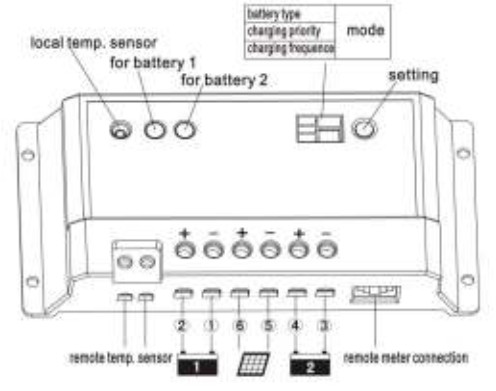
(Note: connect the components as the 1-6)
| Connect with the battery #1 | |
| Connect with the battery #2 | |
| Connect with the PV. |
Remote temp. sensor
A connection point for RTS(option) to remotely monitor battery temperature
Local temp. sensor
Measures ambient temperature. Battery regulation is adjusted accordingly
For battery 1
Provides charging & battery status and errors
For battery 2
Provides charging & battery status and errors
Remote meter connection
A communication port for the remote meter
Note: where is no RTS, the controller calculate the data which got from the local temp. sensor. The controller will come to RTS automatically when the RTS was connected.
SETTING MODE
![]()
Three leds flashing, each LED express different specifications, choose the LED first according to the following information, and then press the switch for 5 seconds until the number flashing, choose one number as you need, and leave it and the number you set will be saved.
- 1 st led is the battery type setting.
Number shows Battery type 1 Sealed battery 2 Gel battery 3 Flooded battery - nd 2 led is for charging priority, only set the percentage you want for battery #1, the controller will automatically calculate the rest for battery #2.
Number shows Battery #1 charging Battery # 2 charging 0 0% 100% 1 10% 90% 2 20% 80% 3 30% 70% 4 40% 60% 5 50% 50% 6 60% 40% 7 70% 30% 8 80% 20% 9 90%(pre-set) 10% Note: in the normal charging status, the controller will divide the charging as the setting. While battery #1 is fully charged, more charge current will be diverted to battery #2, and return to the setting charging automatically when the battery #1 is in low voltage.
When the controller detects there is only battery #1, all the charging will go to the battery #1 automatically. - rd 3. 3 led is for charging frequency.
Number shows PWM Charging frequency 0 25Hz(pre-set) 1 50Hz 2 100Hz
TROUBLESHOOTING
- LED blinking, short circuit, check the PV and battery, and make sure that they are in correct connection
- LED slowly flashing, fully charged
- LED ON, on charging
- LED frequent flashing, with battery, no charging
- LED OFF, no battery or over voltage
MECHANICAL DRAWING

Documents / Resources
 |
EPSOLAR EPIPDB-COM 10A Duo Battery Charging Solar Controller [pdf] Instruction Manual EPIPDB-COM 10A Duo Battery Charging Solar Controller, EPIPDB-COM 10A, Duo Battery Charging Solar Controller, Battery Charging Solar Controller, Charging Solar Controller, Solar Controller, Controller |


