emm Labs WiFi Connection Using AP Mode with Control App
Product Specifications
- A supported Wi-Fi adapter required
- USB port below network cable port for adapter installation
- Compatible with Realtek’s RTL8811AU, RTL8811CU, and RTL8812BU chipsets
- Manufacturer: EMM Labs / Meitner Audio
Product Usage Instructions
- Ensure a supported Wi-Fi adapter is installed in the USB port located below the network cable port.
- If you have changed the device name, it will appear instead of ‘ProductName’.
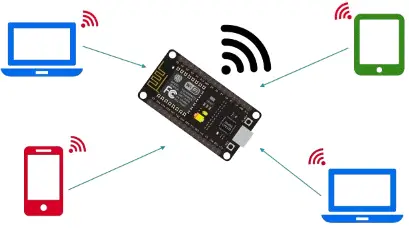
- Download and install the Mconnect Control app on your mobile device.
- Connect your mobile device to the same Wi-Fi network as the product.
- Open the Mconnect Control app and navigate to the Play to list.
- You should see the EMM Labs/Meitner product listed there.
- Once a Wi-Fi connection is established, the product will remember the network and automatically connect to it when powered on.
Note: The Wi-Fi adapter is not provided by EMM Labs/Meitner Audio. Make sure to use one of the supported adapter chipsets mentioned above.
For more detailed information and support, visit www.emmlabs.com.
AP mode Installation guide
Access Point (AP) mode allows for devices to be added to a secure home wireless network by connecting to the camera’s temporary access point using a Wi-Fi enabled device.
AP mode installation steps
Activate AP mode on the camera:
- Connect the camera’s AC adapter and plug it into a non-switched outlet. The camera’s LED illuminates red while it is booting up. If the standard power supply is too short to reach an outlet, see How do I extend the power supply of a camera?.
- Wait for the camera to finish its startup process. This should take approximately 2 minutes for most Alarm.com video cameras.
- Press and hold the camera’s WPS button for 5 to 7 seconds. Release the button immediately after the camera’s LED starts to flash white. For more information about the typical LED status indicators for Alarm.com video devices, see What does my camera’s LED light mean?.
Note: While holding the button, a blue LED flashes to indicate WPS mode, then a white LED flashes to indicate AP mode.
Connect the camera to the Wi-Fi network:
- Using a computer, smartphone, or tablet, connect to the Wi-Fi network named ALARM (##:##:##). The numbers in parentheses are the last six digits of the camera’s MAC address.
- On the same device, open a web browser and enter the web address for the video device being connected (e.g., http://v723install or http://522irinstall) or 192.168.1.1 in the address bar. Follow the on-screen instructions to add the camera to the Wi-Fi network. The user interface and steps vary between video devices.

- Click to select the desired language.
- Click Scan for Wi-Fi Networks.
- Click to select the user’s Wi-Fi network. The Wi-Fi name automatically populates in the SSID field.
- In Security Key, enter the password of the Wi-Fi network. This is case-sensitive.
- Click Save.
- Once the video device’s status LED turns solid green, begin enrollment. If the video device status LED does not turn solid green, double-check the Wi-Fi name and password and try again or, for alternative connection options, see Connect the video device to an internet network.
User interface version two
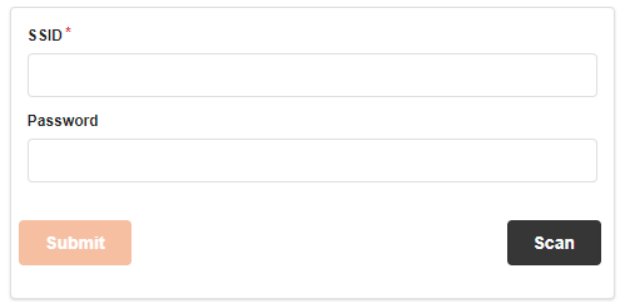
- Click Scan.
- Click to select the desired network. The Wi-Fi name automatically populates in the SSID field.
- In the Password field, enter the password of the Wi-Fi network. This is case-sensitive.
- Click Submit.
- Once the video device’s status LED turns solid green, begin enrollment. If the video device status LED does not turn solid green, double-check the Wi-Fi name and password and try again, or for alternative connection options, see Connect the video device to an internet network.
Enroll the camera to the customer account:
Once the video camera is connected to the Wi-Fi, follow the on-screen associate the camera to the customer’s account using the Customer app Video Installation Wizard, Customer Website (www.alarm.com/addcamera), or MobileTech app. For more information about the Video Installation Wizard, see
- https://answers.alarm.com-Partner-Installation-and-Troubleshooting-Video-Devices-General-Video-Information-AP-mode-I…
- Updated: Thu, 31 Oct 2024 13:52:28 GMT
FAQs
Q: Can I use any Wi-Fi adapter with the product?
A: No, the product requires a supported Wi-Fi adapter with specific chipsets such as Realtek’s RTL8811AU, RTL8811CU, or RTL8812BU.
Q: How do I change the device name?
A: You can change the device name through the settings of the Mconnect Control app on your mobile device.
Q: What should I do if the product does not connect to the Wi-Fi network?
A: Ensure that the Wi-Fi adapter is properly installed, and both your mobile device and the product are connected to the same Wi-Fi network. You can also try restarting both devices.
Documents / Resources
 |
emm Labs WiFi Connection Using AP Mode with Control App [pdf] User Guide WiFi Connection Using AP Mode with Control App, Using AP Mode with Control App, Mode with Control App, Control App |