ELPRO LIBERO Gx Wireless Real Time Data Logger
Instruction Manual
![]()
![]()
LIBERO Gx
Operation Manual

1 Safety Instructions
Intended Use
All electrical devices produced by ELPRO are intended for commercial use (,,business to business”).
Environmental Conditions
Temperature
Temperatures outside of operation range may damage the battery. For the operation range see specifications on www.elpro.com.
Water/Humidity
Limited protection against dust ingress and protected against splash water from any direction.
Pressure
Overpressure or vacuum can damage the device. Do not vacuum if used for airfreight.
Mechanical Force
Avoid violent knocks and blows. Avoid violent knocks and blows.
IR radiation
Avoid exposure to IR radiation (heat and superheated steam can result in deformation of the case).
Microwave
Do not expose to microwave radiation (risk of battery explosion).
X-ray
Avoid long-term exposure to X-ray (risk of harm to device). Tests of short x-ray exposures as part of transportation processes (airports, customs) have been performed and documented (available at ELPRO).
Battery
Do not remove or exchange battery. Material safety data sheet according to provisions of directive 91/155/EEC and shipping information are available from ELPRO. Do not subject the batteries to mechanical stress nor dismantle them. The leaking battery fluid is highly corrosive and can generate severe heat when it comes into contact with moisture or it can ignite fire.
Safe Use
Ordinary people may install and operate the device without further safeguards.
Radio Equipment
This equipment emits radiated power: LTE Bands 1, 2, 3, 4, 5, 8, 12, 13, 14, 17, 18, 19, 20, 25, 26, 28, 66 maximum power: 23 dBm
ELPRO-BUCHS AG
Langaeulistrasse 45
9470 Buchs SG
Switzerland
2 Quick Start

3 System Overview
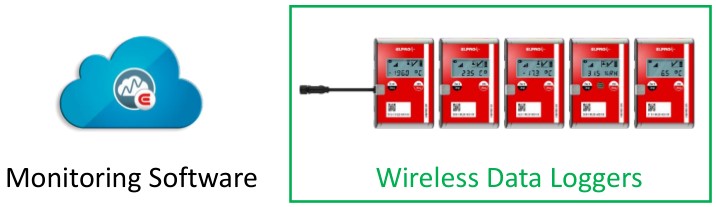
The LIBERO Gx realtime data logger family described in this document are used for temperature monitoring. The measured values are transmitted via the cellular network to a monitoring software (ELPRO Cloud) which stores and analyzes the data, provides alerts if alarm limits are violated, and generates reports. The system provides superior visibility and transparency in meeting GxP requirements. The sensor-based monitoring software is easily accessible via a web browser and is also used to configure the devices.
The following pages cover the key functionality of the Wireless data logger (LIBERO GS/GL/GF/GH/GE) For more detailed software support, please visit our online knowledge base: https://www.elpro.cloud/support/elpro-cloud
3.1 LIBERO Gx Types
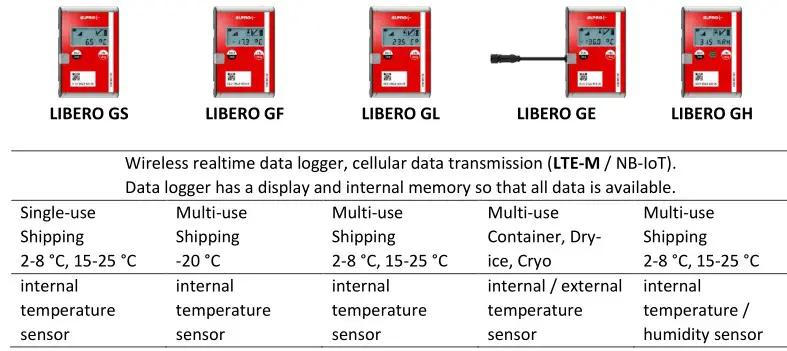
For technical specifications: please go to www.elpro.com/liberog
4 Functionality and Modes
Unless otherwise noted the following information applies equally to all three LIBERO models. After configuration of the data logger measured values for temperature and relative humidity (LIBERO CH only) are recorded, stored and evaluated with regard to the defined alarm criteria. The display shows the current mode.
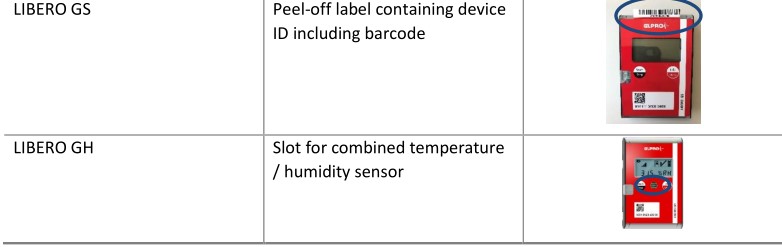
4.1 Elements
4.1.1 Generic elements
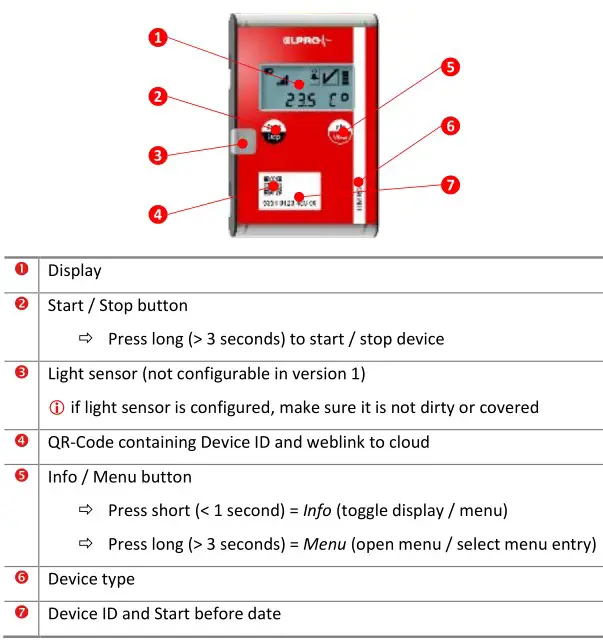
4.1.2 Specific elements
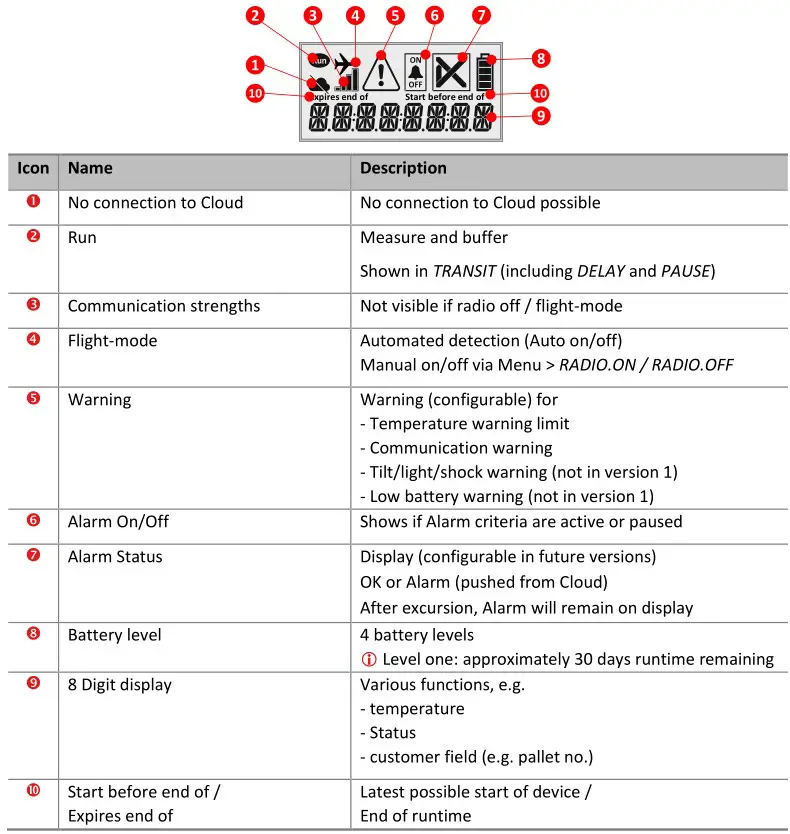
4.2 Display
4.3 States
LIBERO Gx devices are mainly used to monitor temperature sensitive products through the entire supply chain. The device has various configuration options available. The device states are visualized below and further described in subsequent chapters. The workflow options may vary depending from configuration and device type (e.g. single use).

4.3.1 Shelf life
When delivered, the device is in SHELFLIFE.
- In this state, the device is not transmitting and the display is switched off.
- By pressing the Info button (shortly), the battery level as well as the Start before Date / Expiry
- Date are visible By pressing the Start/Stop button for 3 seconds, the device will activate communication
4.3.2 Configuration
In the CONFIG mode the device connects immediately to the cloud to retrieve a configuration. The display shows CONFIG.
- When entering this state, the device communicates in a higher frequency for the first 30 minutes
- After the receipt of the configuration the device enters START mode immediately
- By pressing the Info button the Start before Date / Expiry Date are visible
4.3.3 Start
When the display shows START, the device is configured properly and can be started according to the chosen start option.
- By pressing the Info button the Profile information / configured info field / Start before Date / Expiry Date are visible
- By pressing the Start/Stop button, the device starts logging (TRANSIT or DELAY). The RUN icon on the display indicates a successful start.
- the Start/Stop button is inactive for 2 minutes after start
- to reconfigure a device, delete the sensor in the cloud and reset the device
4.3.4 Delay
Depending on the activation mode, the device will enter into DELAY or TRANSIT.
- The display indicates the DELAY mode by showing DELAY.
- if DELAY mode “press button to activate alarm limits” is configured, the display shows DELAY
- if DELAY mode “time delay” is configured, the display shows the remaining time
- By pressing the Info button the actual measurement value / configured info field are visible
4.3.5 Transit
In TRANSIT, the alarm limits are activated (if configured). The Alarm on/off icon appears (Alarm on).
- By pressing the Start/Stop button, the device enters ARRIVED mode. The RUN icon on the display disappears.
- Ensure to pack the device as such that the start / stop button is not pressed accidentally
- By pressing the Info button the second measurement value (for LIBERO GH/GE) / configured info field are visible
4.3.6 Pause
When the alarm limits are deactivated, the device will enter PAUSE mode. The Alarm on/off icon changes to Alarm off. The device remains logging and transmitting.
- By pressing the Info button the second measurement value (for LIBERO GH/GE) / configured info field are visible
4.3.7 Arrived
After terminating the TRANSIT mode, the device will enter ARRIVED mode. The RUN icon on the display disappears. The device will still log and communicate (interval 2 hours) for 72 hours or until stopped.
- By pressing the Start/Stop button, the device enters STOP mode.
- By pressing the Info button the measurement values / configured info field / Expiry Date are visible
4.3.8 Stop
In STOP mode, the device will not log any measurement data. The device communicates at a reduced interval (12 hours) for 24 hours.
- By pressing the Info button the configured info field / Expiry Date are visible
- By pressing the Menu button, the following menu options are available (select by pressing Menu button):
4.3.9 Sleep
After stop, the device is in SLEEP mode.
- In this state, the device is not transmitting and the display is switched off.
- By pressing the Info button (shortly), the battery level as well as the Expiry Date are visible
- By pressing the Start/Stop button for 3 seconds, the device will activate communication and enter STOP mode.
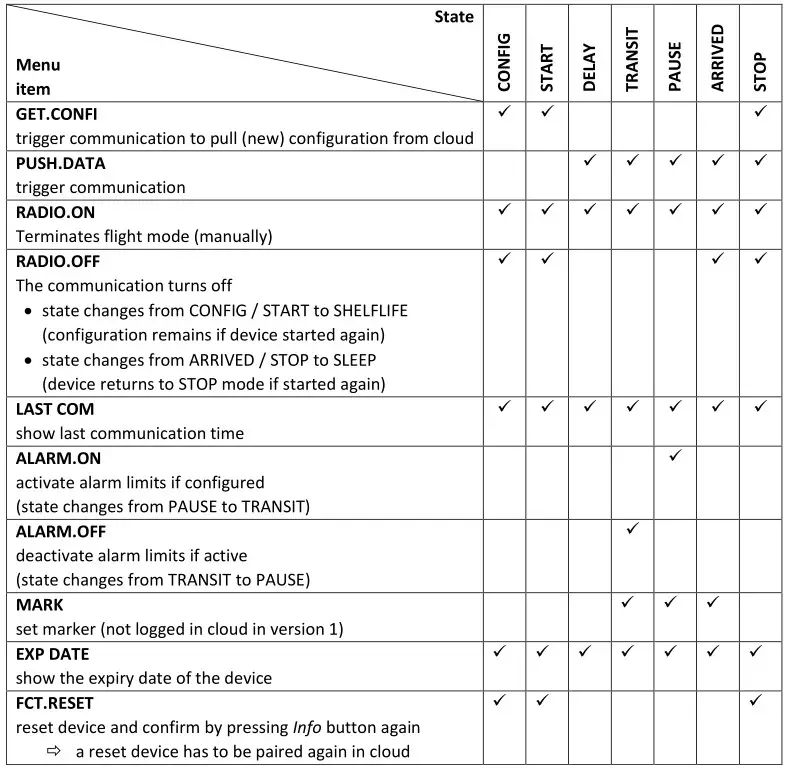
The LIBERO G family feature a menu to operate the device:
- To enter the menu, press the Menu button for at least three seconds
- To switch between the menu options, press the Info button shortly
- To select a menu item, press the Menu button for at least three seconds. To confirm, a selected menu item blinks once.
- the menu item FCT.RESET hast to be confirmed by pressing the Info button again shortly
- to leave the menu
- wait for 5 seconds
- press the Start/Stop button
- select the last menu item EXIT
All menu items and its availability are described in the table below (now menu available in SHELFLIFE / SLEEP mode)
5 Further instructions
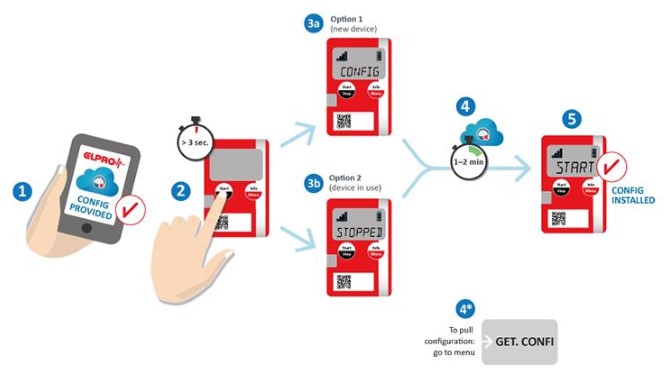
5.1 Pairing procedure
5.2 Start before Date / Expiry Date
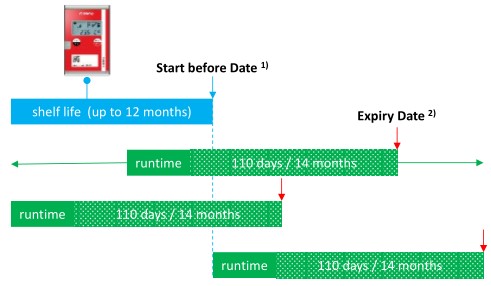
1) The Start before Date indicates the latest possible start of the device. The date (MMM/yyyy) is visible on the device label or via the display (before first device start)
⇒ Device cannot be started afterwards (for Multi use devices: only applicable to initial start)
2) The Expiry Date indicates the end of the runtime of the device. The date (MMM/yyyy) is visible via the display (> Menu) or in the Cloud. The runtime is calculated from the initial start date.
⇒ Device stops automatically (logging and communication)
6 Accessories
6.1 Bracket
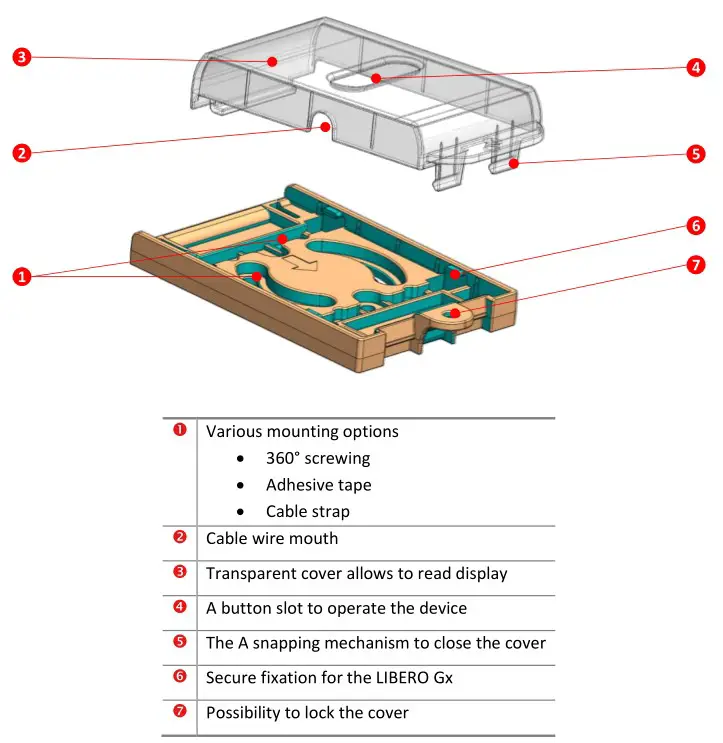
ELPRO offers an optional bracket (BRA_LIBERO Gx (part number 802286)) for mounting of data loggers if required, i.e. to containers for cryogenic applications. The bracket is made of solid ABS plastic to protect the data logger but not influence the communication. It consists of an upper and a lower part. The LIBERO is inserted into the lower holder from above.
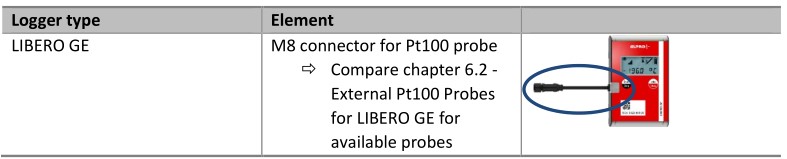
6.2 External Pt100 Probes for LIBERO GE
LIBERO GE can be used for different applications, depending on the sensor element. ELPRO offers standard probes for three main applications:
- Cryogenic shipments and storage
- Dry ice shipments and storage
- Freezer (-25 °C..-15°C, typical) / fridge (+2 °C..+8 °C) / ambient (+15 °C..+25 °C) shipments and storage
- to ensure correct measurement values, do only use external sensor elements provided by ELPRO
6.2.1 Cryogenic shipments and storage
For cryogenic applications the LIBERO GE is usually mounted directly to the container or the container lid, using the optionally available bracket with the sensor leading into the tank. ELPRO offers an easy, turnkey service for mounting the assembly and calibration.
ELPRO offers two Pt100 standard probes for cryogenic applications with M8 connector in different lengths:


6.2.2 Dry ice shipments and storage
Also in dry ice applications, the LIBERO GE is usually attached to the outside of the container using the optionally available bracket and the sensor leads into the tank. ELPRO offers an easy, turnkey service for mounting the assembly and calibration.
For this application, ELPRO offers two standard probes with a probe length of 10 cm and Teflon cable in different lengths:


6.2.3 Freezer / fridge / ambient shipments and storage
For temperature monitoring of freezers, refrigerators or rooms, ELPRO offers two waterproof silicon Pt100 probes with different cable lengths as standard articles:


6.3 Extension of sensor cables
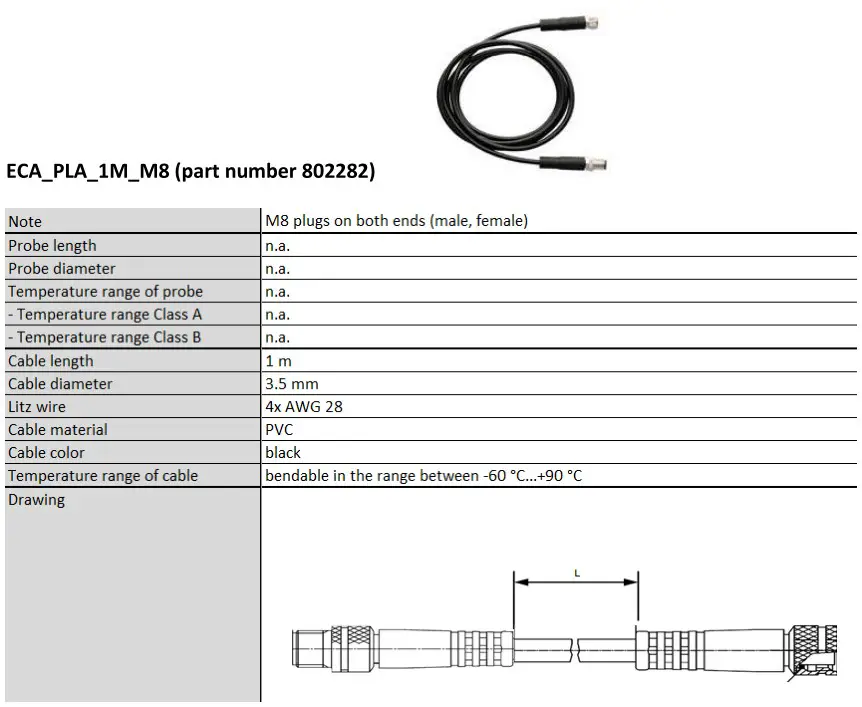
An extension cable with two M8 connectors at a length of 1m is also available to attach the data logger and the probe.
ATTENTION:
Total cable length (including sensor and cable tail on the data logger) must not exceed 3 m!
6.4 M8 connector incl. mounting service on Pt100 probe
ELPRO offers a mounting service, adding an M8 connector to a Pt100 temperature sensor in order to use any 4-wire Pt100 probe in combination with LIBERO CE.

7 Disposal
a) Device
![]() Electronic devices are recyclable and do not belong in the household waste. Dispose of the product at the end of its service life in accordance with applicable laws. Remove any batteries and dispose of them separately from the product.
Electronic devices are recyclable and do not belong in the household waste. Dispose of the product at the end of its service life in accordance with applicable laws. Remove any batteries and dispose of them separately from the product.
b) Batteries
![]() You are legally obliged to dispose of all used batteries according to applicable laws; disposal via household waste is prohibited. Batteries are marked with the adjacent symbol, under which is printed the chemical symbol for the heavy metal (Cd = cadmium, Hg = mercury, Pb = lead). This indicates the battery contains hazardous material. You can dispose of used batteries at collection points in your local community. Please help protect our environment and dispose of batteries properly.
You are legally obliged to dispose of all used batteries according to applicable laws; disposal via household waste is prohibited. Batteries are marked with the adjacent symbol, under which is printed the chemical symbol for the heavy metal (Cd = cadmium, Hg = mercury, Pb = lead). This indicates the battery contains hazardous material. You can dispose of used batteries at collection points in your local community. Please help protect our environment and dispose of batteries properly.
8 Declaration of Conformity
8.1 EU Declaration
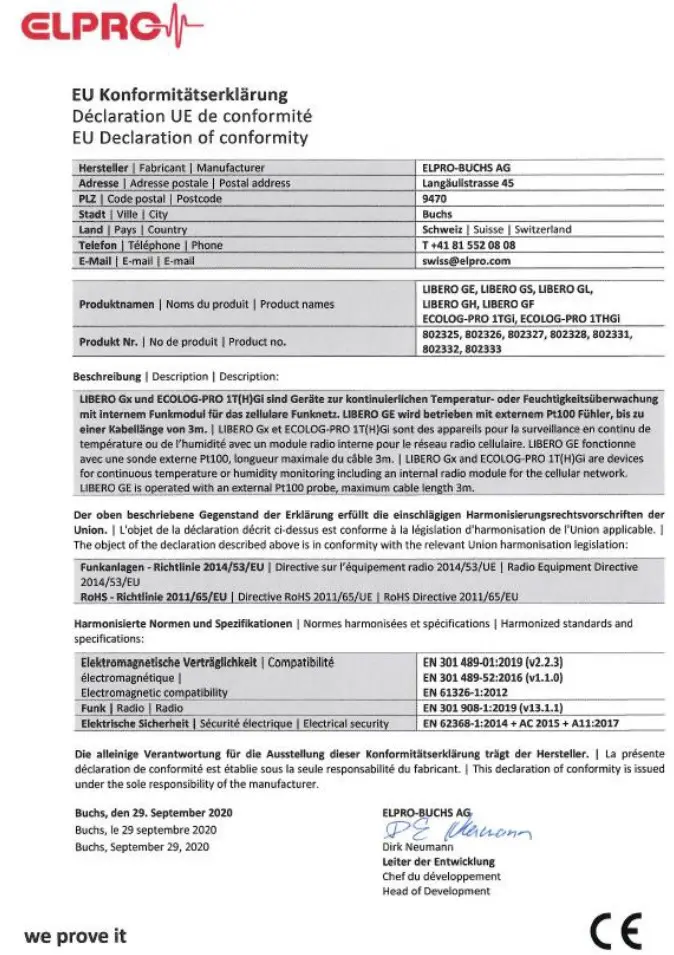
![]()
8.2 FCC/ISED Regulatory notices

9 Revision History

![]()
![]() ELPRO-BUCHS AG
ELPRO-BUCHS AG
Langäulistrasse 45
9470 Buchs
SWITZERLAND
E-Mail: swiss@elpro.com
For local agencies see:
www.elpro.com
Documents / Resources
 |
ELPRO LIBERO Gx Wireless Real Time Data Logger [pdf] Instruction Manual LIBERO Gx Wireless Real Time Data Logger, LIBERO Gx, Wireless Real Time Data Logger, Real Time Data Logger, Time Data Logger, Data Logger |
 |
ELPRO LIBERO Gx Wireless Real Time Data Logger [pdf] Instruction Manual LIBERO Gx Wireless Real Time Data Logger, LIBERO Gx, Wireless Real Time Data Logger, Real Time Data Logger, Time Data Logger, Data Logger, Logger |