Elitech GSP-6 Pro Bluetooth Temperature and Humidity Data Logger Recorder

Overview
- GSP-6 Pro is temperature and humidity data logger with external probe. It features with a large LCD Screen, audible-visual alarm, auto shortened interval for alarms and other functions; its built-in magnets are also easy for mounting during usages.
- It can be used to record the temperature/humidity of medicines, chemicals, and other goods during storage, transportation and in each phase of the cold chain including cooler bags, cooling cabinets, medicine cabinets, refrigerators and laboratories.
- LED Indicator
- LCD Screen
- Button
- Type-C Port
- Temperature-Humidity Probe
- Glycol Bottle Probe (optional)

Specifications
| Model | GSP-6 Pro | GSP-6Pro Gle |
| Temperature Measurement Range | -40°C~+85°C (-40°F~185°F) | |
| Temperature Accuracy | ±0.3°C/±0.6°F (-20°C~+40°C), ±0.5°C/±0.9°F (others) | |
| Humidity Measurement Range | 0%RH~100%RH | |
| Humidity Accuracy | ±3%RH (25°C, 20%RH ~ 80%RH), ±5%RH (others) | |
| Resolution | 0.1°C/°F; 0.1%RH | |
| Memory | Maximum 100,000 points | |
| Logging Interval | 10 seconds to 24 hours | |
| Data Interface | Type-C | |
| Start Mode | Press button; Use software | |
| Stop Mode | Press button; Auto-stop; Use software | |
| Software | ElitechLog, for macOS & Windows system | |
| Report Format | PDF/EXCEL/TXT* via ElitechLog software, TXT for Windows ONLY | |
| Power | 1.5V AA battery (14505)/ TypeC (Non rechargeable) | |
| Shelf Life | 2 years | |
| Certification | CE,FCC,WEEE | |
| External Probe | Temperature-humidity probe | glycol bottle probe (optional) |
| Dimensions | 118.8 x 64.6 x 19.6 mm | |
| Weight | 130g | |
The glycol bottle contains 8ml propylene glycol.
Operation
- Activate Logger
Pull out the battery insulator strip
- Install Probe(the probe must be plugged into the port on the right side)
Please install the probes to the corresponding jacks, details are shown below:
- Install Software
Please download and install the ElitechLog software (macOS and Windows) from Elitech US: www.elitechustore.com/pages/download or Elitech UK: www.elitechonline.co.uk/software or Elitech BR: www.elitechbrasil.com.br. - Configure Parameters
First, connect the data logger to the computer via USB cable, wait until the icon shows on the LCD, then configure via:
Software:
If you do not need to change the default parameters (in Appendix); please click Quick Reset under Summary menu to synchronize local time before usage;
If you need to change the parameters, please click the Parameter menu, enter your preferred values, and click the Save Parameter button to complete the configuration.
Warning! For first time user or after battery replacement:
To avoid time or time zone errors, please make sure you click Quick Reset or Save Parameter before usage to configure your local time into the logger. Note: The parameter of Interval Shortened is disabled by default. If you set it to Enable, it will auto shorted the logging interval to once per minute if it exceeds temperature/humidity limit(s). - Start Logging
Press Button: Press and hold the button for 5 seconds until the icon shows on the LCD, indicating the logger starts logging.
Note: If the icon keeps flashing, it means the logger configured with start delay; it will start logging after the set delay time elapses.
 - Stop Logging
Press Button*: Press and hold the button for 5 seconds until the icon shows on the LCD, indicating the logger stops logging.
Auto Stop: When the logging points reach the maximum memory, the logger will stop automatically.
Use Software: Connect the logger to your computer; open software, click Summary menu and Stop Logging button.
Note:*Default stop is via Press Button, if set as disabled, the button stop function will be invalid; please open the ElitechLog software and click Stop Logging button to stop it. - Download Data
Connect the data logger to your computer via USB cable, and wait until the icon shows on the LCD, then download data via:
ElitechLog Software: The logger will auto-upload data to ElitechLog, then please click Export to select your desired file format to export.
If data failed for auto-upload, please manually click Download and then repeat above operation. - Reuse the Logger
To reuse a logger, please stopped it first; then connect it to your computer and use software to save or export the data. Next, reconfigure the logger by repeating the operations in 4. Configure Parameters*.
After finished, follow 5. Start Logging to restart the logger for new logging.
Warning! * To make space for new loggings, all previous logging data inside the logger will be deleted after re-configuration. If you forgot to save/export data, please try to locate the logger in the History menu of software.
App operation instruction can visit www.elitechlog.com
APP Operation Instructions
Bluetooth Function Indicator
If![]() flashing ,representing waiting for Bluetooth connection,
flashing ,representing waiting for Bluetooth connection,![]() If constant light indicates that Bluetooth is connected。
If constant light indicates that Bluetooth is connected。
Install Software
The mobile phone can download the “Elitech iCold” app through the Google Play/App Store app store. After installation, you can register an app account to use it, or you don’t need to register an account. Simply click on “Bluetooth Data Logger” to immediately enter the configuration parameters page.
Modify Parameters
- Click on the top left corner
 ,Select Bluetooth Data Logger
- Click on the device corresponding to the SN code

- The first use requires configuring parameters (time zone, recording interval, upper and lower limits of temperature and humidity). After confirming the parameters, click “Save” in the upper right corner to complete the parameter configuration (Configuration can only be done in an unrecorded state, otherwise it will directly jump to the data list interface)

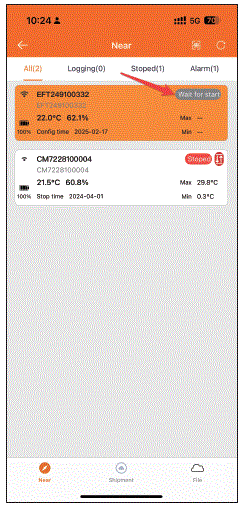
- After successful parameter configuration, the device status displays “Wait for start”

- Long press the GSP-6Pro Home button for 5 seconds, wait for the device status to change from “Wait for start” to “Logging”, and the device will start recording data

Data viewing
- Click on the top right corner of the nearby menu
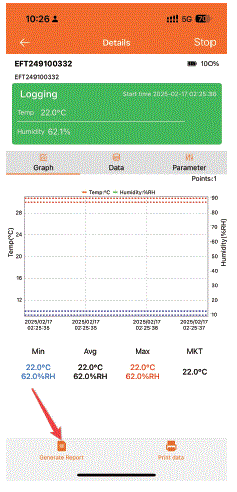
 Refresh device list .Click the Data Logger button, the device list will be highlighted and the device will be topped up. Click on the device to select the option to read data
- After completing the data reading, click on the top right corner
 Can stop recording. Click on the data menu to view a detailed data list (when there is too much data, it may take 1-2 minutes to read), click on the generate report below to generate a data report in the required format (Supports PDF); Click to print and print the data list through the matching Bluetooth printer
Status Indication
Button
| Operation | Press and hold the button for 5 seconds | Press and release the button |
| Function | Start/Stop logging | Check/Switch interfaces |
LCD Screen
- Stopped
- Logging
- Circular Logging
- Over Limit Alarm
- Bluetooth
- Battery Level
- Alarm state
- Max/Min/MKT/Average Values
- Connected to PC
- High/Low Temperature Limit
- High/Low Temperature/Humidity Limit
- Current Time
- Logging Points
- Month-Day
LCD Interface
- Temperature (Humidity); (Humidity);

- Maximum, Current Time

- Minimum, Current Date

- High Alarm Limit

- Low Alarm Limit

- Average

- Probe Not Connected

The display of maximum and minimum values can be set through the APP to display continuously for 1 to 15 days or record the entire process
Buttons-LCD-LED Indication
To enable buzzer function, please open ElitechLog software and go
Battery Replacement
- Open the battery cover, Remove the old battery.
- Install a new dry battery into the battery compartment.
- Close the battery cover.

What’s Included
- Data Logger x 1
- Probe x 1
- 1.5V AA battery(14505) x 1
- USB Cable x 1
- User Manual x 1
Warning
- Please store your logger at room temperature.
- Please pull out the battery insulator strip in the battery compartment before using.
- If you use the logger for the first time, please use software to synchronize system time and configure parameters.
- Do not Remove the battery if the logger is recording.
- The LCD screen will be auto off after 15 seconds of inactivity (by default). Press the button again to turn on the screen.
- Any parameter configuration on software will delete all logged data inside the logger. Please save data before you apply any new configurations.
- To ensure the humidity accuracy, please avoid contact with unstable chemical solvents or compounds, especially avoid long-term storage or exposure to the environments with high concentrations of ketene, acetone, ethanol, isopropanol, toluene etc.
- Do not use the logger for long-distance transport if the battery icon is less than half as

- The glycol filled bottle probe can be considered as a thermal buffer that can simulate the actual temperature variations inside, which is suitable for vaccine, medical or similar scenarios.
Frequently Asked Questions
Can the logging interval be adjusted?
Yes, the logging interval can be set between 10 seconds to 24 hours through the software.
What is the purpose of the Glycol Bottle Probe?
The Glycol Bottle Probe is optional and can be used to simulate temperature-sensitive products for more accurate temperature monitoring.
How do I mount the GSP-6 Pro during usage?
The GSP-6 Pro comes with built-in magnets for easy mounting on surfaces during usage.
What type of batteries does the GSP-6 Pro use?
The GSP-6 Pro uses a 1.5V AA battery or Type-C non-rechargeable battery.
Where can I download the ElitechLog software?
You can download the ElitechLog software from Elitech's official websites based on your region.
Documents / Resources
 |
Elitech GSP-6 Pro Bluetooth Temperature and Humidity Data Logger Recorder [pdf] Instruction Manual GSP-6 Pro, GSP-6Pro Gle, GSP-6 Pro Bluetooth Temperature and Humidity Data Logger Recorder, GSP-6 Pro, Bluetooth Temperature and Humidity Data Logger Recorder, Temperature and Humidity Data Logger Recorder, Humidity Data Logger Recorder, Data Logger Recorder, Logger Recorder |
