![]()

ABX00087 Πλακέτα ανάπτυξης WiFi UNO R4
Cricket Shot Recognition using Arduino UNO R4 WiFi + ADXL345 + Edge
Ωθηση
This document provides a complete workflow for building a cricket shot recognition system using Arduino UNO R4 WiFi with an ADXL345 accelerometer and Edge Impulse Studio. The project involves collecting accelerometer data, training a machine learning model, and deploying the trained model back to the Arduino for real-time shot classification.
Cricket shots considered in this project:
– Cover Drive
– Straight Drive
– Pull Shot
Βήμα 1: Απαιτήσεις υλικού
– Arduino UNO R4 WiFi
– ADXL345 Accelerometer (I2C)
– Jumper wires
– Breadboard (optional)
– Καλώδιο USB Type-C
Βήμα 2: Απαιτήσεις λογισμικού
– Arduino IDE (latest)
– Edge Impulse Studio account (free)
– Edge Impulse CLI tools (Node.js required)
– Adafruit ADXL345 library
Step 3: Wiring the ADXL345
Connect the ADXL345 sensor to the Arduino UNO R4 WiFi as follows:
VCC → 3.3V
Γείωση → Γείωση
SDA → SDA (A4)
SCL → SCL (A5)
CS → 3.3V (optional, for I2C mode)
SDO → floating or GND
Step 4: Make IDE Sensor Ready
Πώς να εγκαταστήσετε βιβλιοθήκες αισθητήρων στο Arduino IDE;
Άνοιγμα του Arduino IDE
Open Tools → Manage Libraries… and install: Adafruit ADXL345 Unified Adafruit Unified Sensor
(If you have LSM6DSO or MPU6050 instead: install SparkFun LSM6DSO , Adafruit LSM6DS or MPU6050 accordingly.)
Step 5: Arduino Sketch for Data Collection
Upload this sketch to your Arduino UNO R4 WiFi. It streams accelerometer data in CSV format (x,y,z) at ~18 Hz for Edge Impulse.
#συμπεριλαμβάνω
#include <Adafruit_ADXL345_U.h>
Adafruit_ADXL345_Unified accel =
Adafruit_ADXL345_Unified(12345);
void setup() {
Serial.begin(115200);
if (!accel.begin()) {
Serial.println(“No ADXL345 detected”);
ενώ (1);
}
accel.setRange(ADXL345_RANGE_4_G);
}
void loop() {
sensors_event_t e;
accel.getEvent(&e);
Serial.print (e.acceleration.x);
Serial.print(“,”);
Serial.print(e.acceleration.y);
Serial.print(“,”);
Serial.println(e.acceleration.z);delay(55); // ~18 Hz
}
Set Up Edge Impulse

Step 6: Connecting to Edge Impulse
- Close Arduino Serial Monitor.
- Run the command: edge-impulse-data-forwarder –frequency 18
- Enter axis names: accX, accY, accZ
- Name your device: Arduino-Cricket-Board
- Confirm connection in Edge Impulse Studio under ‘Devices’.


Βήμα 7: Συλλογή Δεδομένων
In Edge Impulse Studio → Data acquisition:
– Device: Arduino-Cricket-Board
– Sensor: Accelerometer (3 axes)
– Σample length: 2000 ms (2 seconds)
– Συχνότητα: 18 Hz
Record at least 40 samples per class:
– Cover Drive
– Straight Drive
– Pull Shot Collect Data Examples
Κάλυμμα Drive
Device: Arduino-Cricket-Board
Label: Cover Drive
Sensor: Sensor with 3 axes (accX, accY, accZ)
Sample length: 10000ms
Συχνότητα: 18 Hz
Example Raw Data:
accX -0.32
accY 9.61
accZ -0.12
Straight Drive
Device: Arduino-Cricket-Board
Label: Straight Drive
Sensor: Sensor with 3 axes (accX, accY, accZ)
Sample length: 10000ms
Συχνότητα: 18 Hz
Example Raw Data:
accX 1.24
accY 8.93
accZ -0.42
Pull Shot
Device: Arduino-Cricket-Board
Label: Pull Shot
Sensor: Sensor with 3 axes (accX, accY, accZ)
Sample length:10000 ms
Συχνότητα: 18 Hz
Example Raw Data:
accX 2.01
accY 7.84
accZ -0.63 
Step 8: Impulse Design
Open Create impulse:
Μπλοκ εισόδου: Δεδομένα χρονοσειρών (3 άξονες).
Window size: 1000 ms Window increase (stride): 200 ms Enable: Axes, Magnitude (optional), frequency 18.
Processing block: Spectral analysis (a.k.a. Spectral Features for motion). Window size: 1000 ms Window increase (stride): 200 ms Enable: Axes, Magnitude (optional), keep all defaults first.
Μαθησιακό μπλοκ: Ταξινόμηση (Keras).
Κάντε κλικ στην επιλογή Αποθήκευση παρόρμησης. 
Generate features:
Μεταβείτε στην επιλογή Φασματική ανάλυση, κάντε κλικ στην επιλογή Αποθήκευση παραμέτρων και, στη συνέχεια, στην επιλογή Δημιουργία χαρακτηριστικών για το σύνολο εκπαίδευσης.

Train a small model
Go to Classifier (Keras) and use a compact config like:
Neural network: 1–2 dense layers (e.g., 60 → 30), ReLU
Epochs: 40–60
Learning rate: 0.001–0.005
Batch size: 32
Data split: 80/20 (train/test)
Save and train the data
Evaluate and Check Model testing with the holdout set.
Inspect the confusion matrix; if circle and up overlap, collect more diverse data or tweak
Spectral parameters (window size / noise floor).
Step 9: Deployment to Arduino
Go to Deployment:
Choose Arduino library (C++ library also works).
Ενεργοποιήστε τον μεταγλωττιστή EON (εάν είναι διαθέσιμος) για να συρρικνώσετε το μέγεθος του μοντέλου. 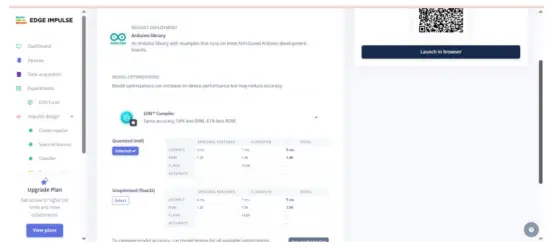 Download the .zip, then in Arduino IDE: Sketch → Include Library → Add .ZIP Library… This adds exampλιγότερο όπως το στατικό buffer και το συνεχές under File → Πχamples →
Your Project Name – Edge Impulse. Inference sketch for Arduino UNO EK R4 WiFi + ADXL345.
Step 10: Arduino Inference Sketch
#συμπεριλαμβάνω
#include <Adafruit_ADXL345_Unified.h>
#include <your_project_inference.h> // Replace with Edge Impulse header
Adafruit_ADXL345_Unified accel =
Adafruit_ADXL345_Unified(12345);
static bool debug_nn = false;
void setup() {
Serial.begin(115200);
while (!Serial) {}
if (!accel.begin()) {
Serial.println(“ERROR: ADXL345 not detected”);
ενώ (1);
}
accel.setRange(ADXL345_RANGE_4_G);
}
void loop() {
float buffer[EI_CLASSIFIER_DSP_INPUT_FRAME_SIZE] = {0};
for (size_t ix = 0; ix < EI_CLASSIFIER_DSP_INPUT_FRAME_SIZE; ix +=
3) {
uint64_t next_tick = micros() + (EI_CLASSIFIER_INTERVAL_MS *
1000);
sensors_event_t e;
accel.getEvent(&e);
buffer[ix + 0] = e.acceleration.x;
buffer[ix + 1] = e.acceleration.y;
buffer[ix + 2] = e.acceleration.z;
int32_t wait = (int32_t)(next_tick – micros());
if (wait > 0) delayMicroseconds(wait);
}
signal_t signal;
int err = numpy::signal_from_buffer(buffer,
EI_CLASSIFIER_DSP_INPUT_FRAME_SIZE, &signal);
if (err != 0) return;
ei_impulse_result_t result = {0};
EI_IMPULSE_ERROR res = run_classifier(&signal, &result,
debug_nn);
if (res != EI_IMPULSE_OK) return;
for (size_t ix = 0; ix < EI_CLASSIFIER_LABEL_COUNT; ix++) {
ei_printf(“%s: %.3f “, result.classification[ix].label,
result.classification[ix].value);
}
#if EI_CLASSIFIER_HAS_ANOMALY == 1
ei_printf(“anomaly: %.3f”, result.anomaly);
#endif
ei_printf(“\n”);
}
Έξοδος π.χample:
 Συμβουλές:
Διατηρήστε το EI_CLASSIFIER_INTERVAL_MS συγχρονισμένο με τη συχνότητα προώθησης δεδομένων σας (π.χ., 100 Hz → 10 ms). Η βιβλιοθήκη Edge Impulse ορίζει αυτήν τη σταθερά αυτόματα από τον παλμό σας.
Αν θέλετε συνεχή ανίχνευση (συρόμενο παράθυρο), ξεκινήστε από το παράθυρο ΣυνεχήςampΤο le περιλαμβάνεται στη βιβλιοθήκη EI και swap στις αναγνώσεις ADXL345.
We will be adding video tutorials soon; till then, stay tuned – https://www.youtube.com/@RobuInlabs
And If you still have some doubts, you can check out this video by Edged Impulse: https://www.youtube.com/watch?v=FseGCn-oBA0&t=468s
![]()
Έγγραφα / Πόροι
 |
Arduino ABX00087 UNO R4 WiFi Development Board [pdf] Οδηγός χρήστη R4 WiFi, ADXL345, ABX00087 UNO R4 WiFi Development Board, ABX00087, UNO R4 WiFi Development Board, WiFi Development Board, Development Board, Board |