![]() EclerCLOUD
EclerCLOUD
SOFTWARE
Remote Monitoring & Control Platform USER MANUAL
Thank you for your confidence in our products!
It is VERY IMPORTANT to read this manual carefully and to fully understand its contents in order to obtain maximum and optimal performance from this Software.
The latest version of the application is always available on our website www.ecler.com.
DESCRIPTION and CHARACTERISTICS
EclerCLOUD offers a solution for the remote management of Ecler devices. From the EclerCLOUD platform, you can monitor the status of amplifiers, matrices or other devices and configure them individually or in groups, as well as perform maintenance actions and request status reports. All of this may be done remotely via a web browser from a computer, tablet or smartphone. It is ideal for managing your devices without having to be at the device’s location.
![]() No additional software installation is required.
No additional software installation is required.
![]() An EclerCLOUD account is required to use it. See the ‘Signing up for EclerCLOUD’ chapter to create an account.
An EclerCLOUD account is required to use it. See the ‘Signing up for EclerCLOUD’ chapter to create an account.
![]() It is recommended to read the User’s Instruction Manual for the EclerCLOUD compatible devices
It is recommended to read the User’s Instruction Manual for the EclerCLOUD compatible devices
ECLERCLOUD COMPATIBLE DEVICES
The following devices are supported by EclerCLOUD:
![]() VIDA devices must be upgraded to firmware version 2.0 or higher.
VIDA devices must be upgraded to firmware version 2.0 or higher.
![]() Click on the model name above to access the User Manual for that model.
Click on the model name above to access the User Manual for that model.
REGISTER WITH ECLERCLOUD
3.1 Types of User profiles
In EclerCLOUD there are three User levels, which are as follows:
- Admin: This User has the highest level of access to the service. He/she has the ability to manage and configure all aspects of the system, including creating and deleting users, assigning roles, modifying global settings, full access to all data and functions, as well as performing maintenance and upgrades to the device.
- Diver: He/she cannot manage or configure aspects of the system, but can interact with devices, including the use of the Deep Dive function.
- Viewer:. They can view device data and reports, but do not have the ability to make changes, edits or modifications to the device configuration. This role is suitable for users who only need to access information without making modifications to the devices or the EclerCLOUD platform.
![]() Access Levels: A User may have access to the entire system or to specific levels of the Organization, such as groups or subgroups, as determined by the Administrator.
Access Levels: A User may have access to the entire system or to specific levels of the Organization, such as groups or subgroups, as determined by the Administrator.
3.2 Create an Administrator account
When you register with EclerCLOUD, you will automatically create an account in a new Organization with Administrator privileges.
![]() If you have an Ecler “Private Area” (for partners) or “Ecler Training” account, you can gain access using the same credentials.
If you have an Ecler “Private Area” (for partners) or “Ecler Training” account, you can gain access using the same credentials.
![]() If you need to add users with limited permissions (Viewer or Diver profile), you can do so by inviting new users via the User Management section in your Administrator account.
If you need to add users with limited permissions (Viewer or Diver profile), you can do so by inviting new users via the User Management section in your Administrator account.
To create an Administrator account you must follow the steps below:
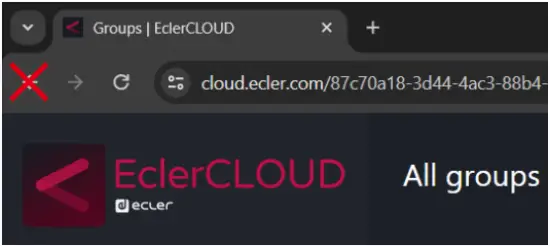
- Go to EclerCLOUD from your browser: Sign In | EclerCLOUD
- Click on “Log in or register with Ecler”

- Click on “Register”.
- Fill in the form with your details. Click on the “Register” button. You will be redirected to the personal login area of ecler.com.
 You need to be registered on ecler.com to be a User of the EclerCloud platform.
 We advise you to save your credentials in your browser to facilitate future connections.
 - The account will be created automatically, and you will be directed to a page where you can set up your Organization. Enter the name of the Organization and save the changes by clicking on “Save”.

- You will receive a verification email from marketing@ecler.com. You will need to confirm this in order to continue with the process.
![]() The Administrator will be able to change his/her own access password from the EclerCLOUD web service, as well as manage the Users and their passwords.
The Administrator will be able to change his/her own access password from the EclerCLOUD web service, as well as manage the Users and their passwords.
![]() Both the usernames and passwords are case-sensitive.
Both the usernames and passwords are case-sensitive.
3.2.1 Keep me logged in
When this function is active, no new login will be required each time the VIDA web app is opened. The LOGIN page will not be displayed, and you will be taken directly to the last page visited.
![]() To deactivate this function, it is necessary to log out of the web application.
To deactivate this function, it is necessary to log out of the web application.
3.2.2 Forgot password
Allows users and the Administrator to change their password.
![]() To restore Administrator credentials click on “Password forgotten?” and enter your email address. You will be sent an email from which you can change your password.
To restore Administrator credentials click on “Password forgotten?” and enter your email address. You will be sent an email from which you can change your password.
3.3 User interface
When you log in to EclerCLOUD with your User account, you will see the welcome page (see the ‘Devices’ chapter for detailed information on the platform’s welcome page). In the User interface you will find the following elements:

- Main menu: this is always accessible on the left side of the screen and shows the various menu options.
- Current page: Displays all configuration options within the chosen menu option in the middle right hand side of the screen. A menu entry may contain different tabs with different pages.
![]() As it is a web page, navigation on the web page must always be “forward”, i.e. browsing via the various menus and options must be done by selecting buttons within the web page itself and not those of the browser interface or computer peripherals, e.g. pressing a “back” button (see figure below). Otherwise, incorrect device information may be displayed, as the browser may update a cached page and not the changes made on the device.
As it is a web page, navigation on the web page must always be “forward”, i.e. browsing via the various menus and options must be done by selecting buttons within the web page itself and not those of the browser interface or computer peripherals, e.g. pressing a “back” button (see figure below). Otherwise, incorrect device information may be displayed, as the browser may update a cached page and not the changes made on the device.
3.3.1 Filtering and visualisation tools
- Search (Search CTRL+K): a drop-down menu will appear that allows you to filter the items by the words entered. This tool allows you to filter any type of device or group, regardless of location or category. The search is not case sensitive.

In the example in the figure above, the User has searched for the word “vida” in the search engine and found one device matching their search.
It is possible to filter the search within the page by displaying the results according to their category (All | Groups | Devices) and using the various filters offered within each one (Tags | Parent Group | Model | Online status | Alarms | Warnings | Signal Presence) (for more details see the ‘Groups’ chapter), allowing advanced searches.

Filters in the search can be added or removed individually and results matching the search will be displayed.
In addition, all filters can be deleted with the “Reset All” button, as shown in the figure below.

![]() Search filtering can be used to update the firmware of several devices at the same time, provided it is allowed (they must be found online). If you have the firmware URL, you can update more than one device at a time or schedule an update for a specific day/time.
Search filtering can be used to update the firmware of several devices at the same time, provided it is allowed (they must be found online). If you have the firmware URL, you can update more than one device at a time or schedule an update for a specific day/time.
![]() Different devices of the same model can be filtered and then the firmware update can be performed in one go, saving you a lot of time.
Different devices of the same model can be filtered and then the firmware update can be performed in one go, saving you a lot of time.

ADD A DEVICE: FIRST STEPS
To add a device to EclerCLOUD, the device must be connected to the Internet. It is recommended to read the respective instruction manuals of the compatible devices for further details. This manual describes the basic configuration for starting up the equipment.
![]() See the list of EclerCLOUD-compatible devices and their respective User manuals in the ‘EclerCLOUD-compatible devices’ chapter.
See the list of EclerCLOUD-compatible devices and their respective User manuals in the ‘EclerCLOUD-compatible devices’ chapter.
4.1 Internet connection
The device requires an Internet connection to communicate with EclerCLOUD. It will need tobe connected to a network from which it can access the Internet.
4.1.1 Starting up the equipment.
- Connecting to the mains.
Make sure your device is connected to the mains.
Check the User manual of the connected device to make sure you have connected it properly; you can find the User manual on our website at www.ecler.com
- Network connection: network switch or network router
An RJ-45 connector allows the equipment to be connected to an Ethernet network. Connect the device to your network router using a network cable. CAT5e or higher recommended.
4.1.2 Connection via Ethernet cable
The Ethernet network interface of the device is configured by default in dynamic addressing mode (DHCP) and will be assigned an automatic IP by the DHCP server (make sure that the router or network switch has this option enabled), so it will not be necessary to configure any parameters on the device. Connect the device to your router or network switch and the device is ready to be added to EclerCLOUD.
If static addressing (STATIC) is required, please refer to the corresponding section in the User manual of the corresponding equipment; see the ‘EclerCLOUD compatible devices’ chapter.
4.1.3 Add a device: EclerCLOUD
4.1.3.1 Method 1: add a device from EclerCLOUD
To add a device to EclerCLOUD, log in to your User account and click on “Devices” in the main menu. Then click on the “Add device” button in the top right corner.

You will be presented with a screen to configure the new device. The only essential parameter to add a new device is its identification (ID), which is given and is unique for each device.

The device ID can be found on the device page (such as the example shown in the figure below of a VIDA device, labelled “Device ID”. Make sure that the connection is enabled (Enable Connection set to ON). The ID is a 16-digit alphanumeric code, unique to each device.

Registering a device
Once the device is connected to the internet and you have located its ID, you can proceed to register it in EclerCLOUD by entering the ID on the page shown in the figure below. Assign a name to the device for easy identification and then save the changes.
![]() EclerCLOUD can support many devices at the same time, we advise you to name and organise your devices in groups so that you can easily find them later.
EclerCLOUD can support many devices at the same time, we advise you to name and organise your devices in groups so that you can easily find them later.
If you have performed all the above steps correctly, you should have the device connected to EclerCLOUD without pairing.
To pair it, access the device menu and enable the connection. You can verify that the devices have been paired if on the device page the “Connection Status” is shown as online and in the cloud status it is shown as APPROVED.

4.1.3.2 Method 2: add to EclerCLOUD from the device itself
Access the Cloud tab on your device, under the settings tab. Within the tab you will see the Organization ID box.
Log in to EclerCLOUD from Administrator mode and access “Organization”.
Within the page you will see the “Organization ID”. Copy the text from the box and insert it into the empty box on the device page.
Enable the connection and:
- The device will be linked to your Organization and can then be moved to the desired destination. The “Organization ID” can be found if you have Administrator access in EclerCLOUD, on the left side tab under “Organization”.
- The device must be approved. To do this, go to the EclerCLOUD device “Unapproved” screen and approve the connection so that it is ready for operation.
- Once the device has been approved, you will be able to edit and monitor it.

EclerCLOUD API
Access to the EclerCLOUD API allows users to integrate third-party services, which is especially valuable when you have a large number of devices and need to monitor their status or control parameters in an automated way. With this functionality, it is possible to program settings and monitor the behaviour of devices efficiently, which optimises the management of systems.
5.1 Authentication in EclerCLOUD
To ensure that only authorised users can access the API and control EclerCLOUD devices, it is necessary to authenticate processes with a Client ID and a Client Secret. These act as the login credentials, i.e. the Client ID is equivalent to the user name, while the Client Secret behaves like a password.
5.2 Renewal of Client Secret
If the Client Secret is at risk of being compromised or if there are doubts about its security, the Administrator can renew it.
![]() It is important to note that after renewal, any process that is using the previous Client Secret will lose access to the API. Therefore, all processes dependent on it will have to be updated with the new Client Secret to re-establish access.
It is important to note that after renewal, any process that is using the previous Client Secret will lose access to the API. Therefore, all processes dependent on it will have to be updated with the new Client Secret to re-establish access.
5.3 Using the EclerCLOUD API
Access to the API functions enables various control and monitoring actions. The available operations can be consulted at the following link: EclerCLOUD API Documentation.
WebGUI
EclerCLOUD is the User interface that allows the visualisation and management of ECLER devices in the cloud, provided they are connected to the network, managed by the system Administrator. It allows you to see all the devices connected to an Organization and even connect them remotely (Deep Dive functionality). Information is stored separately by Organizations, which in turn may have groups and subgroups.
![]() Groups operate in a similar way to folders on a PC. They allow devices to be organised and structured in a logical and hierarchical manner within an Organization.
Groups operate in a similar way to folders on a PC. They allow devices to be organised and structured in a logical and hierarchical manner within an Organization.
Each device belongs to a specific Organization and is assigned to a group within that Organization.

The EclerCLOUD User interface is accessible from any web browser, and is compatible with any Windows, macOS or Tablet device.
![]() Web application not optimised for Smartphone. We recommend using it on a PC or Tablet.
Web application not optimised for Smartphone. We recommend using it on a PC or Tablet.
![]() We recommend updating your browser to the latest version to ensure that the app functions correctly.
We recommend updating your browser to the latest version to ensure that the app functions correctly.
6.1 Groups
In EclerCLOUD, the Organization is structured through the creation of groups and subgroups, which permits the logical Organization of devices and resources within the entity. These groups can be subdivided, making it easier to manage large numbers of devices and resources. From the corresponding tab, users can view all the groups to which they have access, according to the permissions assigned by the system Administrator.
![]() Administrators will always have access to all groups and sub-groups of the Organization.
Administrators will always have access to all groups and sub-groups of the Organization.
![]() An Administrator User can create up to 5 Organizations
An Administrator User can create up to 5 Organizations

6.1.1 Edit Group
Administrators have permission to add and edit groups. Editing a group allows you to modify its name, description (up to 250 characters), choose its parent group (making it a subgroup of another folder) and add labels(for more information, see the section on “Tags”).

6.1.2 Delete group
When deleting a group, all folders linked to the group are deleted and all devices within these groups will be relocated to the parent level.

6.1.3 Search options
Devices within a folder or on the device page can be sorted by Last added, First added or Last updated.

It is also possible to apply search filters from the folder itself.

6.2 Devices
The devices page in EclerCLOUD shows all devices in all folders within the Organization. On the main tab, devices are organised into three categories: Approved devices, Quarantined devices and Unapproved devices.
From this page, users can filter devices according to their needs.

6.2.1 Detailed device information

This provides the following device information:
- Device name
This indicates the name of the device in the EclerCLOUD platform, this can be changed with Administrator permissions and therefore does not need to match the local name of the device. - ID
The 16-characters code is a unique identifier consisting of letters and numbers that represents the serial number of the device. This code is unique for each device and is used to link the device to the cloud. - MAC Address
The MAC address is a unique identification of the device, also known as a physical address. This address is unique to each device and is composed of 6 blocks of 2 hexadecimal characters (8 bits each). - Type
This refers to the category or classification of the device according to its primary function or purpose within a system. This field provides information on the nature of the device and may include categories such as amplifier, digital matrix, router, etc. - Model:
This refers to the specific type of device, please refer to the EclerCLOUD compatible models in the ‘Compatible devices’ chapter. - Cloud Status
This indicates the current status of the device in relation to the EclerCLOUD platform. This state can present itself in various forms:
• Approved: This indicates that the device has been successfully recognised and authorised to operate within the cloud environment. The device is active and functioning as expected.
• Quarantined: This refers to a situation where the device has been temporarily isolated due to possible security or configuration problems. During this period, the device cannot access all cloud features or resources.
• Unapproved: This indicates that the device has not been authorised to operate in the cloud and may be experiencing configuration or authentication issues. The device may need to be verified or properly configured before it can access the cloud. - Last Update
This refers to the most recent time at which information or feedback was received from the device. This information indicates when the device data, such as status, measurements, events, etc., was last retrieved from the device. The update interval is 5 seconds. - Power Status
This refers to the status of the device’s power supply. This indicates whether the device is receiving adequate power or if there is a problem with the power supply. Typically, this status can be displayed as “RUNNING” or “SLEEPING”, indicating whether the device is active and receiving power or whether it is off and without power. - Online Status
This refers to the current connection status of a device. It is represented by a cloud symbol that can indicate three different states:
• Off: This indicates that the device is switched off or has no connection to the network.
• Online: Means that the device is connected and active, and has established a proper connection to the network or platform to which it is linked.
• Unknown: This status may indicate that the device is in quarantine, or that its connection status cannot be confirmed at that time. - Uptime
This refers to the length of time for which a device has been approved and active. This uptime indicates how long the device has been operational and fully operational since approval was granted. It is important to note that a quarantined device will not have an uptime, as it is not in an active or operational state during that period. - Firmware version
This refers to the specific software edition that is installed and running on a particular device. This information indicates the current firmware version being used by the device in question.
Knowing the firmware version is important to ensure that the device is up to date with the latest bug fixes, performance improvements and new features provided. - Last Firmware Update
Displays the date on which the last firmware update of the device was performed. - Recurrent Updates
This indicates whether a periodic update of the device firmware is scheduled. These updates can be configured to take place automatically at regular intervals, e.g. daily at a specific time. In addition, you can specify a URL from which the device will download the updated firmware during the scheduled update. This process ensures that the device firmware is always up to date with the latest bug fixes and enhancements provided.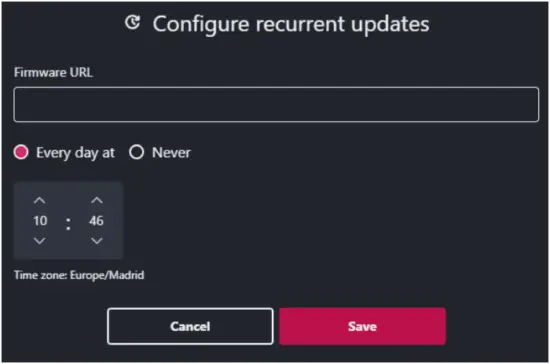
- Tags
Contains the tags associated with the device, which are used to classify and organise devices according to different criteria or shared characteristics. Tags allow for more efficient management and more accurate searching of devices within the platform.
For more information on how labels are used and their importance in the Organization and management of devices, see the ‘Tags’ chapter. - Deep Dive
Deep Dive functionality is available for devices that have an embedded web application and are connected online. This function allows you to connect to the device remotely from any location.
Clicking on Deep Dive takes you to the interface of the device, such as a VIDA amplifier, and redirects you to the login page of the device. Once logged in, a remote connection to the device is established, allowing changes and settings to be made as if connected via a local network.
It is important to note that there is a restriction on the number of users that can remotely connect to the device at the same time, which is 1. This means that only one User at a time can access the Deep dive functionality, which does not prevent someone else from connecting to the device locally.
This functionality provides great flexibility and convenience for remote device management from anywhere in the world.

At the top right of the interface, next to the “Deep Dive” button, you will find the following functionalities:
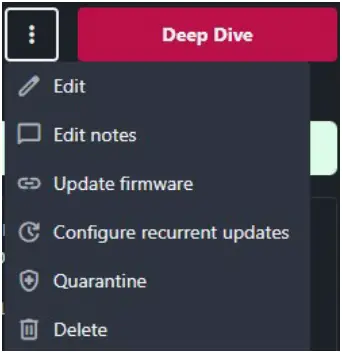
- Edit
The device editing function allows the following aspects of the device to be modified:
a) Name: This allows the device to be renamed for improved identification and Organization.
b) Group: This allows you to change the group to which the device is assigned, making it easier to manage and organise devices within the platform.
c) Tags: This allows you to add, delete or modify the tags associated with the device. Tags are useful for classifying and searching for devices according to specific criteria.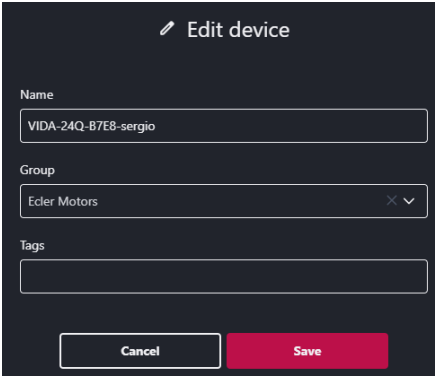
- Edit notes
This function allows you to add or edit notes to be displayed next to the device name in the device overview. Notes provide a space to add secondary information that is easily accessible from the device view, without the need to click on the device directly.
Notes are useful for including additional details about the device, such as instructions for use, contact information, current status of the device, or any other relevant information that the User wants to have at hand in a quick and convenient way.
By editing the notes on the device, the User can customise and organise the information according to their specific needs, improving the efficiency and usability of the platform.
- Update firmware
This updates the device to the latest firmware version. The update can be direct or can be scheduled in the calendar for a date.
Only an approved device can be upgraded online. Therefore, if an update is scheduled for a specific date, it must be approved and online at that time.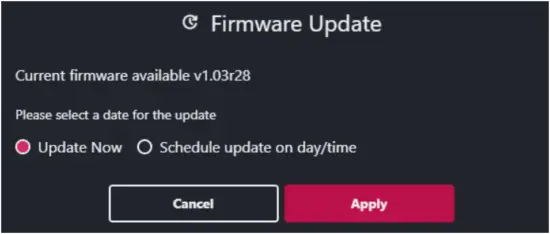 Information about the latest firmware for the device can be found on the dedicated product page on our website at www.ecler.com.
 - Quarantine
This functionality allows you to quarantine a device or terminate its quarantine.
Quarantine is a security measure applied to a device when it is suspected of posing a risk to the network or system in which it is embedded. During quarantine, the device may be isolated and limited in its functions to avoid potential security problems.
Quarantining a device restricts its access to the network or certain functions, which helps prevent the spread of potential threats or vulnerabilities. At the end of the quarantine, the device regains full access and can function normally within the system again.
These actions provide an additional layer of protection and security, allowing administrators to effectively monitor and manage devices for potential security threats or issues. - Delete
The delete function allows you to unlink and permanently remove the device from EclerCLOUD.

![]() It is important to note that this action cannot be undone and will completely remove the device from the platform.
It is important to note that this action cannot be undone and will completely remove the device from the platform.
Before deleting a device, it is crucial to make sure that you want to perform this action, as you will not be able to recover any information associated with the device once it has been deleted.
When a device is removed, it is unlinked from any site in the CLOUD. If you wish to have the device active again, you will need to reconfigure it from scratch.
This feature provides a way to manage and wipe unwanted or unused devices from the cloud platform and can only be done on a device-by-device basis. It does not allow multiple selection.
6.2.2 Device tabs
These tabs vary depending on the type of device, the most common tabs are explained below.

- Alarms
These are indicators that appear if any of the following states are encountered and indicate that the concerned device is not working properly.
- Warnings
This displays an indicator in case of a corresponding warning; the concerned device continues to work.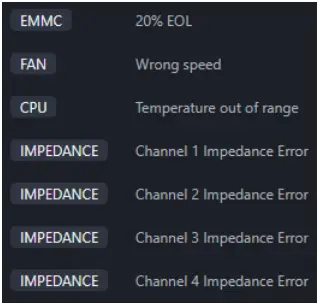
- Audio
This indicates if a signal is present or if the channel is silent on the inputs and outputs of the device. For example, in the figure below, Auxiliary Output 1 is silent.
- Network
This provides information about the device’s Network ports, MAC address, IP, its mask and the gateway of the device.
- Consumption
This provides graphical information on the consumption of the device. You can set a time frame (indicating from when you want to display and until when).
In addition to the visual information in the table, the total running consumption, total idle consumption, total running time and total idle time can be viewed.

6.3 Settings
To access the settings page, click on the three dots next to the e-mail address at the bottom of the left tab.
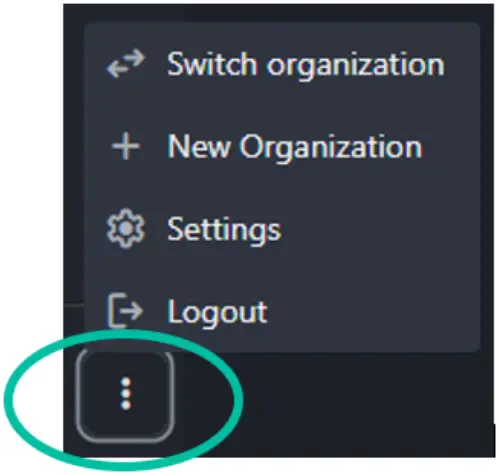
From there, the following actions can be performed:
- Switch Organization
This will take you to a tab from which you can switch to managing another Organization.
- New Organization
You go to a tab from which you can create a new Organization.
- Settings
In this tab you can change your password (you will receive an e-mail from marketing@ecler.com from which you can reset your password).

![]() You can also change the language of the website and adjust the time zone you are in. Currently we only offer the web App in English and Spanish.
You can also change the language of the website and adjust the time zone you are in. Currently we only offer the web App in English and Spanish.
![]() At the top right you will find a button to save your configuration changes.
At the top right you will find a button to save your configuration changes.
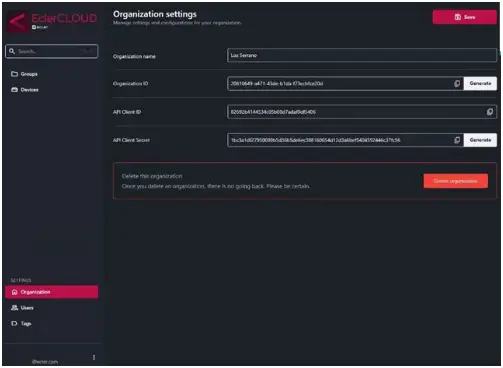
6.4 Organization
From the Administrator profile, the Organization’s settings can be accessed to configure the following parameters.

- Organization name
You can change the name of the Organization. - Organization ID
The Organization Token is an alphanumeric code used to link EclerCLOUD to a device. You can copy it and use it on a compatible device in the CLOUD settings tab to link it.
![]() Each device has a unique “Device ID” and each Organization has a unique “Organization ID” (a new key can be generated by clicking on the “Generate” button).
Each device has a unique “Device ID” and each Organization has a unique “Organization ID” (a new key can be generated by clicking on the “Generate” button).
![]() It is possible to link a device to the CLOUD platform by two methods: by using the “Device ID” directly from the CLOUD page or by using the “Organization ID” (Organization token) via the device page.
It is possible to link a device to the CLOUD platform by two methods: by using the “Device ID” directly from the CLOUD page or by using the “Organization ID” (Organization token) via the device page.

- API Client ID
This refers to the User to be able to log in to the API, it cannot be changed and is unique to the Organization. - API Client Secret
This refers to the password to access the API. It is auto-generated, but a new one can be generated. - Delete this Organization
Allows the Organization to be deleted, once it is deleted it is not possible to go back.
![]() We recommend that you only delete your Organization if you are absolutely sure about it, as once deleted, it cannot be recovered.
We recommend that you only delete your Organization if you are absolutely sure about it, as once deleted, it cannot be recovered.
6.5 Users
The User page can only be accessed from an Administrator account. On this page you can view the information of all users who have access to the Organization.

You can find the following information about a User:
- Name: name or e-mail address.
- eMail:.
- Role: shows the type of role the User can have, such as Administrator, diver or viewer, for more information about User types, click here.
- Groups: shows information on which accesses (folders) the person has.
- Status: shows whether the person has access to the cloud (Active), or the status of the invitation.
- Last login: Displays the last login.
![]() The Administrator can manage a person’s roles and allow/deny him/her access to certain folders within the Organization by clicking on the three dots.
The Administrator can manage a person’s roles and allow/deny him/her access to certain folders within the Organization by clicking on the three dots.
![]() A User can also be removed from the Organization. This action cannot be undone, but you can always resend an invitation.
A User can also be removed from the Organization. This action cannot be undone, but you can always resend an invitation.
6.6 Tags
Only the Administrator has access to view the tags page and manage the tags. Tags are identifiers used to organise, search for data and facilitate searching by filtering. Labels can be added to groups, subgroups and devices to give them a customised callsign.

- New tag: at the top right there is a button to add new tags.
In the label table you can see the following information:- Tag: name given to the tag.
- Tagged devices: devices containing the tag
- Tagged groups: groups with this tag.
![]() From this page you can only edit the name and colour of the label. To place or remove a label, you must do so directly from the device page.
From this page you can only edit the name and colour of the label. To place or remove a label, you must do so directly from the device page.
![]() Delete tag: deletes the selected tag permanently. Once deleted, it cannot be recovered.
Delete tag: deletes the selected tag permanently. Once deleted, it cannot be recovered.
All product characteristics are subject to variation due to production tolerances.
NEEC AUDIO BARCELONA S.L. reserves the right to make changes or improvements in the design or manufacturing that may affect these product specifications.
For technical queries contact your supplier, distributor or complete the contact form on our website, in Support / Technical requests.
Motors, 166‐168
08038 Barcelona, Spain
Tel. (+34) 932238403
information@ecler.com
www.ecler.com ![]()
Documents / Resources
 |
ecler EclerCLOUD Remote Monitoring and Control Platform [pdf] User Manual 50-0459-0100 1, EclerCLOUD Remote Monitoring and Control Platform, EclerCLOUD, Remote Monitoring and Control Platform, Monitoring and Control Platform, Control Platform, Platform |