![]() DJI FlightHub 2
DJI FlightHub 2
User Guide
v1.4 2022.08
Disclaimer and Warning
Congratulations on purchasing your new DJI™ product. The information in this document relates to your safety and your legal rights and responsibilities. Read this entire document carefully to ensure proper configuration before use. You agree to use this product only for purposes that are proper and in accordance with all applicable laws, rules, and regulations, and all terms, precautions, practices, policies, and guidelines DJI has made and may make available. This document and all other collateral documents are subject to change at the sole discretion of DJI.
Please read this statement and the terms of use in DJI FlightHub™ 2 before using it. By using this product, you hereby signify that you have read this disclaimer and warning carefully and that you understand and agree to abide by the terms and conditions herein. You agree that you are solely responsible for your own conduct while using this product and for any consequences thereof. You agree to use this product only for purposes that are proper and in accordance with all applicable laws, rules, and regulations, and all terms, precautions, practices, policies, and guidelines DJI has made and may make available.
DJI accepts no liability for damage, injury, or any legal responsibility incurred directly or indirectly from the use of this product. The user shall observe safe and lawful practices including, but not limited to, those set forth in this document.
Notwithstanding the above, your statutory rights under applicable local legislation are not affected by this disclaimer.
DJI and DJI FlightHub are trademarks of SZ DJI TECHNOLOGY CO., LTD. (abbreviated as “DJI”) and its affiliated companies. Names of products, brands, etc., appearing in this document are trademarks or registered trademarks of their respective owner companies. This product and document are copyrighted by DJI with all rights reserved. No part of this product or document shall be reproduced in any form without the prior written consent or authorization of DJI.
Introduction
DJI FlightHub 2 is a cloud-based aircraft task management platform, providing functions for member, device, map annotation, media file, and flight route library management. By distributing annotations to DJI Pilot 2 and managing the cloud mapping progress, DJI FlightHub 2 makes the remote access of real-time task information possible and improves team productivity and efficiency.
Before Using
Supported Devices Supported aircraft include Matrice 30 series, Mavic 3 enterprise series, and Matrice 300 RTK, and supported payloads are Zenmuse H20 series. If a different payload is mounted onto the aircraft, some or all of the functions of DJI FlightHub 2 may not be supported.
Operating Requirements
- Browsers that can run DJI FlightHub 2 should be Chrome 92 and above, Safari 13 and above, or Firefox 90 and above.
- DJI Pilot 2 app version should be later than v4.0.
Roles and Permissions
There are five roles within an organization: super administrator, organization administrator, device maintainer, organization member, and temporary member. There can be multiple projects within an organization and each project has two roles: project administrator and project member. Users with different roles are granted with different permissions, and permissions at the organization and project levels are independent of each other.
Organization Roles and Permissions
User permissions at the organization level are as follows:
- Super Administrator: Manages the organizational life cycle and owns all permissions of an organization administrator. There should be at least one super administrator within an organization and the super administrator can only leave the organization when the role is transferred to another member.
- Organization Administrator: Manages members, devices, and projects within the organization.
- Device Maintainer: Manages all devices within the organization.
- Member: Views project information, adds devices, and exits the organization.
- Temporary Member: Has limited operation permissions within the joined project.
![]() Both super and organization administrators can click
Both super and organization administrators can click ![]() on the Members page to view detailed permission descriptions.
on the Members page to view detailed permission descriptions.
Project Roles and Permissions
User permissions at the project level are as follows:
- Project Administrator: Manages the project life cycle and owns all project permissions, including member, device, project, annotation, media file, and flight route library management. There should be at least one project administrator within a project.
- Member: Has basic operation permissions within the project.
![]() The project administrator can click
The project administrator can click ![]() on the “Edit project info” panel to view detailed permission descriptions.
on the “Edit project info” panel to view detailed permission descriptions.
Registration and Login
Users can visit https://fh.dji.com, create a DJI account, and log in to DJI FlightHub 2.
![]() Users can log in to DJI FlightHub 2 and DJI Pilot 2 at the same time with the same DJI account, but multiple logins to the same platform are not supported.
Users can log in to DJI FlightHub 2 and DJI Pilot 2 at the same time with the same DJI account, but multiple logins to the same platform are not supported.
Organization Management
Create an Organization
If users have not joined any organizations, they will be directed to the Organization Management page.
Click Create Organization and enter an organization name to create an organization. The user who creates the organization will be assigned as a super administrator.
At the next login, users will be directed to the Projects page and be able to switch organizations on the upper left corner of the page.

Click the user account on the upper right corner and select My Organization to enter the Organization Management page. Administrators can edit member names, change member roles, and filter members by their organization roles, joined projects, or joining methods.

Create a Project
Administrators can click “+” in the middle of the project list panel or on the upper right corner to create a project.

The location information of the administrator will be requested when creating a project, and the geographic location obtained will be used as the default project point of interest.
Fill in the following information to create a project.

- Project Name
The project name is required and should be within 28 characters. - Description
The project description is optional. - Join Project with Code
Administrators can enable Join Project with Code after creating a project. Click Copy Code to copy the project ID and code as well as the project link and send them to members who wish to join the project. DJI FlightHub 2 users can click the link or enter the project ID and code on the My Organization page to join the project. DJI Pilot 2 users can log in to the DJI FlightHub 2 cloud service and join the project with the project ID and code.
For users who are not organization members but join projects under the organization, their organization roles will be assigned as temporary members. - Members
Click Add Member to add organization members to the project. Users can also join the project with the project ID and code. - Devices
Click Add Device to add organization devices to the project. For DJI Pilot 2 users who enter the project, once their aircraft are linked with remote controllers, the aircraft information will be automatically displayed on the device list. - Project Point of Interest
Click Set Point of Interest. The set point will be displayed in the middle of the web page when users enter the project.
Click Create Project to create the project.
Both super and organization administrators can edit, archive, and delete projects. They can also activate archived projects. The project administrator can edit, archive, activate, and delete projects they manage.
Other members can only view information of joined projects.
![]() DJI Pilot 2 users cannot view or work on archived projects.
DJI Pilot 2 users cannot view or work on archived projects.
Member Management
Both super and organization administrators can manage members on the Members page.
Add Members
Click Add Members and fill in members’ accounts and organization names and roles. To add multiple members at once, administrators can also download an Excel template, fill in the members’ information, and then upload the file.
Change Member Information
Administrators can edit member information and delete members.
![]() The organization administrator cannot change the role or delete the account of the super administrator.
The organization administrator cannot change the role or delete the account of the super administrator.
 Administrators can also select multiple accounts and change member roles or delete all accounts at once.

Device Management
DJI Pilot 2 users can bind their devices to DJI FlightHub 2 organizations. Make sure that the remote controller is connected to the internet. Open DJI Pilot 2 and enter the home screen.
- Tap Settings on the upper left corner and log in with a DJI account.
- Tap Cloud Service and select the DJI FlightHub 2 cloud service. Users need to select the organization and project they want to join upon the first login. At subsequent logins, they will be directed to the project page they entered last time. If users have not joined any organization, they can contact the administrators for details.

- After logging in, the project information will be displayed on the screen. Click Device Binding to bind the aircraft to the organization.

The administrators can manage the aircraft on the Devices page after the aircraft is bound to the organization.

Real-Time Project Information
DJI FlightHub 2 users can view online project information, device details, and livestreams on the Team page.
Online Project Information
After joining a project, project members can view team information, such as device statuses and online members on the left panel. Device statuses include:
A. When a device is online, its information will be displayed on the left panel.
B. When a device is offline for less than five minutes, its information will be displayed in gray.
C. When a device is offline for more than five minutes, its information will not be displayed.
Aircraft and remote controller locations will be displayed on the map. Click the aircraft or the remote controller icon and a line connecting the aircraft to its linked remote controller will be displayed. A window above the aircraft shows the aircraft call sign and its altitude above the sea level. Click the window to open the Device Details and Livestreams panel.

Project members can also perform the following actions on the map.
- Click
 to search geographic locations. The location will be displayed in the middle of the web page.
 - View
 for the map orientation.
 - Click
2Dto enable the 3D map. Press and hold the Control/Ctrl key and left button of the mouse together to rotate the map. - Click
 to view GEO Zone information.
 - Click
 and the project point of interest will be displayed in the middle of the web page.
Device Details and Livestreams
When a device is online, project members can click ![]() to view device details, such as the transmission signal strength, satellite connection status, and aircraft altitude. Click camera buttons to view livestreams from the aircraft camera or payload. During a livestream, click
to view device details, such as the transmission signal strength, satellite connection status, and aircraft altitude. Click camera buttons to view livestreams from the aircraft camera or payload. During a livestream, click ![]() to start recording, and the recorded video will be stored to Media Files automatically.
to start recording, and the recorded video will be stored to Media Files automatically.
Annotation Management
Project members can click ![]() to enter the Annotation page and add annotations such as points, lines, and areas on the map by selecting
to enter the Annotation page and add annotations such as points, lines, and areas on the map by selecting ![]() on the right side of the screen. The project administrator can click
on the right side of the screen. The project administrator can click ![]() to distribute annotation folders to DJI Pilot 2 and click
to distribute annotation folders to DJI Pilot 2 and click ![]() to lock folders. Once the folder is locked, project members can no longer edit the annotations in the folder.
to lock folders. Once the folder is locked, project members can no longer edit the annotations in the folder.

Click ![]() to import KML files and click
to import KML files and click ![]() to select and export annotation folders to KML files.
to select and export annotation folders to KML files.
DJI Pilot 2 users can also select ![]() to create points, lines, and areas after entering the map view.
to create points, lines, and areas after entering the map view.
Annotations will be uploaded remotely to DJI FlightHub 2 and stored in Shared Folder. Annotations in Shared Folder are distributed by default and cannot be disabled.
Cloud Mapping
DJI Pilot 2 users can log in to the DJI FlightHub 2 cloud service to perform cloud mapping.
- Tap Flight Route on the DJI Pilot 2 home screen and select Mapping.

- Configure settings on the right panel. Tap
 to save settings and tap
  to perform the mapping task.
 DJI FlightHub 2 supports infrared and visible light mapping with Zenmuse H20, H20T, H20N, and the Matrice 30 camera.
- Enable Cloud Mapping on the mapping checklist and upload the flight task.

- Tap Progress to view the mapping status.

DJI FlightHub 2 project members can click ![]() to enter the Map page. Select the mapping task to view the task planning area and mapping output.
to enter the Map page. Select the mapping task to view the task planning area and mapping output.
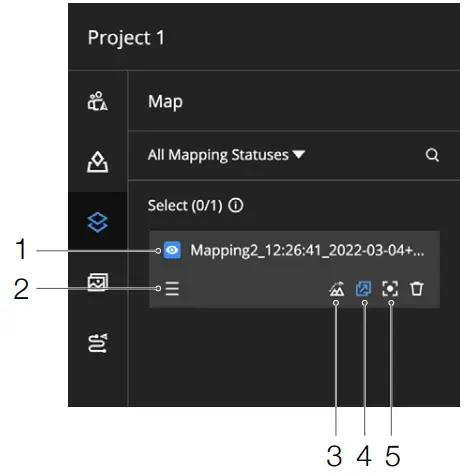
- Display the Mapping Output
The project administrator can click to display the mapping output on the map.
 - Change the Task Order
The order of mapping tasks on the left panel indicates the mapping output display order on the map.
The mapping task at the top of the list will have its mapping output displayed on the top of the map.
The project administrator can drag to change the task and output order.
 - Load the Elevation Data
After the elevation of a mapped area is calculated, the project administrator can click to load the elevation data onto the map.
Users can only load the elevation data of a mapped area one at a time. - Distribute the Mapping Output
After a task is completed, its mapping output will be distributed to DJI Pilot 2 by default. The project administrator can click to cancel the distribution.
 - Center the Mapping Output
Click to select the mapping task, and its mapping output will be displayed in the middle of the web page.
Media Files
Project members can click ![]() to enter the Media Files page and manage all media files uploaded from DJI Pilot 2.
to enter the Media Files page and manage all media files uploaded from DJI Pilot 2.
Upload Media Files
The automatic upload of media files in DJI Pilot 2 is disabled by default. To enable the function, DJI Pilot 2 users can click Media File Upload in DJI FlightHub 2 Services and choose to upload photos and videos to DJI FlightHub 2 automatically. In the dual control mode, media files will be uploaded to DJI FlightHub 2 via the first remote controller that is linked to the aircraft. Users can also change the settings and upload media files from another controller.
DJI Pilot 2 users can also enter the camera view and upload media files on the left panel.

To manually upload media files, DJI Pilot 2 users can enter Album and select files that need to be uploaded.
- Select project files, tap
 on the lower right corner of the screen, and upload files to DJI FlightHub 2.
 - on the upper left corner shows the number of files waiting to be uploaded.
- To upload media files from other projects, tap the project name, select files, and tap on the lower right corner to upload files to the corresponding project media file library.

Manage Media Files
Project members can view, edit, transfer, and delete media files uploaded from DJI Pilot 2, as well as download compressed media files.

Click ![]() to load photos with location information onto the map. Select Filter Media Files Displayed on Map to view all the photos that are displayed on the map.
to load photos with location information onto the map. Select Filter Media Files Displayed on Map to view all the photos that are displayed on the map.
![]() Panoramas are displayed on the map by default.
Panoramas are displayed on the map by default.
Flight Route Library
Project members can click to enter the flight route library to create and edit flight routes.
Create Flight Routes
Click “+” on the upper right corner of the flight route list and fill in the information below to create a flight route.

- Route Name
The route name is required and should be within 60 characters. - Select aircraft and payload
Only Matrice 30 series are supported. - Route Type
Only Waypoint routes are supported.
Click OK to create the flight route.
Edit Waypoint Routes
Edit Flight Routes
Enter the flight route editor and set flight route details.

![]() Move the mouse
Move the mouse ![]() over to view setting descriptions.
over to view setting descriptions.
Pay attention to the settings below.
- Basic Information
Click to edit the flight route name and change the aircraft and payload.
Changing the payload will affect flight route settings. - Takeoff Point Settings (AGL)
Click Set Takeoff Point and set the location where the aircraft will take off.
A. Edit the longitude, latitude, and altitude above the ground level on the coordinate panel. B. Select and drag the takeoff point icon
  to move the takeoff point. Press and hold the Alt key and drag the icon up and down to adjust the altitude.
C. Click Delete Takeoff Point to delete the takeoff point data.
When the Altitude mode is set to Altitude Relative to Takeoff Point (ALT), the takeoff point will be a reference point used to plan the flight route. The actual takeoff point of an aircraft when performing a task may differ from the set takeoff point. The route altitude will be based on the altitude of the actual takeoff point during the flight. - Safe Takeoff Altitude (ALT)
Safe Takeoff Altitude is the altitude relative to the takeoff point altitude. Aircraft will ascend to the safe takeoff altitude after takeoff and fly to the flight route start point. - Altitude Mode
The Altitude mode is set to Absolute Altitude by default. Project members can also change it to Altitude Relative to Takeoff Point (ALT) or Above Ground Level. - Return-to-Home Altitude (ALT)
The return-to-home altitude should be set based on the actual flight condition, surrounding environment, and GEO information. It is recommended that the altitude be set higher than the highest geographical point in the flight area.
Edit Waypoints
Select ![]() and click on the map to add waypoints. Select a waypoint and set waypoint details.
and click on the map to add waypoints. Select a waypoint and set waypoint details.

- Longitude and Latitude
The longitude and latitude of an aircraft are obtained from its geographical location on the map. - Altitude, Ellipsoid Height (WGS84), Waypoint Type, Aircraft Yaw, and Flight Speed
These parameters are consistent with the corresponding flight route settings by default. If the flight
route settings are changed, the above parameters will also be updated. - Actions
Click “+” to add actions for the aircraft, gimbal, and payload. - Click on the upper left corner to save the flight route settings.
Perform Flight Tasks
DJI Pilot 2 users can log in to the DJI FlightHub 2 cloud service and perform cloud flight tasks.
- Enter the home screen of DJI Pilot 2, tap Flight Route, select Cloud to view flight routes created on DJI FlightHub 2.
- Select the flight route and tap
 , the flight route will be downloaded to Flight Route Library.
 3. Select and enter flight route settings. Tap
  to perform the flight task.
DJI Support
https://www.dji.com/support
This content is subject to change without prior notice.
Download the latest version from

![]() https://www.dji.com/flighthub-2/downloads
https://www.dji.com/flighthub-2/downloads
If you have any questions about this document, contact DJI by sending a
message to DocSupport@dji.com.
![]() and DJI FlightHub are trademarks of DJI.
and DJI FlightHub are trademarks of DJI.
Copyright © 2022 DJI All Rights Reserved.
Documents / Resources
 |
dji FlightHub 2 Cloud Based Aircraft Task Management Platform [pdf] User Guide FlightHub 2, Cloud Based Aircraft Task Management Platform, FlightHub 2 Cloud Based Aircraft Task Management Platform, Aircraft Task Management Platform, Task Management Platform, Management Platform, Platform |


