Installation Diagram

Always disconnect the power before installing or replacing bulb and before cleaning or other maintenance.
- Remove fixture from its original package.
- Separate mounting plate (1c) from canopy removing canopy screws (2f)
- Attach mounting plate (1c) to electrical junction box (la) using screws provided (1d) in hardware package
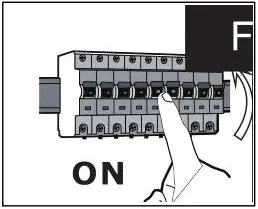
- To change fixture height, push and hold wire gripper (2g), slide wire to desired length and then release wire gripper (2g) to secure (Remove excess wire if necessary)
- Secure mounting plate (1c) to mounting surface with anchors (1f) and screws (1e)
- Make proper electrical connections (black to hot “L”, white to neutral “N”, ground to “GND”) with wire nuts (1b) provided in hardware package
- Attach canopy(2a) to mounting plate(1c) with canopy screws(2f) and nuts(2c) , tighten them(2f and 2c).
- Fine tone wire length if necessary, by push and hold wire gripper (2g) and then adjust wire to desired length

- To shorten the cable-just push the cable up, cable will be locked Automatically.
- To length the cable-lift up on the cable and push up on the lock while keep the lock depressed, lower the cable to the desired length, release the lock to set.
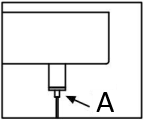 A: push
![]()
LED Wireless remote control operation instructions
I. Key function of remote control
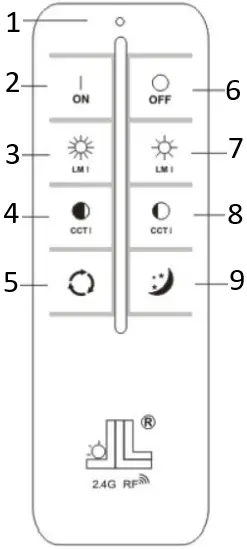
- indicator light
- Turn on
- brightness +
- cold light
- cycle
- Turn off
- brightness –
- warm light
- nightlight
II. Key instructions
Turn on: Short time lamp lighting, Electricity within 5 s, Long press for the code function, After power on 5 s, Long press has no effect
Turn off: Short time lamp goes out, Electricity within 5s, Long press for clear code function, After power on 5 s, Long press has no effect;
Cold light +:
1, Short on time, Turn the cold light fixture on one level, At the same time, the warm light lamp darkens one level, There are 15 levels of cold light from out to full light;
2, Long time, The luminaire is gradually lightened, At the same time, the warm light gradually darkens;
Warm light +:
1, Short on time, The warm light fixture should be one step brighter, When the cold light lamp darkens one level, There are 15 levels of warm light from out to full light;
2, Long time, The warm luminaire is gradually lightened, At the same time, the cold light gradually darkened;
brightness + :
1, Short on time, Heat and cold light lamps are brighter, There are 11 levels of brightness from lowest to highest;
2, Long time, Cold and warm light lamps and lanterns are gradually brightened;
brightness – :
1, Short on time, Dim the light and cold lamps, There are 11 levels of brightness from highest to lowest;
2, Long time, The cold and warm light lamps are gradually dimmed; cycle: Short press the loop key, The light is Warm, neutral, cold, Nightlight, Four state cycles, Press short to change the state one at a time; night lamp: Short press the nightlight button, The lowest brightness of a lamp converted to Warm light;
The key light : Key indicator light, The indicator button is pressed;
Note: One of the heating and cooling light Settings, Customers can define themselves according to the power supply and lamps.
III. Functional specifications
Mapping function
Turn off THE LED’ s AC power for more than 10 seconds, Then turn on the LED AC power again, 4 seconds. Long press the light button once, LED light flashes slowly once. The code successfully. Then the remote control can control the brightness, cooling and heating of the LED lights with good code.
Note: An LED light is only controlled by the last successful remote control, For example, If an LED 1 ight fixture, There is a new remote control and its code matching is successful, Then the remote control will automatically clear the code with the lamp. But a remote control can be coded and controlled with multiple LED lights,
Code clearing function
Turn off THE LED’ s AC power for more than 10 seconds, Then turn on the LED AC power again, 4 seconds, Long press the Turn off button or nightlight button once, LED light slow flash 2 time, The Ming and Qing dynasties were successful.
Note: The function of code clearing is based on the code matching between the remote control and the lamp, For example, in the following cases, the remote control and the lamp do not have the function of code clearing, If there is no clear code function, A long press to turn off the light has no effect.
(1) The remote control is not coded with the lamp, Then there is no clear code function.
(2) When they had finished coding, they cleared the code, Then there is no clear code function.
(3) They have coded each other, But then came a new remote control that corresponded with the light fixture, Then the remote control and its code function will automatically clear, No clear code function.
1. On switch function,
The lamp is normally energized, Power on the 0.5S-2S switch, The light is Warm, neutral, cold, Nightlight, 4 state loop Twitches.
2. Power off memory function
Use the remote control to adjust the brightness of LED lights, The brightness of LED lamps and the code value of the remote control will be kept in the memory of LED controller after 15S of power, Power back on after you have lost power and light the lamp at its previous brightness, And has the code remote control is still controllable.
Documents / Resources
 |
Digilog E27 LED Wireless Remote Control Light Fixture [pdf] Installation Guide E27 LED Wireless Remote Control Light Fixture, E27, LED Wireless Remote Control Light Fixture, Remote Control Light Fixture, Light Fixture, Fixture |