1. Einleitung
Welcome to the user manual for your Ulefone Armor X9 Rugged Phone. This guide provides essential information on setting up, operating, maintaining, and troubleshooting your device. The Ulefone Armor X9 is designed for durability and performance, featuring robust protection and advanced functionalities.
Key features of your Ulefone Armor X9 include:
- IP68/IP69K Grade 360 All Round Protection: Konstruiert, um rauen Umgebungen standzuhalten.
- Betriebssystem Android 11: Enjoy the latest Android experience.
- 4 GB RAM + 128 GB ROM: AmpSpeicherplatz und Speicherkapazität für Ihre Anwendungen und Daten.
- 16MP Triple Rear Camera: Capture high-quality photos and videos.
- Enorme Akkukapazität von 5580 mAh: Verlängerte Nutzungsdauer.
- Triple Navigation System: Enhanced positioning accuracy.
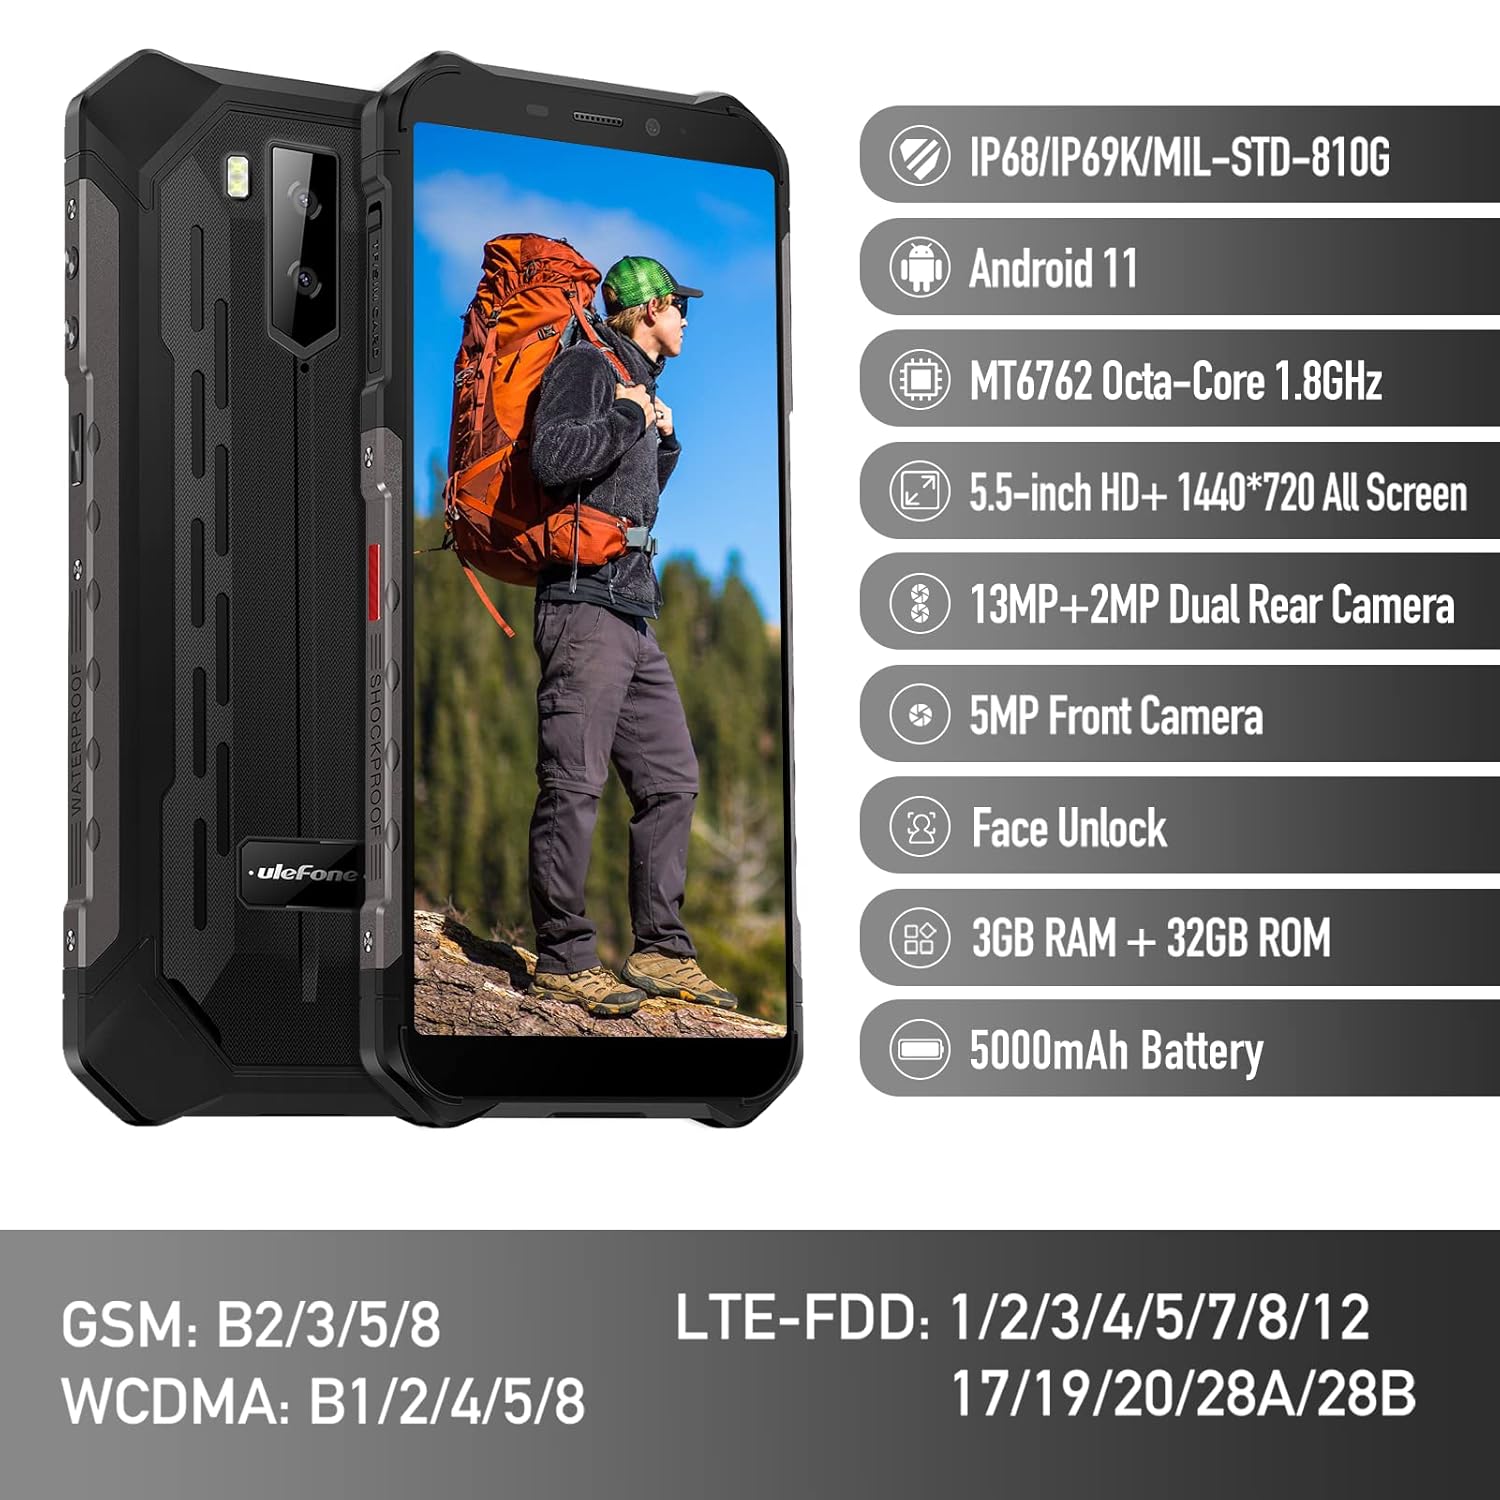
Figure 1: Ulefone Armor X9 Rugged Phone overview, highlighting its robust design and core specifications like IP68/IP69K rating, Android 11, Octa-Core processor, 5.5-inch HD+ screen, 13MP+2MP dual rear camera, 5MP front camera, Face Unlock, 3GB RAM + 32GB ROM, and 5000mAh battery.
2. Einrichtung
2.1. Installation der SIM-Karte und der TF-Karte
The Ulefone Armor X9 supports dual SIM cards and a TF (microSD) card for expandable storage. Follow these steps to install them:
- Suchen Sie den SIM-Karten-Einschub an der Seite des Telefons.
- Verwenden Sie das mitgelieferte SIM-Auswurfwerkzeug, um das Fach zu öffnen.
- Carefully place your Nano-SIM cards into the designated slots (SIM1 and SIM2).
- If using a TF card, place it into the dedicated TF card slot. Note that some configurations may share a slot between SIM2 and the TF card.
- Gently push the tray back into the phone until it is flush with the device body. Ensure the tray is properly sealed to maintain water and dust resistance.

Figure 2: Illustration of the dual SIM and TF card tray, showing how to insert SIM1, SIM2, and a TF card into the Ulefone Armor X9.
2.2. Erstes Aufladen
Before first use, it is recommended to fully charge your Ulefone Armor X9. Use the provided USB cable and power adapter.
- Verbinden Sie das USB-Kabel mit dem Ladeanschluss Ihres Telefons.
- Verbinden Sie das andere Ende des USB-Kabels mit dem Netzteil.
- Stecken Sie das Netzteil in eine Wandsteckdose.
- Die Ladeanzeige erscheint auf dem Bildschirm. Lassen Sie das Telefon laden, bis das Akkusymbol „voll“ anzeigt.
2.3. Ein-/Ausschalten
- So schalten Sie das Gerät ein: Halten Sie den Ein-/Ausschalter (normalerweise auf der rechten Seite) gedrückt, bis das Ulefone-Logo erscheint.
- So schalten Sie das Gerät aus: Halten Sie die Ein-/Aus-Taste gedrückt, bis das Menü mit den Energieoptionen auf dem Bildschirm erscheint. Wählen Sie „Ausschalten“ und bestätigen Sie.
- Neustarten: Wählen Sie im Menü „Energieoptionen“ die Option „Neustart“ und bestätigen Sie.
3. Bedienungsanleitung
3.1. Grundlegende Navigation (Android 11)
Your Ulefone Armor X9 runs on Android 11, offering an intuitive user interface. Common gestures and navigation include:
- Nach oben wischen: Öffne die App-Übersicht.
- Nach unten wischen: Öffnen Sie das Benachrichtigungsfeld und die Schnelleinstellungen.
- Klopfen: Wählen Sie ein Element aus oder öffnen Sie eine App.
- Lange drücken: Kontextmenüs aufrufen oder Symbole verschieben.
- Pinch-to-Zoom: Bilder vergrößern oder verkleinern und web Seiten.

Figure 3: Screenshots of the Android 11 interface on the Ulefone Armor X9, showing settings menus, quick toggles, and the sound recorder application.

Figure 4: The 5.5-inch 18:9 All Screen display of the Ulefone Armor X9, showcasing its immersive viewing experience with an image of a skier.
3.2. Kameranutzung
Your phone is equipped with a 16MP Triple Rear Camera and a Front Camera. To use the camera:
- Öffnen Sie die Anwendung „Kamera“ von Ihrem Startbildschirm oder aus der App-Übersicht.
- Tippen Sie auf den Auslöser, um ein Foto aufzunehmen.
- Wechseln Sie je nach Bedarf zwischen Foto- und Videomodus.
- Tap the icon to switch between the front and rear cameras.
- Explore various camera modes and settings for optimal results.
3.3. Konnektivität
The Ulefone Armor X9 supports various connectivity options:
- W-lan: Gehen Sie zu Einstellungen > Netzwerk & Internet > WLAN, um eine Verbindung zu verfügbaren Netzwerken herzustellen.
- Bluetooth: Go to Settings > Connected devices > Bluetooth to pair with Bluetooth devices.
- Geographisches Positionierungs System: The phone features AGPS for accurate location services. Ensure location services are enabled in Settings > Location.
- USB: Connect your phone to a computer using a USB cable for data transfer or charging.
3.4. Gesichtsentsperrung
For convenient and secure unlocking, your Ulefone Armor X9 supports Face Unlock:
- Gehen Sie zu Einstellungen > Sicherheit > Gesichtserkennung.
- Befolgen Sie die Anweisungen auf dem Bildschirm, um Ihr Gesicht zu registrieren.
- Sorgen Sie für gute Beleuchtung und halten Sie das Telefon während der Registrierung auf Augenhöhe.
- Nach der Registrierung können Sie Ihr Telefon entsperren, indem Sie einfach in die Frontkamera schauen.
4. Wartung
4.1. Reinigung und Pflege
To maintain the performance and appearance of your rugged phone:
- Wischen Sie Bildschirm und Gehäuse mit einem weichen, fusselfreien Tuch ab.
- Bei hartnäckigem Schmutz verwenden Sie ein leichtamp Tuch. Vermeiden Sie aggressive Chemikalien oder scheuernde Materialien.
- Ensure all port covers are securely closed to maintain water and dust resistance, especially after charging or using headphones.

Figure 5: The Ulefone Armor X9's 360° All Protection Design, showcasing its superior materials and superb durability against impacts and harsh conditions.
4.2. Water and Dust Resistance (IP68/IP69K)
The Ulefone Armor X9 is rated IP68/IP69K, meaning it is resistant to dust and water immersion. However, this resistance is not permanent and may decrease over time with normal wear. To ensure optimal protection:
- Do not intentionally submerge the phone in water for extended periods or beyond specified depths.
- Avoid exposing the phone to high-pressure water or extreme temperatures.
- Ensure all port covers are tightly sealed before exposure to water or dust.
- Falls das Telefon nass wird, trocknen Sie es gründlich ab, bevor Sie es aufladen oder irgendwelche Anschlüsse öffnen.
4.3. Batteriepflege
To prolong the life of your 5580mAh Lithium Polymer battery:
- Vermeiden Sie extreme Temperaturen (Hitze oder Kälte), da diese die Leistungsfähigkeit der Batterie beeinträchtigen können.
- Verwenden Sie ausschließlich das Original-Ladegerät und -Kabel oder zertifiziertes kompatibles Zubehör.
- Lassen Sie den Akku nicht häufig vollständig entladen. Laden Sie ihn auf, bevor er einen sehr niedrigen Ladestand erreicht.
5. Fehlerbehebung
If you encounter issues with your Ulefone Armor X9, try the following troubleshooting steps:
5.1. Telefon lässt sich nicht einschalten
- Stellen Sie sicher, dass der Akku geladen ist. Schließen Sie das Telefon für mindestens 30 Minuten an ein Ladegerät an.
- Um einen Neustart zu erzwingen, halten Sie den Netzschalter 10-15 Sekunden lang gedrückt.
5.2. Ladeprobleme
- Verify that the charging cable and adapter are working correctly. Try a different charger if available.
- Stellen Sie sicher, dass der Ladeanschluss sauber und frei von Schmutz ist.
- Make sure the charging cable is fully inserted into the port. Some rugged phone ports may require a firm connection due to protective covers.
5.3. SIM/TF Card Not Detected
- Ensure the SIM/TF card is correctly inserted into the tray and the tray is fully seated.
- Starten Sie das Telefon neu.
- Check if the SIM card is active with your network provider.
5.4. App-Abstürze oder Einfrieren
- Schließen Sie die problematische App und öffnen Sie sie erneut.
- Löschen Sie den Cache und die Daten der App (Einstellungen > Apps > [App-Name] > Speicher & Cache).
- Stellen Sie sicher, dass die App auf die neueste Version aktualisiert ist.
- Starten Sie das Telefon neu.
5.5. Werksreset
Sollten die Probleme weiterhin bestehen, kann ein Zurücksetzen auf die Werkseinstellungen Abhilfe schaffen. Warnung: Dadurch werden alle Daten auf Ihrem Telefon gelöscht. Sichern Sie wichtige Daten, bevor Sie fortfahren.
- Gehen Sie zu Einstellungen > System > Optionen zurücksetzen.
- Wählen Sie „Alle Daten löschen (Werkseinstellungen zurücksetzen)“.
- Bestätigen Sie Ihre Entscheidung und geben Sie gegebenenfalls Ihre PIN/Ihr Passwort ein.
6. Spezifikationen
Below are the detailed specifications for the Ulefone Armor X9:

Figure 6: Details of the Ulefone Armor X9's Octa-Core Processor, highlighting its power-efficient yet powerful performance, along with 3GB RAM and 32GB ROM, and support for up to 256GB TF card extendable storage.
| Besonderheit | Spezifikation |
|---|---|
| Betriebssystem | Android 11.0 |
| RAM | 3 GB (Note: Feature bullets mention 4GB RAM, please verify actual model) |
| Speicherkapazität | 32 GB (Expandable with TF card up to 256GB. Feature bullets mention 128GB ROM, please verify actual model) |
| CPU Modell | MT6762 Octa-Core 1.8 GHz (Note: Specifications list 'Snapdragon', but image indicates MT6762. Please verify actual model) |
| Technische Daten | 15.8 x 7.75 x 1.38 cm |
| Artikelgewicht | 472 g |
| Batterien | 1 Lithium-Polymer-Akku (5580 mAh, im Lieferumfang enthalten) |
| Drahtlose Kommunikation | Mobilfunk, Bluetooth, USB, WLAN |
| GPS | AGPS |
| Besondere Merkmale | Rear Camera, Face Unlock, IP68/IP69K, MIL-STD-810G |
| Anzeige | 5.5-inch HD+ 1440*720 All Screen |
| Rückfahrkamera | 13MP+2MP Dual Rear Camera (Note: Feature bullets mention 16MP Triple Rear Camera, please verify actual model) |
| Frontkamera | 5MP Frontkamera |
| Farbe | Schwarz |
| Hersteller | Ulefone |
Note: Specifications are based on available product data and may vary slightly. Please refer to your product packaging for the most accurate information. There are discrepancies between feature bullets, specifications, and image text regarding RAM, ROM, CPU, and camera megapixels. This manual uses the most frequently cited or detailed information, with notes for clarification.
7. Garantie und Support
7.1. Garantieinformationen
Your Ulefone Armor X9 is covered by a manufacturer's warranty. The specific terms and duration of the warranty may vary by region and retailer. Please refer to the warranty card included in your product packaging or contact your point of purchase for detailed information regarding warranty coverage and claims.
7.2. Kundendienst
For technical assistance, troubleshooting beyond this manual, or warranty inquiries, please contact Ulefone customer support or your authorized dealer. You can typically find contact information on the official Ulefone webauf der Website oder in Ihrer Produktdokumentation.
- Visit the official Ulefone website for FAQs, software updates, and support contact details.
- Halten Sie Ihren Kaufbeleg und die Seriennummer des Produkts bereit, wenn Sie den Kundendienst kontaktieren.