1. Einleitung
The Retevis RA619 is a versatile two-way radio designed for reliable communication in various outdoor and recreational settings. It features a compact design, Bluetooth headset compatibility, multiple charging options, and essential safety functions like vibration alerts and an SOS button. This manual provides detailed instructions for the proper setup, operation, and maintenance of your RA619 walkie talkie.

Image 1.1: The Retevis RA619 walkie talkie with its included Bluetooth headset, showcasing its compact design and accessories.
2. Lieferumfang
Upon unpacking your Retevis RA619 walkie talkie, please verify that all the following items are included:
- 2x Retevis RA619 Bluetooth Walkie Talkie
- 2x Wireless Bluetooth Headset
- 2x Ladestation
- 2x USB-Ladekabel
- 2x Battery Cover with Li-ion Battery
- 1x Benutzerhandbuch

Image 2.1: A visual representation of all components included in the Retevis RA619 walkie talkie package.
3. Produktüberschreitungview
Familiarize yourself with the various parts and controls of your Retevis RA619 walkie talkie.

Image 3.1: Detailed diagram illustrating the physical components and control buttons of the RA619 walkie talkie and its Bluetooth headset.
3.1 Walkie Talkie Components
- Antenne: Zum Senden und Empfangen von Signalen.
- Taschenlampe: Integrated LED flashlight for illumination.
- Lautstärkeregler: Rotates to adjust speaker volume and powers the unit on/off.
- LCD Anzeige: Shows channel number, battery status, and feature indicators.
- Lautsprecher-/Mikrofonbuchsen: Für externes Audiozubehör.
- PTT-Taste (Push-to-Talk): Zum Übertragen Ihrer Stimme drücken und halten.
- Modus-Taste: Durchläuft verschiedene Betriebsmodi.
- Menü-Schaltfläche: Greift auf Einstellungen und Optionen zu.
- Auf/Ab-Tasten: Navigate menus and adjust settings (e.g., channel selection).
- Monitor-Taste (MON): Deaktiviert vorübergehend die Rauschsperre, um auch schwache Signale zu empfangen.
- Anrufknopf: Löst einen Rufton aus.
- SOS-Taste: Aktiviert die Notfallalarmfunktion.
- Lautsprecher: Für Audioausgabe.
3.2 Bluetooth Headset Components
- High Volume Button: Increases headset volume.
- Low Volume Button: Decreases headset volume.
- Ein / Aus Schalter: Schaltet das Headset ein oder aus.
- PTT-Taste: Activates transmission when connected to the walkie talkie.
4. Einrichtung
4.1 Einlegen und Laden der Batterie
The RA619 walkie talkie offers flexible power options, including a rechargeable lithium-ion battery and compatibility with AA batteries.
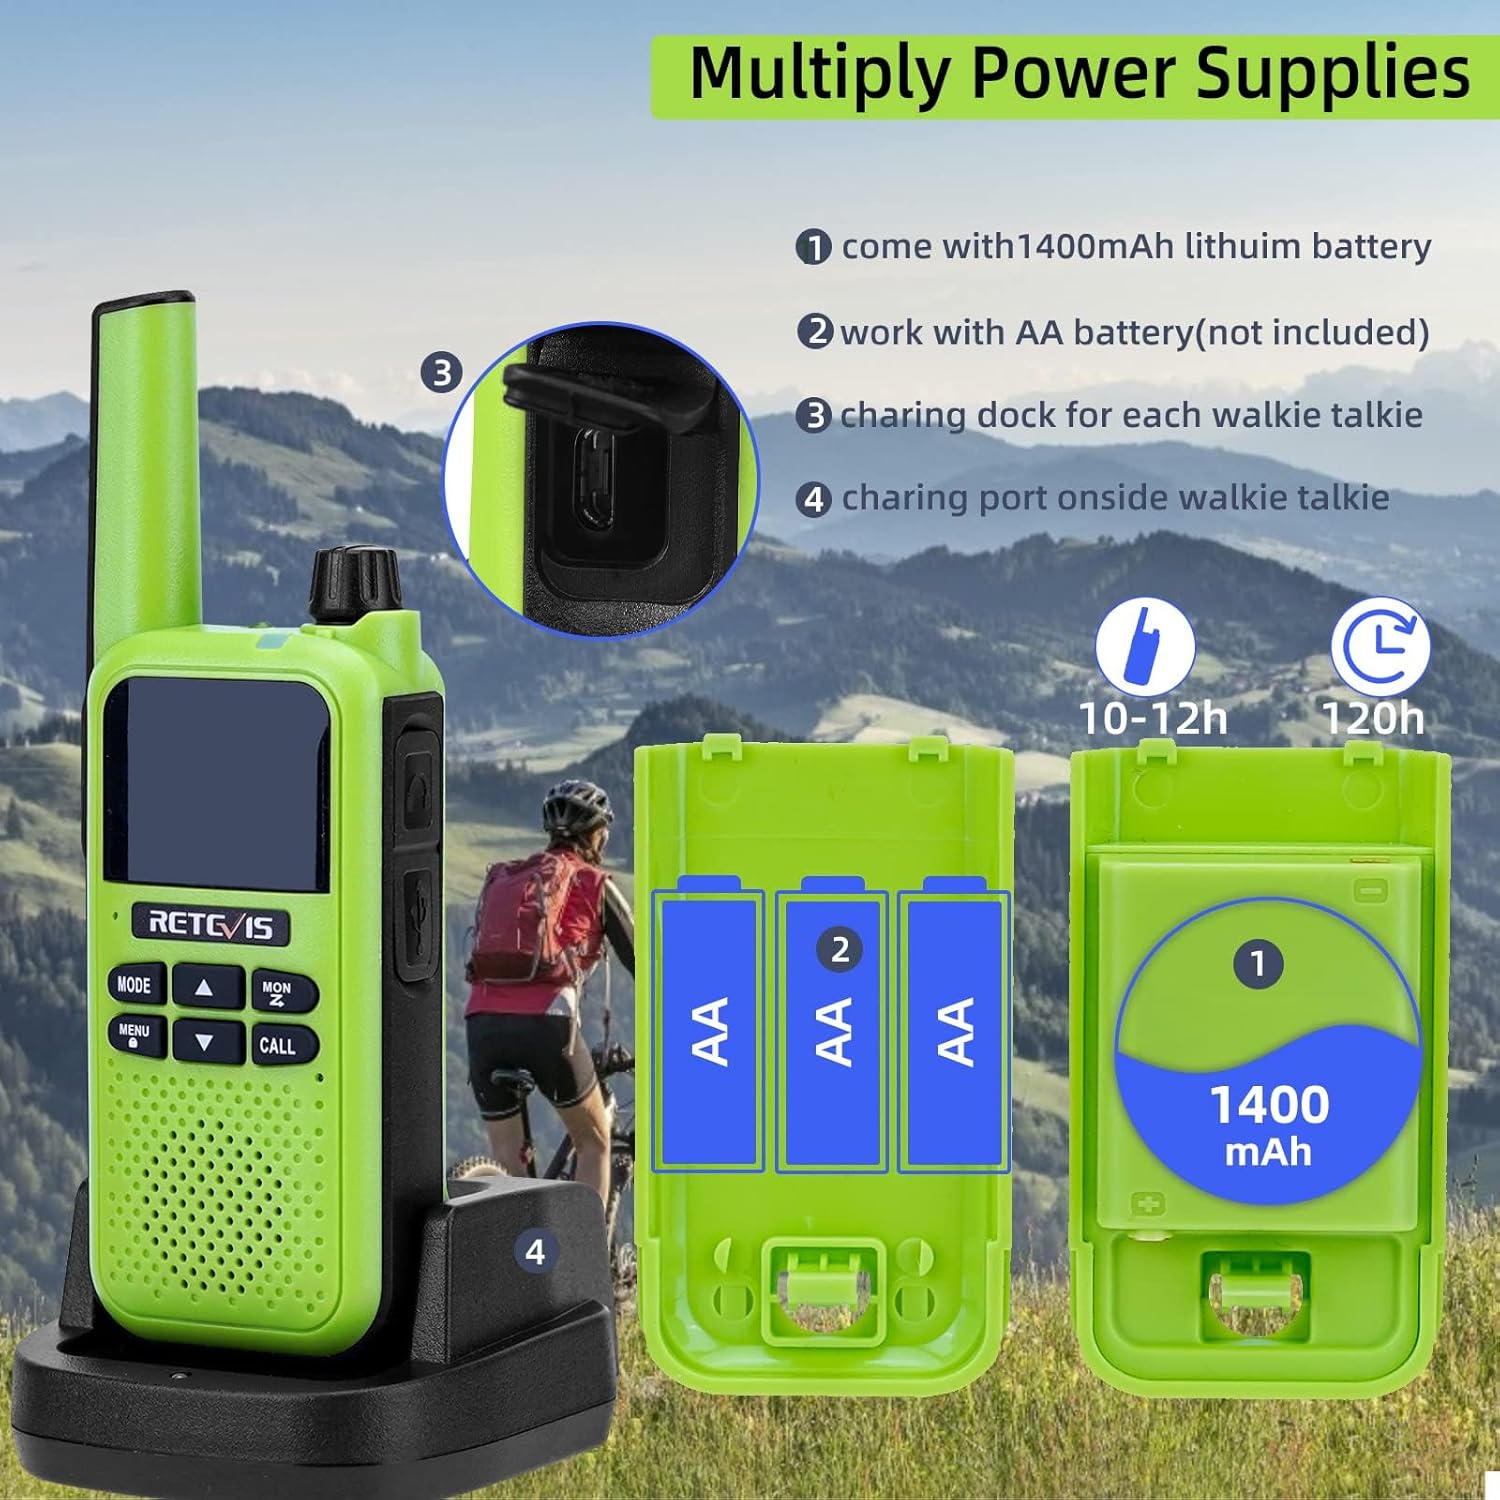
Image 4.1: Illustration of the various power supply methods for the RA619, including the 1400mAh lithium battery, AA battery compartment, charging dock, and micro USB port.
- Litium-Ionen-Batterie: The walkie talkie comes with a 1400mAh lithium-ion battery pack. Insert this battery into the compartment on the back of the radio and secure it with the provided battery cover.
- AA Batteries (Not Included): Alternatively, you can power the walkie talkie using 3 AA batteries. Open the battery compartment, insert the AA batteries according to the polarity markings, and close the cover.
- Laden über Dock: Place the walkie talkie into the charging dock. Connect the USB charging cable to the dock and a suitable USB power source. The charging indicator will show the charging status.
- Aufladen über Micro USB: For direct charging, connect the micro USB charging cable to the port on the side of the walkie talkie and a USB power source.
A full charge typically takes 10-12 hours and provides approximately 120 hours of standby time.
5. Bedienungsanleitung
5.1 Ein-/Ausschalten und Lautstärkeregelung
- To power on the walkie talkie, rotate the Volume Knob clockwise until you hear a click.
- Zum Ausschalten drehen Sie den Lautstärkeregler gegen den Uhrzeigersinn, bis Sie ein Klicken hören.
- Adjust the volume by rotating the Volume Knob clockwise to increase and counter-clockwise to decrease.
5.2 Kanalauswahl
The RA619 supports 16 channels for communication.
- Drücken Sie die SPEISEKARTE , um das Menü aufzurufen.
- Verwenden Sie die UP or RUNTER arrow buttons to navigate to the channel selection option.
- Drücken SPEISEKARTE again to select the channel.
- Verwenden Sie die UP or RUNTER arrow buttons to choose your desired channel (1-16).
- Drücken SPEISEKARTE um Ihre Auswahl zu bestätigen, und drücken Sie dann MODUS , um das Menü zu verlassen.
5.3 Push-to-Talk (PTT) Communication
- Stellen Sie sicher, dass beide Walkie-Talkies auf dem gleichen Kanal eingestellt sind.
- Halten Sie die PTT button on the side of the walkie talkie.
- Sprechen Sie deutlich in das Mikrofon.
- Lassen Sie den PTT Klicken Sie auf die Schaltfläche, um auf eine Antwort zu warten.
5.4 VOX-Funktion (Sprachgesteuerte Vermittlungsstelle)
The VOX function allows for hands-free communication, activating transmission when it detects your voice.

Image 5.1: A user on a motorcycle communicating hands-free, demonstrating the VOX feature of the RA619 walkie talkie.
- Um VOX zu aktivieren, drücken Sie die SPEISEKARTE button, navigate to the VOX setting, and select your desired sensitivity level.
- When using a headset, ensure VOX is enabled on the walkie talkie for hands-free operation.
5.5 Bluetooth Headset Pairing
The RA619 walkie talkie can be paired with the included Bluetooth headset for wireless communication.

Image 5.2: A Retevis RA619 walkie talkie and its Bluetooth headset, with a background depicting outdoor activity, highlighting its hands-free capability.

Image 5.3: Visual guide demonstrating the simple steps to pair the RA619 walkie talkie with its Bluetooth headset by pressing the dedicated Bluetooth button.
- Ensure both the walkie talkie and the Bluetooth headset are powered on.
- Press and hold the Bluetooth button on the side of the walkie talkie until the pairing indicator flashes.
- The headset should automatically connect. A confirmation tone or indicator light will signal a successful connection.
5.6 Call Vibration Function
The RA619 features a vibration alert for incoming calls, useful in noisy environments or when discretion is required.

Image 5.4: The RA619 walkie talkie vibrating, indicating an incoming call, useful for discreet alerts in various settings.

Image 5.5: A visual representation of the RA619's vibration alert feature, ensuring notifications are received even in challenging conditions.
To enable or disable the vibration function, access the menu settings and locate the 'Vibration' option.
5.7 SOS-Notruffunktion
In emergency situations, the SOS function can be activated to alert others.

Image 5.6: Close-up of the RA619 showing the dedicated SOS button and the LED torch button.

Image 5.7: A scenario depicting the use of the RA619's SOS emergency function after an accident, highlighting its safety utility.
Drücken und halten Sie die entsprechende Taste. SOS button to activate the emergency alarm. This will transmit an alert signal to other radios on the same channel.
5.8 LED Taschenlampe
The integrated LED flashlight provides illumination in dark environments.

Image 5.8: The RA619 walkie talkie illuminating a dark camping area with its built-in LED flashlight.
Drücken Sie die entsprechende Fackel-Licht Knopf zum Ein- und Ausschalten der Taschenlampe.
5.9 Drahtlose Kopierfunktion
The wireless copy function allows for quick and simultaneous duplication of settings between multiple RA619 walkie talkies.

Image 5.9: Diagram illustrating the wireless copy function, enabling quick synchronization of settings across multiple RA619 units.

Image 5.10: Two RA619 walkie talkies demonstrating the wireless copy feature, simplifying setup for multiple devices.
Refer to the specific instructions in the full user manual for detailed steps on initiating and completing the wireless copy process.
6. Wartung
- Reinigung: Verwenden Sie ein weiches,amp cloth to clean the exterior of the walkie talkie. Avoid using harsh chemicals or abrasive cleaners.
- Lagerung: Store the walkie talkie in a cool, dry place away from direct sunlight and extreme temperatures when not in use for extended periods. Remove batteries if storing for several months.
- Batteriepflege: Fully charge the lithium-ion battery before first use. Avoid overcharging or completely draining the battery to prolong its lifespan.
- Wasserbeständigkeit: Note that the Retevis RA619 is nicht wasserbeständig. Avoid exposure to rain, splashes, or immersion in water to prevent damage.
7. Fehlerbehebung
If you encounter issues with your Retevis RA619 walkie talkie, refer to the following common problems and solutions:
| Problem | Mögliche Ursache | Lösung |
|---|---|---|
| Kein Strom | Batterie leer oder falsch eingesetzt. | Charge the battery or replace AA batteries. Ensure batteries are correctly inserted. |
| Senden und Empfangen nicht möglich | Incorrect channel, out of range, or low battery. | Verify both radios are on the same channel. Move closer to the other radio. Charge battery. |
| Schlechte Audioqualität | Volume too low, interference, or microphone/speaker obstruction. | Adjust volume. Move away from sources of interference. Ensure microphone and speaker are clear. |
| Bluetooth-Headset lässt sich nicht koppeln | Headset not in pairing mode or too far from radio. | Ensure headset is on and in pairing mode. Bring headset closer to the walkie talkie. |
Sollte das Problem nach dem Ausprobieren dieser Lösungsansätze weiterhin bestehen, wenden Sie sich bitte an den Retevis-Kundendienst, um weitere Unterstützung zu erhalten.
8. Spezifikationen
| Besonderheit | Detail |
|---|---|
| Modellnummer | EUA9217BX2 |
| Marke | Retevis |
| Farbe | Grün |
| Anzahl der Kanäle | 16 |
| Frequenzbereich | 446.00625–446.19375 MHz |
| Maximale Sprechreichweite | 1.5 Mile (approximately 2.4 km) |
| Akku-Typ | 1400mAh Lithium Ion (included) or 3x AA (not included) |
| Bandtage | 3.7 Volt |
| Technische Daten | 3.4T x 5.5B x 15.8H Zentimeter |
| Gewicht | 325 g |
| Wasserbeständigkeit | Nicht wasserfest |
| Besondere Merkmale | Call Vibration, Emergency Alarm, Bluetooth Headset, VOX, LED Flashlight, Wireless Copy |
9. Sicherheitshinweise
- Das Funkgerät darf nicht in explosionsgefährdeten Bereichen (z. B. in der Nähe von brennbaren Gasen, Staubpartikeln, Metallpulvern) betrieben werden.
- Do not attempt to disassemble or modify the radio. Repairs should only be performed by authorized service personnel.
- Verwenden Sie ausschließlich zugelassene Batterien und Ladegeräte, um Schäden zu vermeiden und die Sicherheit zu gewährleisten.
- Keep the radio and its accessories out of reach of small children.
- Vermeiden Sie längere Einwirkung von direkter Sonneneinstrahlung oder extremen Temperaturen.
- Do not immerse the radio in water, as it is not water resistant.
10. Garantie und Support
For warranty information and customer support, please refer to the documentation provided with your purchase or visit the official Retevis website. Contact details for support are typically available on the manufacturer's webWebsite.


