1. Einleitung
Vielen Dank für Ihren Einkauf.asing the ORIA Motion Sensor Light. This battery-powered LED night light is designed to provide convenient, automatic illumination in various areas of your home. Please read this manual carefully before installation and use to ensure proper operation and longevity of your device.
2. Packungsinhalt
- 3 x ORIA Motion Sensor Night Light
- 6 x Schrauben
- 1 x doppelseitiges Klebeband
- 1 x Benutzerhandbuch
3. Spezifikationen
| Modell | OUS-HY-UF75Y |
| Stromquelle | 3 x AAA-Batterien (nicht enthalten) |
| Bandtage | 4.5 Volt |
| Wastage | 0.2 Watt |
| Lichtquellentyp | LED |
| Lumen | 20lm |
| Besonderheit | Bewegungssensor |
| Lebensdauer | 20,000 Stunden |
| Material | Acrylnitril-Butadien-Styrol (ABS) |
| Technische Daten | 1.04 x 2.75 x 3 Zoll |
| Artikelgewicht | 5.9 Unzen (pro Einheit) |
4. Sicherheitshinweise
- Mischen Sie keine alten und neuen Batterien.
- Mischen Sie keine Alkali-, Standard- (Kohle-Zink) oder wiederaufladbaren (Nickel-Cadmium) Batterien.
- Achten Sie darauf, dass die Batterien mit der richtigen Polarität (+ und -) eingelegt sind.
- Entfernen Sie die Batterien, wenn die Leuchte längere Zeit nicht verwendet wird.
- Dieses Gerät ist nur für den Innenbereich bestimmt.
- Vor Wasser und übermäßiger Feuchtigkeit schützen.
- Außerhalb der Reichweite von Kindern aufbewahren.
5. Einrichtung
5.1 Einlegen der Batterie
- Drehen Sie die Rückseite der Lampe vorsichtig gegen den Uhrzeigersinn, um das Batteriefach zu öffnen.
- Legen Sie 3 AAA-Batterien (nicht im Lieferumfang enthalten) in das Batteriefach ein und achten Sie dabei auf die richtige Polarität.
- Replace the back cover by aligning the marks and twisting clockwise until secure.
5.2 Montagemöglichkeiten
The ORIA Motion Sensor Light offers two installation methods:

Image: Demonstrates the two installation methods: using screws for a permanent fixture or double-sided adhesive tape for a temporary, non-damaging mount.
Option 1: Schraubmontage
- Choose a desired location for the light.
- Mark the positions for the two screw holes on the mounting surface.
- Bohren Sie bei Bedarf Führungslöcher.
- Secure the light to the surface using the provided screws.
Option 2: Adhesive Tape Mounting
- Clean and dry the desired mounting surface thoroughly.
- Peel off one side of the double-sided adhesive tape and apply it firmly to the back of the light.
- Peel off the other side of the tape and press the light firmly onto the mounting surface for at least 30 seconds.
- Allow 24 hours for the adhesive to fully cure before applying significant pressure.
6. Bedienungsanleitung
The ORIA Motion Sensor Light features three operating modes: ON, OFF, and AUTO.

Image: Illustrates the light's behavior: off during daylight, activating upon motion detection, and automatically turning off after 30 seconds of no motion.
6.1 Modusauswahl
Locate the switch on the side of the light to select your desired mode:
- AUF: The light will remain continuously on, regardless of ambient light or motion.
- AUS: Das Licht bleibt aus.
- AUTO (Bewegungssensormodus): The light will automatically turn on when motion is detected in a dark environment. It will turn off approximately 30 seconds after motion ceases.
6.2 Funktionalität des Bewegungssensors
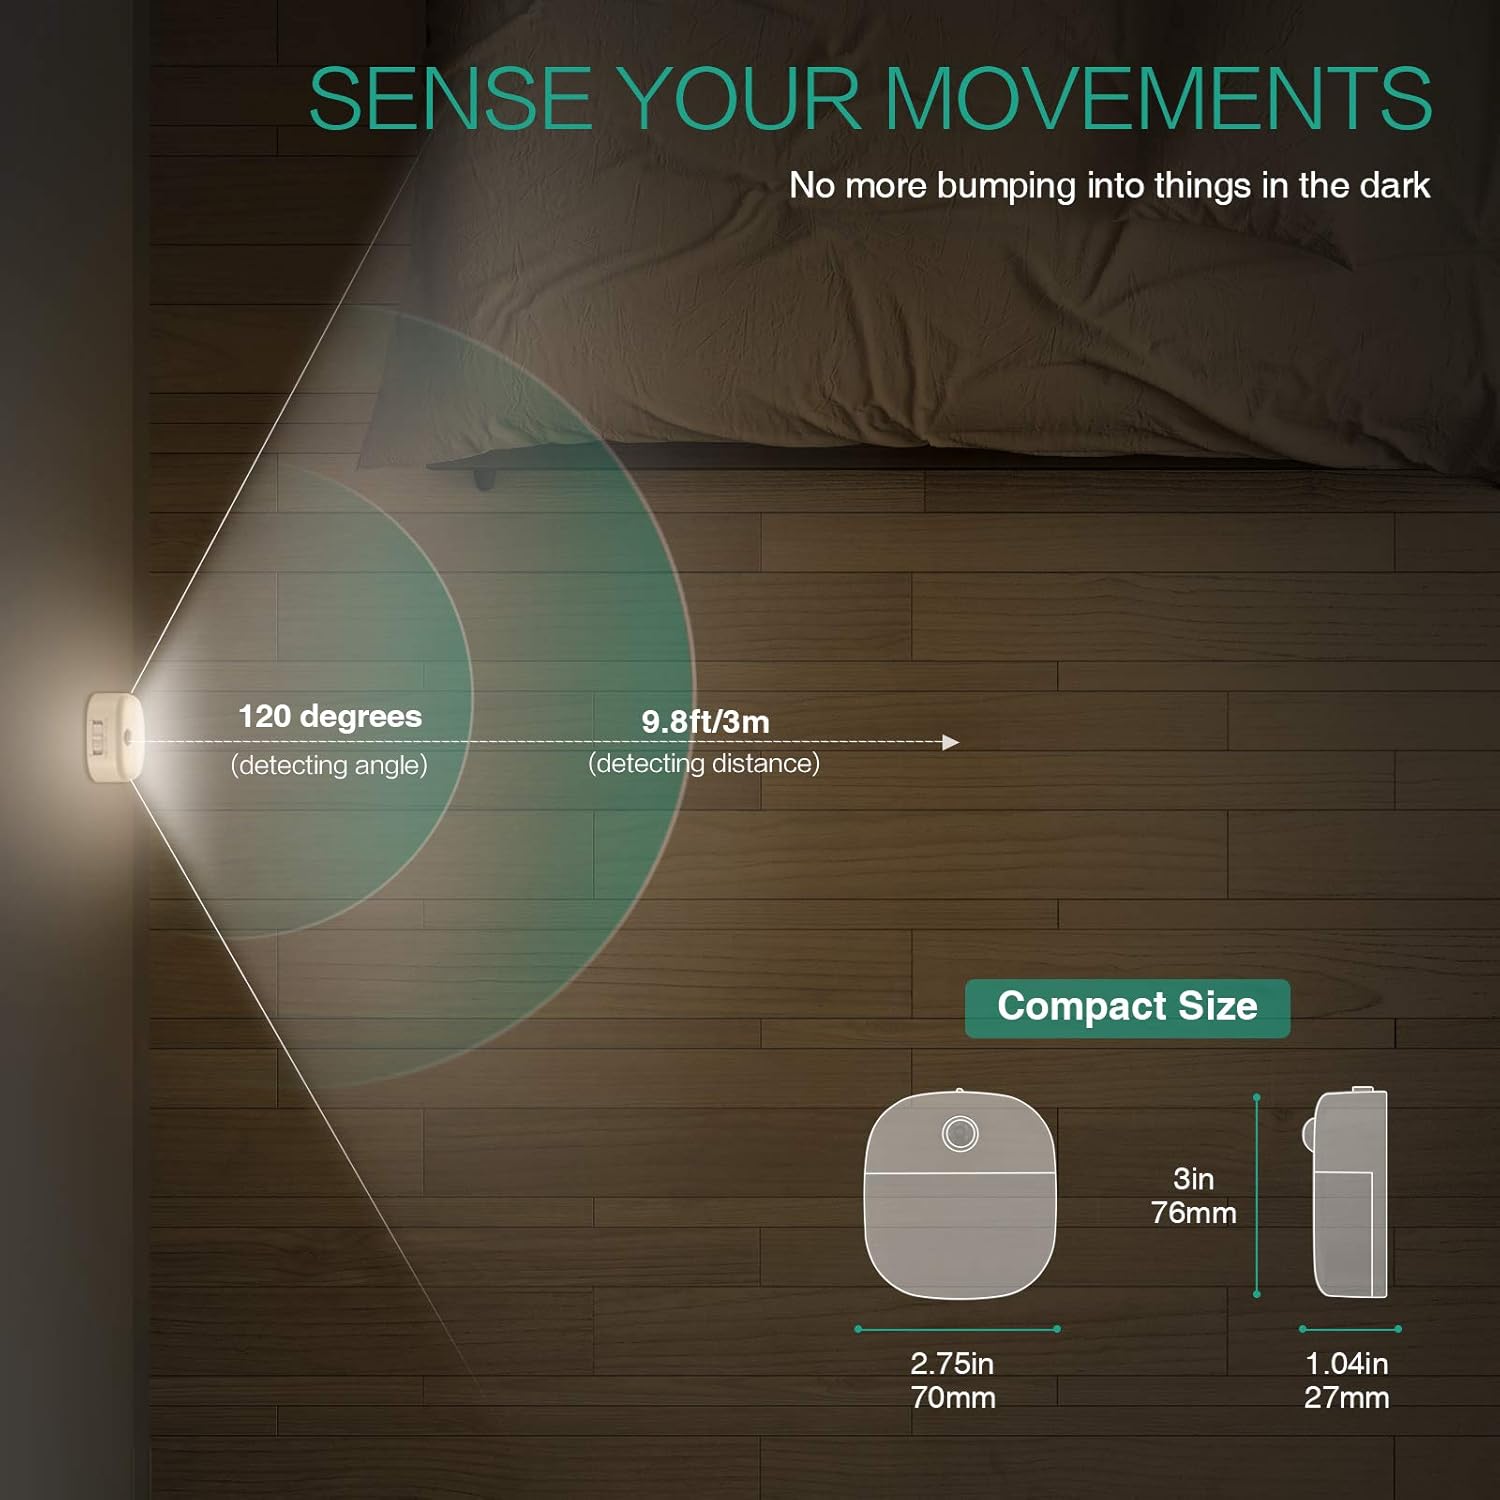
Image: A motion sensor light mounted on a wall, illuminating a staircase as a person ascends, demonstrating its practical application.
- Erfassungswinkel: 120 Grad
- Erkennungsentfernung: Bis zu 9.8 Meter
- The sensor is designed to activate only in low-light conditions to conserve battery life.
- Avoid placing the light in direct sunlight or near heat sources, as this may affect sensor performance.
Video: An official product video demonstrating the ORIA Motion Sensor Light's features, including its gentle illumination and motion detection capabilities in various settings like bookshelves and desks.
7. Wartung
- Reinigung: Wipe the light with a soft, dry cloth. Do not use abrasive cleaners or immerse in water.
- Batteriewechsel: When the light dims or fails to activate, replace all 3 AAA batteries with new ones. Ensure correct polarity.
- Sensorpflege: Keep the motion sensor lens clean and unobstructed for optimal performance.
8. Fehlerbehebung
| Problem | Mögliche Ursache | Lösung |
|---|---|---|
| Licht geht nicht an. |
|
|
| Light stays on continuously (in AUTO mode). |
|
|
| Motion sensor is not sensitive. |
|
|
9. Garantie und Support
ORIA products are designed for reliability and performance. For warranty information or technical support, please refer to the contact details provided with your purchase or visit the official ORIA webWebsite.
Bitte bewahren Sie dieses Handbuch zum späteren Nachschlagen auf.


