1. Einleitung
This manual provides comprehensive instructions for the setup, operation, and maintenance of your LIORQUE HM433A Projection Alarm Clock. Please read this manual thoroughly before using the device to ensure proper function and longevity.
The LIORQUE HM433A is a versatile alarm clock featuring a 180° rotatable projection, FM radio, temperature display, and a convenient USB charging port. It is designed for ease of use and enhanced readability.
2. Packungsinhalt
Überprüfen Sie, ob alle Artikel im Paket vorhanden sind:
- 1 x LIORQUE Projection Alarm Clock (Model HM433A)
- 1 x Benutzerhandbuch (Dieses Dokument)
- 1 x Micro-USB-Kabel
- 1 x AC Adapter
3. Produktüberschreitungview
Machen Sie sich mit den wichtigsten Komponenten und Bedienelementen Ihres Weckers vertraut.

Abbildung 3.1: Front view of the LIORQUE HM433A Projection Alarm Clock, showing the digital display, projection, and general design.
3.1. Bedientasten
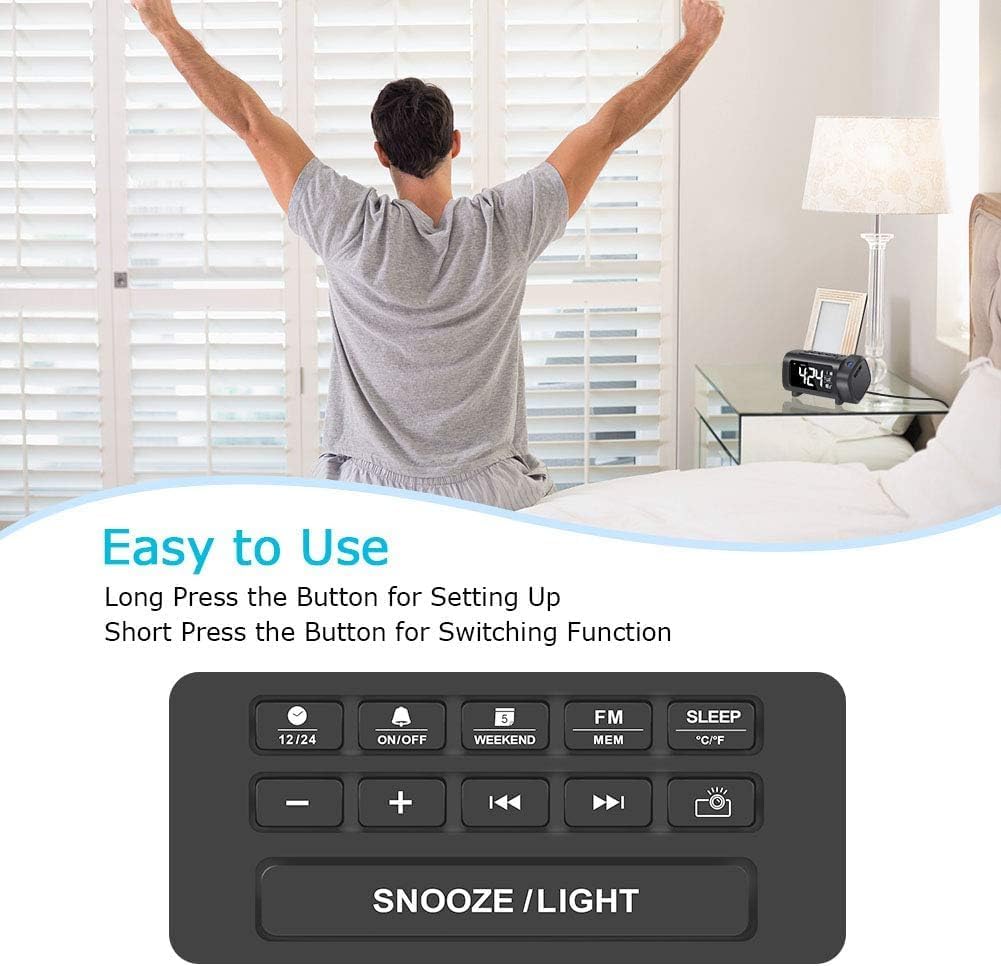
Abbildung 3.2: Top panel control buttons for various functions.
- 12/24-Taste: Zwischen 12-Stunden- und 24-Stunden-Zeitformat umschalten.
- EIN/AUS-Taste: Power on/off the alarm, or activate/deactivate alarm settings.
- Weekend Button: Enable/disable weekend alarm mode.
- FM/MEM Button: Access FM radio functions and save/recall radio presets.
- Schlafknopf: Set the sleep timer for the FM radio.
- °C/°F-Taste: Switch temperature display between Celsius and Fahrenheit.
- - / + Schaltflächen: Adjust values (time, volume, frequency) or navigate menus.
- Zurück-/Weiter-Schaltflächen: Change FM radio stations or navigate tracks.
- Projector Button: Control projection features (on/off, brightness, flip).
- Schlummer-/Lichttaste: Activate snooze during an alarm, or adjust display brightness.
4. Einrichtung
4.1. Stromanschluss
- Connect the Micro USB cable to the input port on the back of the alarm clock.
- Stecken Sie den Netzadapter in eine normale Steckdose. Das Display der Uhr leuchtet auf.
- Notiz: The alarm clock requires continuous AC power for full functionality. It is not battery-operated for primary power.
4.2. Batterie-Backup-Installation
The device includes a CR2032 battery for backup. This battery preserves time and alarm settings during a power outage versorgt jedoch weder das Display noch die Projektion mit Strom.
- Suchen Sie das Batteriefach an der Unterseite des Geräts.
- Öffnen Sie die Fachabdeckung.
- Legen Sie eine CR2032-Batterie ein und achten Sie dabei auf die richtige Polarität (+/-).
- Schließen Sie die Fachabdeckung sicher.
5. Bedienungsanleitung
5.1. Uhrzeit und Datum einstellen
- Zeiteinstellung: Long press the "12/24" button to enter time setting mode. The hour digits will flash. Use the "+" or "-" buttons to adjust the hour. Press "12/24" again to confirm and move to minute setting. Adjust minutes with "+" or "-" buttons. Press "12/24" to confirm.
- 12/24-Stunden-Format: Short press the "12/24" button to switch between 12-hour (with AM/PM indicator) and 24-hour formats.
- Datumseinstellung: Long press the "Weekend" button to enter date setting mode. The year will flash. Use "+" or "-" to adjust. Press "Weekend" to confirm and move to month, then day. Adjust each with "+" or "-" and confirm with "Weekend".
- Temperatureinheit: Short press the "°C/°F" button to switch between Celsius and Fahrenheit.
5.2. Alarme einstellen
The clock supports multiple alarms. Follow these steps for each alarm:
- Weckzeit einstellen: Long press the "ON/OFF" button to enter alarm setting mode. The alarm hour will flash. Use "+" or "-" to adjust the hour. Press "ON/OFF" to confirm and move to minute setting. Adjust minutes with "+" or "-" and confirm with "ON/OFF".
- Auswahl des Alarmtons: After setting the time, you can choose between Buzzer or FM Radio as the alarm sound. Use "+" or "-" to select. Press "ON/OFF" to confirm.
- Alarm aktivieren/deaktivieren: Short press the "ON/OFF" button to toggle the alarm on or off. An alarm icon will appear/disappear on the display.
- Schlummerfunktion: When an alarm sounds, press the "SNOOZE/LIGHT" button to activate snooze. The alarm will pause for 9 minutes and then sound again.
- Wochenendmodus: Short press the "Weekend" button to activate/deactivate weekend mode. In weekend mode, alarms will not sound on Saturdays and Sundays.
5.3. Projection Features
The projector displays the time on a wall or ceiling.

Abbildung 5.1: 180° Projection Flip Function.
- Ein-/Ausschalten: Short press the "Projector" button to turn the projection on or off.
- 180°-Flip: Long press the "Projector" button to flip the projected image 180 degrees, allowing for correct orientation regardless of clock placement.
- Projektionshelligkeit: While projection is active, short press the "Projector" button repeatedly to cycle through 4 brightness levels (Off, Dim, Medium, Bright).

Abbildung 5.2: Adjusting Projection Brightness.
Optimale Projektionsdistanz: For best clarity, the recommended projection distance is 2-3 meters (7-10 feet). For higher ceilings, projecting onto a wall may yield better results.
5.4. Display Brightness and Color
- 4-stufiger Dimmer: Short press the "SNOOZE/LIGHT" button in standard time display mode to cycle through 4 brightness levels for the main display (0%, 50%, 75%, 100%).
- Display Color Switch: Long press the "SNOOZE/LIGHT" button to switch the display color between white and blue.

Abbildung 5.3: Main Display Brightness Levels.

Abbildung 5.4: Display Color Options (White/Blue).
5.5. FM-Radiobetrieb

Abbildung 5.5: FM Radio and Sleep Timer Functionality.
- Ein-/Ausschalten: Short press the "FM/MEM" button to turn the FM radio on or off.
- Automatischer Scan: Long press the "FM/MEM" button to automatically scan and save available FM stations (76.0MHz-108.0MHz). The clock can store up to 15 preset stations.
- Manuelle Abstimmung: Use the "Previous" or "Next" buttons to manually tune to desired frequencies.
- Lautstärke anpassen: Use the "+" or "-" buttons to adjust the radio volume (15 levels).
- Schlaf-Timer: While the radio is playing, short press the "SLEEP" button repeatedly to set a sleep timer (5-90 minutes). The radio will automatically turn off after the set duration.
5.6. USB-Ladeanschluss

Abbildung 5.6: USB Charging Port in Use.
The alarm clock features a 5V/1.2A USB output port on the side. This allows you to charge your smartphone or other USB-powered devices conveniently while the clock is connected to AC power.
6. Wartung
- Reinigung: Reinigen Sie die Oberfläche des Weckers mit einem weichen, trockenen Tuch. Verwenden Sie keine flüssigen Reinigungsmittel oder Scheuermittel.
- Linsenpflege: Gently wipe the projection lens with a soft, lint-free cloth to maintain clear projection quality.
- Lagerung: If storing the device for an extended period, disconnect it from power and remove the backup battery.
7. Fehlerbehebung
| Problem | Mögliche Ursache | Lösung |
|---|---|---|
| Die Uhranzeige ist aus. | No AC power connection. | Ensure the AC adapter is securely plugged into a working outlet and the clock. |
| Die Projektion ist verschwommen oder undeutlich. | Incorrect projection distance or dirty lens. | Adjust the clock's position for optimal distance (2-3m). Clean the projection lens with a soft cloth. |
| Projection is upside down or reversed. | Projection image needs to be flipped. | Long press the "Projector" button to flip the image 180 degrees. |
| Der Alarm ertönt nicht. | Alarm is deactivated or weekend mode is on. | Short press "ON/OFF" to ensure alarm is active (icon visible). Check if "Weekend" mode is enabled. |
| Der FM-Radioempfang ist schlecht. | Antennenposition oder Störungen. | Adjust the position of the clock or its antenna for better reception. Avoid placing near other electronic devices. |
| USB-Ladefunktion funktioniert nicht. | Clock not connected to AC power or device incompatibility. | Ensure the clock is powered by AC. Check the charging cable and the device being charged. |
8. Spezifikationen
| Marke | LIORQUE |
| Modell | HM433A |
| Anzeigetyp | Digital (VA Display) |
| Stromquelle | Kabelgebundenes Elektrogerät (Netzadapter) |
| Batterie-Backup | 1 x CR2032 (im Lieferumfang enthalten) |
| Projektionsmerkmale | 180° Rotatable, 4-Level Brightness |
| Display-Dimmer | 4-Level Brightness, 2-Color (White/Blue) |
| FM-Radiofrequenz | 76.0MHz-108.0MHz (15 preset stations) |
| USB-Ausgang | 5 V/1.2 A |
| Technische Daten | 9.38 x 3.81 x 9.5 cm |
| Gewicht | 320 g |
9. Garantie und Support
Informationen zur Garantie oder zum technischen Support finden Sie in den mit Ihrem Kauf gelieferten Kontaktdaten oder auf der offiziellen LIORQUE-Website. webWebsite. Bewahren Sie Ihren Kaufbeleg für Garantieansprüche auf.


