Einführung
This manual provides detailed instructions for the installation, setup, and operation of your JVC KD-X260BT Digital Media Receiver. This unit is designed to provide high-quality audio playback and hands-free communication in your vehicle, featuring Bluetooth connectivity, USB input, and a 13-band equalizer. Please note, this unit does not play CDs. Read this manual thoroughly before use to ensure proper operation and to prevent damage.

Bild: Vorderseite view of the JVC KD-X260BT Digital Media Receiver, showing the display and control buttons.
Sicherheitshinweise
- Bedienen Sie das Gerät nicht so, dass Sie vom Fahren abgelenkt werden. Konzentrieren Sie sich stets auf die Straße.
- Ensure proper wiring connections to prevent short circuits or damage to the vehicle's electrical system.
- Das Gerät darf keiner Feuchtigkeit oder extremen Temperaturen ausgesetzt werden.
- Versuchen Sie nicht, das Gerät zu zerlegen oder zu verändern. Überlassen Sie alle Wartungsarbeiten qualifiziertem Fachpersonal.
- Use only accessories specified by JVC.
Packungsinhalt
Überprüfen Sie, ob alle Artikel im Paket vorhanden sind:
- JVC KD-X260BT Digitaler Medienreceiver
- Kabelbaum
- Externes kabelgebundenes Mikrofon
- Montagezubehör
- Bedienungsanleitung (dieses Dokument)
Installation
Professional installation is recommended for this product. Incorrect installation can lead to damage to the unit or vehicle. The KD-X260BT features a short body design, which facilitates easier installation in various vehicle dashboards.
Kabelverbindungen:
- Connect the wiring harness according to your vehicle's wiring diagram.
- Stellen Sie sicher, dass alle Verbindungen sicher und isoliert sind, um Kurzschlüsse zu vermeiden.
- Connect the external microphone to the designated input for hands-free calling. Position the microphone in a location that provides clear voice pickup.
- Schließen Sie das Antennenkabel an.
- Bei Verwendung von extern amplifiers, connect the 2.5V preamp outputs (rear/subwoofer selectable).
Montage:
- Montieren Sie die Montagehülse in die Öffnung im Armaturenbrett.
- Schieben Sie den Empfänger in die Montagehülse, bis er einrastet.
- Bringen Sie den Zierring an.
Aufstellen
Erstes Einschalten:
After installation, turn on your vehicle's ignition. The unit should power on. Follow any on-screen prompts for initial setup, such as language selection.
Bluetooth-Pairing:
The KD-X260BT supports Bluetooth 3.0+EDR and allows for two phones to be connected full-time. This enables receiving calls from either phone with a push of a key.
- On the receiver, navigate to the Bluetooth menu.
- Wählen Sie „Kopplung“ oder „Gerätesuche“.
- Aktivieren Sie Bluetooth auf Ihrem Smartphone und suchen Sie nach verfügbaren Geräten.
- Select "KD-X260BT" from the list on your phone.
- Bestätigen Sie den Kopplungscode auf beiden Geräten, falls Sie dazu aufgefordert werden.
- Nach erfolgreicher Kopplung zeigt das Gerät eine Bestätigung an.
The unit supports Bluetooth profiles HFP (Hands-Free Profile 1.6 for wideband speech), HSP (Headset Profile), PBAP (Phone Book Access Profile), A2DP (Advanced Audio Distribution Profile) und AVRCP (Audio/Video Remote Control Profile 1.5).
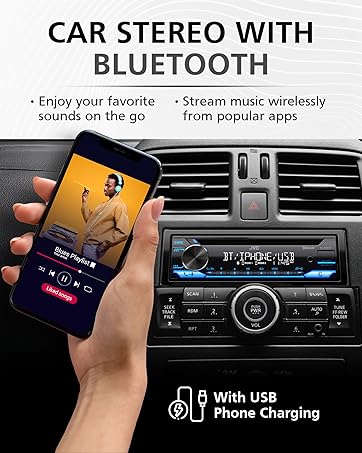
Image: JVC KD-X260BT display indicating Bluetooth connection, with a smartphone showing music playback, illustrating wireless audio streaming.
JVC Remote App:
Download the "JVC Remote" app (available for iOS and Android) to control the receiver's source directly from your smartphone using simple finger gestures.
Bedienungsanleitung
Grundlegende Steuerelemente:
- Netzschalter: Drücken Sie diese Taste, um das Gerät ein-/auszuschalten.
- Lautstärkeregler: Drehen Sie den Regler, um die Lautstärke anzupassen. Drücken Sie, um auf die Menüoptionen zuzugreifen.
- Quellentaste: Press to cycle through available audio sources (Tuner, USB, Bluetooth Audio, AUX).
- Anzeigetaste: Changes display information (e.g., clock, track title).
Radio-Tuner:
- Press the Source button to select "Tuner" (AM/FM).
- Use the seek buttons to find radio stations.
- Press and hold a preset button (1-6) to store a station.
USB-Wiedergabe:
Connect a USB device to the front USB port. The unit supports MP3/WMA/WAV/FLAC playback. The USB port also provides high current 1.5A charging for smartphones.
- Insert the USB device. The unit will automatically switch to USB source and begin playback.
- Use the track buttons to skip tracks.
- Use the folder buttons to navigate through folders.
- MP3-ID3 Tag Display (title/artist/album) is supported.
- Android music playback (AOA 2.0) is supported for Android phones (version 4.1 or later).
Bluetooth-Audiostreaming:
Once a Bluetooth device is paired, select "Bluetooth Audio" as the source to stream music wirelessly. Use the receiver's controls or the paired device to manage playback (play, pause, skip, search via AVRCP 1.5).
Freisprechen:
When a call comes in on a paired phone, the unit will display the caller ID. Press the call button to answer, and the end call button to hang up. The external microphone ensures clear communication.
Audioeinstellungen (Equalizer):
The unit features a 13-Band Graphic Equalizer with 10 preset EQ settings and 1 user-customizable setting. Access the audio menu to adjust:
- Equalizer: Select from preset curves or customize your own.
- Bassverstärkung: Enhances low frequencies.
- Lautstärke: Compensates for perceived loss of bass and treble at low volumes.
- Balance/Fader: Adjusts sound distribution between left/right and front/rear speakers.
- Subwoofer-Steuerung: Adjust subwoofer output level and frequency if connected.
Internet Radio/Digital Radio Control:
Control Pandora, iHeartRadio, and Spotify directly from the receiver when connected to a compatible Android device via Bluetooth.
Steering Wheel Remote Control:
Factory steering wheel control functions can be retained with a third-party adapter (sold separately).
Wartung
- Reinigung des Geräts: Use a soft, dry cloth to wipe the front panel. Do not use abrasive cleaners or solvents.
- USB-Anschluss: Halten Sie den USB-Anschluss frei von Staub und Schmutz.
- Firmware-Updates: Check the JVC webBesuchen Sie die Website regelmäßig, um zu prüfen, ob Firmware-Updates für verbesserte Leistung und Funktionen verfügbar sind.
Fehlerbehebung
| Problem | Lösung |
|---|---|
| Kein Strom | Check vehicle's fuse. Ensure wiring harness is correctly connected. |
| Kein Ton | Check speaker connections. Verify volume level. Ensure correct source is selected. |
| Bluetooth stellt keine Verbindung her | Ensure Bluetooth is enabled on both devices. Delete previous pairing and re-pair. Move devices closer. |
| USB-Gerät nicht erkannt | Ensure USB device is formatted correctly (FAT16/32). Check for compatible file Versuchen Sie es mit einem anderen USB-Gerät. |
| Schlechter Radioempfang | Check antenna connection. Ensure antenna is fully extended (if applicable). |
Technische Daten
| Besonderheit | Detail |
|---|---|
| Modellnummer | KD-X260BT |
| Ausgangsleistung (Spitze) | 50 Watt x 4 Kanäle |
| Ausgangsleistung (RMS) | 22 Watt x 4 Kanäle |
| Anzeige | VA LCD Display, Spanish Text Display |
| USB-Eingang | Front USB, 1.5A Charging, MP3/WMA/WAV/FLAC Playback, Android AOA 2.0 |
| Zusatzeingang | 3.5mm Front Audio Auxiliary Input |
| Bluetooth-Version | 3.0+EDR Certified |
| Bluetooth Profiles | HFP 1.6, HSP, PBAP, A2DP, AVRCP 1.5 |
| Equalizer | 13-Band Graphic Equalizer (10 Preset x 1 User) |
| Voramp Ausgaben | 1 Set of 2.5V (Rear/Subwoofer Selectable) |
| Internetradio-Steuerung | Pandora, Spotify, iHeartRadio (for Android) |
| Abmessungen (Produkt) | 4 x 9 x 8 Zoll |
| Artikelgewicht | 1.79 Pfund |
Garantie und Support
This JVC KD-X260BT Digital Media Receiver comes with a 1-Year Manufacturer's Warranty. For warranty claims, technical support, or service inquiries, please contact JVC customer support or visit the official JVC webBewahren Sie Ihren Kaufbeleg zur Überprüfung der Garantie auf.
JVC Kundendienst: Refer to the contact information provided with your product packaging or on the official JVC webWebsite.