1. Produktüberschreitungview
The POWERTEC 71209 3" T-Track Intersection Kit is designed to enhance woodworking jigs and fixtures by allowing for versatile T-track configurations. This 4-piece kit forms a perpendicular intersection, enabling movement of jigs and fixtures in multiple directions. Constructed from precision-machined, corrosion-resistant anodized aluminum, it offers optimal durability and precision. The kit includes pre-drilled holes for easy installation.

Figure 1: The POWERTEC 71209 T-Track Intersection Kit, showing the four blue anodized aluminum track segments and included wood screws.
2. Enthaltene Komponenten
- (1) T-Tracks Woodworking Intersection Kit containing 4pc t-track segments
- Mounting hardware (wood screws)

Figure 2: Individual components of the T-Track Intersection Kit, including four track segments and mounting screws.
3. Einrichtung und Installation
The T-Track Intersection Kit is designed for easy installation. The tracks are intended to set flush with the surface of your workbench, drill press table, or router table assembly. Each segment features pre-drilled mounting holes for secure attachment.
Installationsschritte:
- Prepare the surface where the T-track intersection will be installed. Ensure the surface is flat and clean.
- Position the four T-track segments to form a cross or intersection pattern. The 90-degree angles on one end of each track are designed to fit accurately together.
- Align the pre-drilled mounting holes on each track segment with the desired screw locations on your surface.
- Secure each track segment using the included #6 x 5/8" flat head wood screws. Ensure the tracks are flush with the surface and securely fastened.
- Verify that the intersection is stable and that T-bolts or hex bolts can slide smoothly through the tracks.

Figure 3: An installed T-track intersection on a white surface, demonstrating how the four segments connect.

Figure 4: The T-track intersection in use, showing a wooden workpiece secured with clamps that slide within the tracks.
4. Bedienungsanleitung
Once installed, the T-Track Intersection Kit allows for versatile positioning of your woodworking jigs, clamps, hold-downs, stops, and other T-track compatible accessories. The intersection provides the ability to slide these components in almost any direction across your work surface.
Verwendungstipps:
- Ensure that all T-track accessories (e.g., 1/4" T-bolts, 5/16" T-bolts, 1/4" hex bolts) are compatible with the 3/4" width of the T-track.
- Regularly check the tightness of your T-track accessories to ensure secure clampvon Werkstücken.
- Utilize the multi-directional movement provided by the intersection to optimize your jig setups for various woodworking tasks.

Abbildung 5: Ein Bspample of the T-track intersection integrated into a wooden workbench, demonstrating its utility for securing workpieces.
5. Wartung
The POWERTEC T-Track Intersection Kit is made from anodized aluminum, which provides natural corrosion protection and durability. Minimal maintenance is required.
- Keep the T-tracks clean and free of sawdust, debris, and wood glue to ensure smooth operation of sliding components.
- Wipe down the tracks with a dry cloth after use. For stubborn residue, a damp Ein Tuch kann verwendet werden, anschließend sollte es sofort getrocknet werden.
- Periodically inspect the mounting screws for tightness and re-tighten if necessary to maintain a secure installation.
6. Fehlerbehebung
Häufige Probleme:
- Accessories not sliding smoothly:
Check for debris or sawdust within the T-track channels. Clean thoroughly. Ensure T-bolts or hex bolts are correctly oriented and not binding.
- Tracks not flush with surface:
Verify that the mounting surface is flat. Re-check screw installation to ensure they are fully seated and not causing the track to lift. If the surface is uneven, shimming may be required.
- Loose track segments:
Re-tighten all mounting screws. If screws are stripped, replace them with appropriate fasteners or relocate the track slightly if possible.
7. Spezifikationen
| Attribut | Wert |
|---|---|
| Modellnummer | 71209 |
| Hersteller | POWERTEC |
| Material | Aluminum (Anodized Blue) |
| Artikelgewicht | 2.88 Unzen |
| Produktabmessungen (montiert) | Ungefähr 5 x 4.5 x 0.4 Zoll |
| Individual Track Length | 3 Zoll |
| Individual Track Width | ¾ inches |
| Individual Track Depth | 3/8 Zoll |
| Installationsmethode | Einschraubbar |
| Stückzahl | 4 (track segments) |
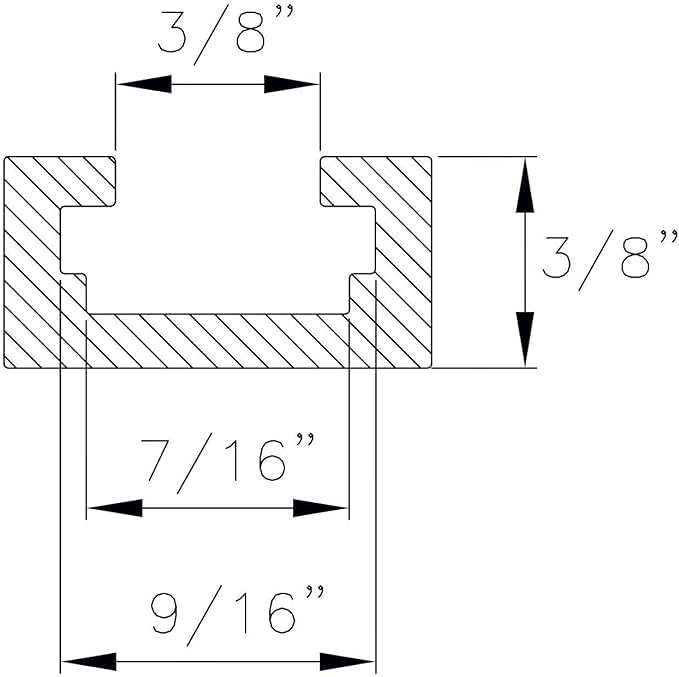
Figure 6: Cross-sectional dimensions of the T-track, indicating key measurements for compatibility.

Figure 7: Detailed cross-sectional view of the T-track, providing additional internal and external measurements.
8. Garantie und Support
For information regarding warranty coverage, product support, or to purchase additional accessories, please visit the official POWERTEC webBesuchen Sie die Website oder wenden Sie sich an den Kundendienst. Spezifische Garantiebedingungen sind in diesem Handbuch nicht enthalten.
You can find more information and related products on the POWERTEC Store auf Amazon.


