1. Einleitung
The OutBack Power FLEXMax 60 Charge Controller is an advanced Maximum Power Point Tracking (MPPT) charge controller designed to optimize the power harvest from your photovoltaic (PV) array. It features a continuous and active MPPT software algorithm that can increase PV array power yield by up to 30% compared to non-MPPT controllers. This controller is engineered for high performance, efficiency, and versatility in advanced power systems.
Hauptmerkmale:
- Increases PV Solar Array Output to battery bank by up to 30%.
- Designed for charging from your solar array to battery banks with nominal design voltages from 12 to 60 VDC.
- Fully Programmable and Built-in 128 Days of Data Logging.
- Full Power Output in Ambient Temperature up to 104°F (40°C).
- Highest quality MPPT controller for maximizing your solar system performance.
2. Sicherheitshinweise
WARNING: Electrical Shock Hazard. Read all instructions carefully before installation and operation.
- Die Installation muss von qualifiziertem Fachpersonal gemäß allen lokalen und nationalen Elektrovorschriften durchgeführt werden.
- Ensure all power sources (PV array, battery bank, and any AC sources) are disconnected before installation or maintenance.
- Verwenden Sie geeignete persönliche Schutzausrüstung (PSA), einschließlich isolierender Handschuhe und Augenschutz.
- Do not operate the charge controller if it has been damaged or exposed to moisture.
- Verify correct polarity for all connections to prevent damage to the unit and connected equipment.
- Sorgen Sie für ausreichende Belüftung rund um das Gerät, um eine Überhitzung zu vermeiden.
3. Produktüberschreitungview
The FLEXMax 60 Charge Controller features a robust design with a built-in, backlit 80-character LCD display for monitoring system status and performance data. It supports a wide range of nominal battery voltages and can step down higher voltage solar arrays to recharge lower voltage Batteriebänke.
Front Panel and Display:
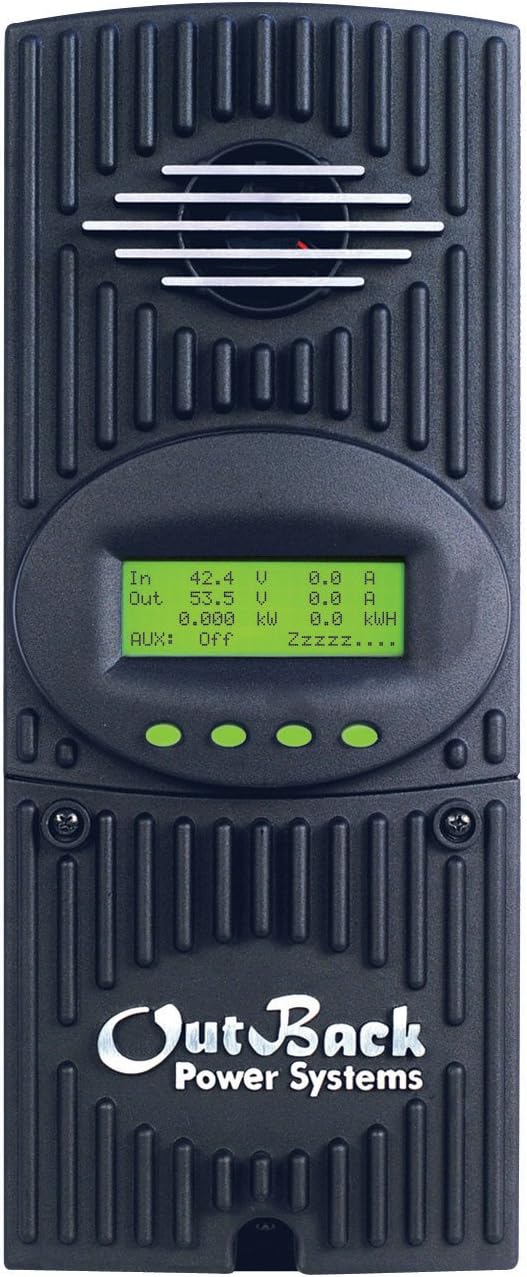
Abbildung 3.1: Vorderseite view of the FLEXMax 60 Charge Controller, showing the integrated LCD display and control buttons.
The LCD display provides real-time information such as input/output voltage and current, power, and energy harvested. Navigation buttons allow users to access various menus for status monitoring, configuration, and data logging.

Abbildung 3.2: Ausführlich view of the FLEXMax display menus, illustrating navigation and available settings for status, charger setup, AUX output control, equalization, and data logging.
4. Einrichtung und Installation
Proper installation is critical for the safe and efficient operation of your FLEXMax 60 Charge Controller. Refer to the detailed wiring diagrams and instructions provided in the official installation manual for your specific system configuration. Below is a general overview und wichtige Überlegungen.
Schaltplan vorbeiview:

Figure 4.1: Simplified wiring diagram from the Quick Start Guide, showing connections for PV array, battery bank, and system display (MATE3).
Wichtige Installationsschritte:
- Montage: Securely mount the charge controller in a well-ventilated, indoor location, away from direct sunlight and moisture. Ensure sufficient clearance for cooling.
- Batterieanschluss: Connect the battery bank to the charge controller. The FLEXMax 60 supports 12, 24, 36, 48, or 60 VDC nominal battery voltages, selectable via field programming at start-up. Ensure correct polarity.
- PV-Anlagenanschluss: Connect the photovoltaic array to the charge controller. The unit can handle up to 150 VDC open circuit voltage from the PV array.
- Erdung: Properly ground the charge controller according to local electrical codes.
- System Display (Optional): Connect an OutBack MATE system display for remote programming and monitoring.
- Erstes Einschalten: After all connections are secure and verified, apply power to the battery bank first, then the PV array.
5. Bedienungsanleitung
The FLEXMax 60 operates automatically once configured. The built-in display provides real-time data and allows for parameter adjustments.
Anzeigenavigation:
- Use the navigation buttons (up, down, enter, exit) to browse through the menus.
- The main menu provides access to Status Screen, Charger Setup, AUX-AUX Output Control, EQ-Battery Equalization, Misc-Miscellaneous, Advanced-Advanced Menu, and Logging-Data Logging.
- The Status Screen displays current operational data such as input/output voltage, current, power, and daily/total energy production.
Ladealgorithmus:
The controller utilizes a five-stage charging algorithm to optimize battery health and lifespan:
- Bulk: Maximum current charging until battery voltage reaches the absorption set point.
- Absorption: Konstante Lautstärketage charging to fully charge the battery, with current gradually decreasing.
- Schweben: Maintains battery voltage at a lower level to prevent self-discharge.
- Ausgleich: (Manual or Automatic) Overcharges batteries at a higher voltage to balance cell voltages and remove sulfation.
- Still: Reduces fan speed and noise during periods of low power demand.
6. Wartung
Regular maintenance ensures the longevity and optimal performance of your FLEXMax 60 Charge Controller.
- Sichtprüfung: Überprüfen Sie das Gerät regelmäßig auf Anzeichen von Beschädigungen, lockeren Verbindungen oder Korrosion.
- Reinigung: Keep the unit clean and free from dust and debris. Ensure cooling vents are not obstructed.
- Verbindungsprüfungen: Annually check all electrical connections for tightness and integrity.
- Batteriewartung: Follow the battery manufacturer's recommendations for maintenance, including checking electrolyte levels (for flooded batteries) and performing equalizations as needed.
7. Fehlerbehebung
This section provides guidance for common issues. For complex problems, consult a qualified technician or OutBack Power support.
Häufige Probleme:
- Kein Strom/Display aus: Batterieanschlüsse und Lautstärke prüfentage. Ensure the battery bank is adequately charged. Verify all circuit breakers are in the ON position.
- Geringe Leistungsabgabe: Inspect PV array connections and ensure panels are clean and free from shading. Check for proper PV array voltage.
- "Stuck Charged" State: Some users have reported instances where the controller remains in a "Charged" state and does not transition to Float mode, potentially leading to battery depletion. This may sometimes be resolved by applying a heavy load to the system or by restarting the unit. If persistent, contact support.
- Überhitzung: Ensure adequate ventilation around the unit. Check for obstructions in the cooling fins or fan.
Allgemeine Schritte zur Fehlerbehebung:
- Verbindungen prüfen: Prüfen Sie, ob alle Kabelverbindungen sicher und korrekt angeschlossen sind.
- Review Meldungen anzeigen: The LCD display may show error codes or status messages that can help diagnose the problem.
- Handbuch konsultieren: Refer to the comprehensive OutBack Power FLEXMax 60 manual for detailed troubleshooting guides.
- Kontaktieren Sie den Support: If the issue persists, contact OutBack Power technical support.
8. Spezifikationen
Detailed technical specifications for the OutBack Power FM60-150VDC FLEXMax 60 Charge Controller.

Figure 8.1: Official specifications table for FLEXMax 60 and FLEXMax 80 models.
| Spezifikation | Wert |
|---|---|
| Nominales Batterievolumentages | 12, 24, 36, 48, or 60 VDC (selectable via field programming) |
| Maximaler Ausgangsstrom | 60 amps @ 104°F (40°C) with adjustable current limit |
| PV Leerlauf Voltage (VOC) | 150 VDC absolute maximum coldest conditions / 145 VDC |
| Standby-Stromverbrauch | Less than 1 Watt typical |
| Wirkungsgrad der Energieumwandlung | 98.1 % bei 60 Amps in at 48 VDC System voltage |
| Betriebstemperatur | Bis zu 104 ° C |
| Anzeigetyp | LCD (80 character, backlit) |
| Artikelgewicht | 11.65 Pfund |
| Technische Daten | 5.75 x 13.5 x 4 Zoll |
| Material | Metall |
| Herstellerteilenummer | FM60 |
| UPC | 847932002050, 733556560024, 025283006068 |
9. Garantie und Support
The OutBack Power FLEXMax 60 Charge Controller comes with a standard 5-year warranty, with a 10-year extended warranty available. Please refer to your product registration and warranty documentation for full terms and conditions.
Kundendienst:
For technical assistance, warranty claims, or service, please contact OutBack Power customer support through their official webWebsite oder die Kontaktinformationen, die auf Ihrer Produktverpackung angegeben sind.
Online-Ressourcen: Besuchen Sie die Outback Store on Amazon für zusätzliche Produktinformationen und Ressourcen.


