DART Drive Analysis and Remote Telemetry Monitoring
Product Information
Specifications
- Product Name: DART
- Function: Remote monitoring of Variable Speed Drives and environmental conditions
- Key Features: Data monitoring, remote monitoring, ambience readings, alerts and notifications
Product Usage Instructions
Web Interface Setup
To set up the web interface, follow these steps:
- Access the device’s IP address in a web browser.
- Enter the necessary admin credentials to log in.
- Configure settings such as network preferences and user access.
Admin Setup
For admin setup:
- Access the admin panel through the web interface.
- Set up user accounts and permissions.
- Adjust monitoring parameters as needed.
Data Monitoring
To monitor data:
- View real-time data on the web interface dashboard.
- Analyze historical data trends for insights.
- Set up alerts for abnormal data patterns.
FAQ
- Q: How do I replace sensors?
A: To replace sensors, follow these steps:- Power off the device and disconnect it from the power source.
- Locate the sensors that need replacement.
- Carefully remove the old sensors and replace them with new ones.
- Power on the device and calibrate the new sensors if necessary.
- Q: How do I clean and care for the device?
A: To clean and care for the device:- Use a soft, dry cloth to wipe the exterior of the device.
- Avoid using harsh chemicals or solvents.
- Regularly check for dust accumulation and clean vents if needed.
Introduction
CAUTION:
Read this manual carefully before installing and using the product. Improper use of the product can cause personal injury and damage to property.
Overview: The DART is an innovative solution that enables remote monitoring of Variable Speed Drives and their surrounding environmental conditions. This manual provides comprehensive guidance on setting up, configuring, and using the device to its full potential.
The equipment and its functioning may be impaired if used in a manner not specified by the product provider.
Key Features:
- Remote monitoring of Variable Speed Drives
- Temperature, humidity, H2S, and particulate sensors for ambient readings
- Cloud connectivity for real-time data access
- Alerts and notifications for critical events
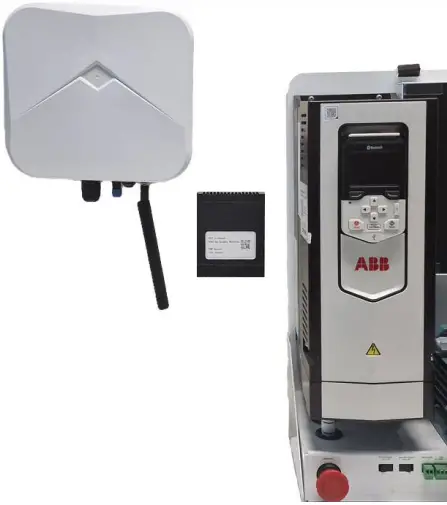
Package Contents:
- DART Device
- Power Adapter
- Installation Guide
- Sensor assembly
- Antenna
Getting Started
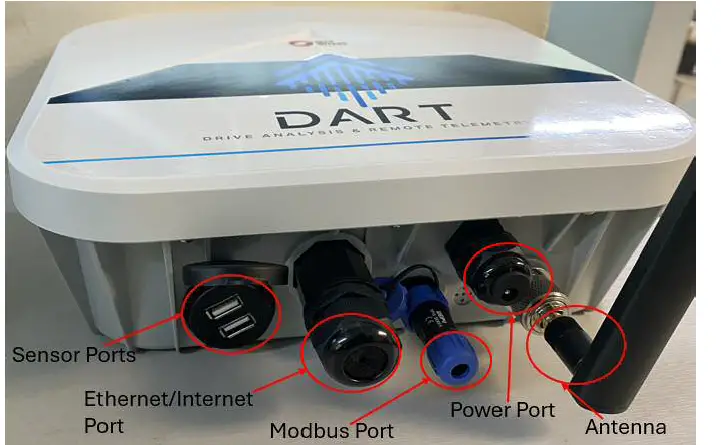
Device Components:
- Dart Gateway
- Power Port
- Sensor Ports
- Ethernet/Internet Port
- Modbus Port
DANGER: Electrical Hazard
Before starting work on the unit, make sure that the unit and the control panel are isolated from the power supply and cannot be energized. This applies to the control circuit as well.
Installation
Hardware Installation
- Unpack the contents of the box: DART device (bigger box), sensor box (smaller box), antenna, power adapter.
- Mount the DART device on a wall or in a cabinet using appropriate fixtures.
- Position the sensor box in the desired location for ambiance measurement, preferably closer to the drives.
- Connect the power adapter to the appropriate port on the DART device.
- Connect the drive(s) using an appropriate three-core screened cable. Ensure proper connections.
- Connect either the EFB ports of the drive or an extended Modbus connector to the indicated ports of the DART device.
- For multiple drives, connect them via a daisy chain configuration.
- Connect the sensor box’s USB cable to the DART device.
- Attach the antenna to the designated port on the DART device for wireless communication.
- After turning on the DART Device and making sure the drive(s) are on, configure parameter 58.01 to Modbus RTU and 58.03 to the node of the drive. For example: node 1 for first drive connected after the DART, node 2 for second drive and so on.
- A good drive to DART connection can be ensured by checking transmitted and received packets in parameter group 58.
Ensure all connections are secure and cables are properly routed.
Web interface Setup
Admin setup:
- Log into https://admin-edc-app.azurewebsites.net/ with the unique login details provided to you.
- This database will allow you to manage all your DART devices in one place.
- Add a client in the client tab.
- In the sites tab, select a client first and then add a site under the client.
- Finally, Add a device under the specified site of a client.
- Give your device any name, however, only add the device ID that has been provided to you.
- If the DART is connected to multiple drives, again, assign any given name to the following drives but, only assign DeviceD_1 for first drive, DeviceID_2 for second drive, DeviceID_3 for third drive and so on.
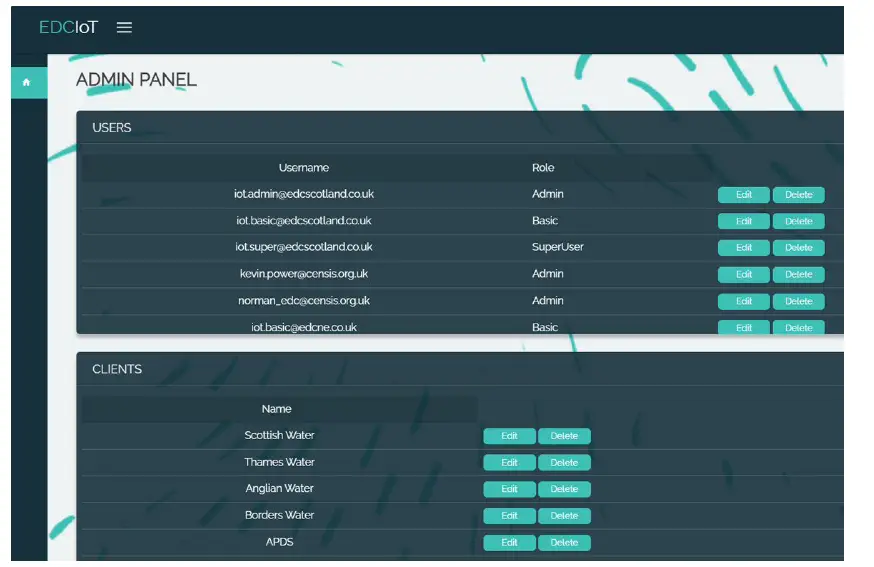
Figure 1: After logging into the admin panel, users can be added in the Users tab. This will allow that particular user to login into the data panel web app.
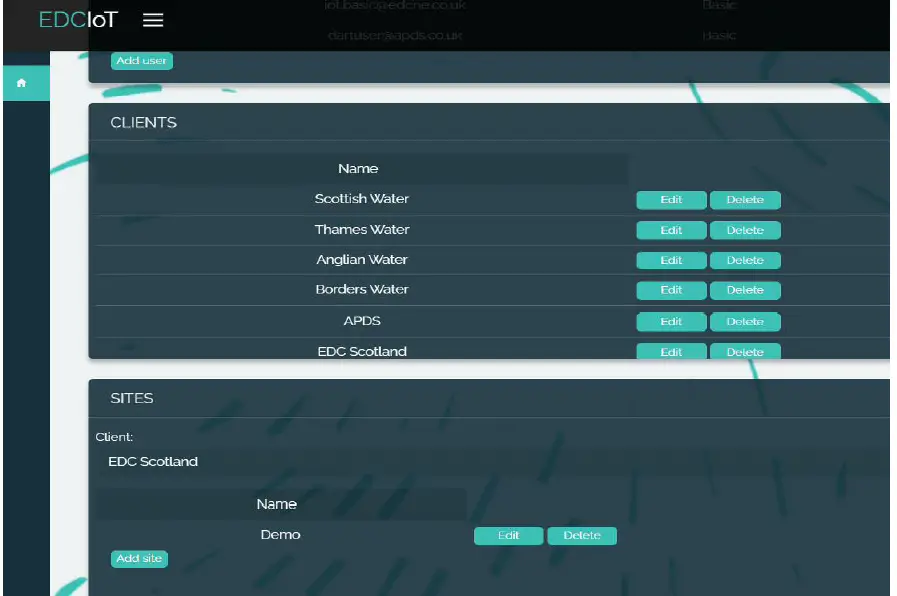
Figure 2: Clients and their sites can be added in the tabs shown in the figure.

Figure 3: In the DEVICES tab, select the site under the client you want to add the device to. The drive name for the device can be anything but the device address should be the same as provided.
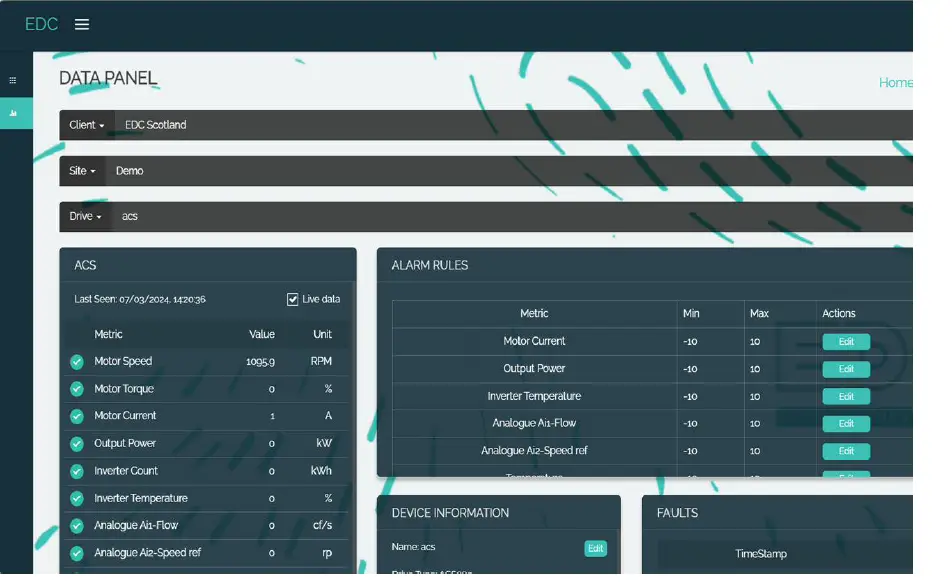
Data Monitoring
- Log into https://edc-app.azurewebsites.net/ with unique login details provided to you.
- On the Data Panel Page, select the drive you want to monitor in a site under a client.
- Data should automatically populate to various tabs on the page.
- Select live data option if you want to monitor live data continuously.
- Set your various alarm limits under the ALARM RULES tab.
- Graphs of different variables can be viewed under the TIME HISTORY tab.

Remote Monitoring
- Ambience Readings: After setting up a new DART device, it is always a good practice to verify the ambience readings by comparing it to a controlled variable during commissioning.
- Alerts and Notifications: When an alarm is triggered, the user will be notified via email which can be setup in the DEVICE INFORMATION tab. Multiple users can be added to this alarm recipients tab.

Troubleshooting
Technical Support: If issues persist, contact technical support for assistance.
Maintenance
- Replacing Sensors: If sensors need replacement, Contact EDC Scotland’s technical support team.
- Cleaning and Care: Make sure the DART Device is installed a dry environment typically with other electronic devices.
Safety Guidelines
- Electrical Safety: Adhere to electrical safety precautions during installation and maintenance.
- Environmental Considerations: Ensure the device is installed in suitable environmental conditions as specified in this manual.
Support
- Contacting EDC Scotland Support: Call 0141 812 3222 / 07943818571 or email rkamat@edcscotland.co.uk
Documents / Resources
 |
DART Drive Analysis and Remote Telemetry Monitoring [pdf] User Manual Drive Analysis and Remote Telemetry Monitoring, Analysis and Remote Telemetry Monitoring, Remote Telemetry Monitoring, Telemetry Monitoring, Monitoring |


