![]() ENGINEERING TOMORROW
ENGINEERING TOMORROW
Installation Guide
Electronic refrigeration control
Type ERC 214
ERC 214 Electronic Refrigeration Control
The ERC 214 is a smart multipurpose refrigeration controller with temperature and defrost management, available with 4 relays.
The controller has been designed to fulfill today’s requirements of commercial refrigeration applications.
Technical Highlights
- Ease of use: Four buttons, easy menu structure, preinstalled application solutions ensure superior usability.
- Simple installation: High performance 16 A relay enable direct connection of heavy loads, such as 2 hp compressors, without use of intermediate relays. A wide range of compatible types of sensors and screw connection terminals ensure high flexibility in installation.
- Safe operation: Special software features like voltage protection, zero cross switching, high condenser temperature protection features ensure safe operation of the unit.
- Energy efficiency: Defrost on demand, day/night mode and smart evaporator fan management ensure energy efficiency.
User Interface
Key Function
 |
Scroll up: Short press (less than 1 second). Main switch ON/OFF: Press and hold (~ 3 seconds). Factory reset: Press and hold at Power up. |
 |
Scroll down: Short press (less than 1 sec.) Defrost Start/Stop: Press and hold (~3 secs.) |
 |
Back function: Short press (less than 1 sec.) Pull down start / stop: Press and hold (~3 secs.) |
 |
Set point change or OK: Short press (less than 1 sec.) Enter Menu: Press and hold (~ 3 secs.) |
Display Icons
 |
Night mode (Energy saving) |
 |
Fan running |
 |
Compressor running (Flashes in pull-down mode) |
 |
Active alarm |
 |
Defrost |
 |
Unit (°C or °F) |
Dimensions (mm) and mounting

Electrical connections

Note:
- 2L and 3L must be connected to the same phase.
- Power connectors: wire size = 0.5 – 1.5 mm², max. tightening torque = 0.4 Nm
- Low voltage signal connectors: wire size = 0.15 – 1.5 mm², max. tightening torque = 0.2 Nm
Quick configuration at power up
- STEP 1: power on
- STEP 2: select the quick configuration menu
Within 30 seconds of power on, press “<” BACK for3 seconds.
The main switch “r12” is automatically set to OFF. - STEP 3: select pre-installed application o61
The display automatically shows the application selection parameter “o61”.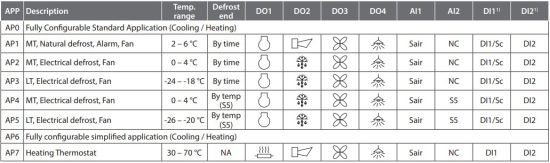 1) The digital inputs DI1 and DI2 can be configured for multiple functions (refer Parameters “o02” and “o37”).
NC = Not configured
Press SET to select the pre-installed application.
The display shows the default value (eg. “AP0” flashing).
Choose the application type by pressing UP/DOWN and press SET to confirm.
The controller presets parameter values according to the selected application and does not hide relevant parameters.
Tip: you can easily move from AP0 to AP7, and thus select the simplified list of parameters, by pressing the UP key (circular list). - STEP 4: select sensor type “o06
The display automatically shows sensor selection parameter “o06”. Press SET to select the sensor type.
The display shows the default value (eg. “n10” flashing).
Choose sensor type by pressing UP/DOWN (n5=NTC 5 K, n10=NTC 10 K, Ptc=PTC, Pt1=Pt1000) and press SET to confirm. Note: All sensors must be the same type. - STEP 5: configure DO4 output “o36”
The display automatically shows the o36 parameter to configure “DO4” output.
Select light “Lig” or alarm “ALA” as per the application and press SET to confirm. - STEP 6: configure DO2 output “o71”
The display automatically shows the “o71” parameter to configure “DO2” output.
Select required configuration (DEF or Lig orALA) as per the application and press SET to confirm.
The display returns to normal display mode and the control is started.
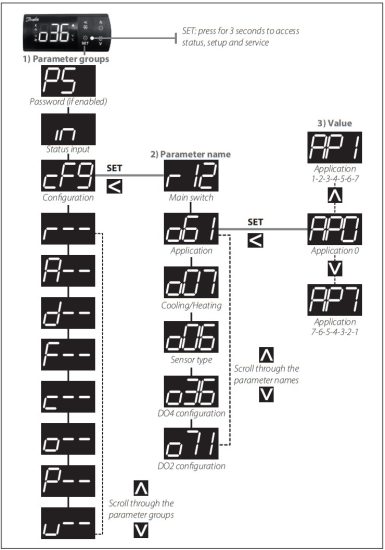
- Press “SET” button for 3 seconds to access the parameter menu (display will show “cFg”).
- Enter “CFg” menu by pressing “SET” button (diaplay will show first parameter “r12” main switch.
- Select “r12” by pressing “SET” button again and set the main switch to “oFF” (r12=0).
- Press back button (<) to come back to ‘CFg” menu.
- Press DOWN button to scroll through the “cFg” menu parameter list.
- Open the “o61 application mode” and select needed application mode (Press SET).
- Open the “o07 Cooling/Heating” and select needed function and press”SET” (applicable only for AP0 and AP6).
- Open the “o06 Sensor type” and select the temperature sensor type used (n5=NTC 5 K, n10=NTC 10 K, Ptc=PTC, Pt1=Pt1000)- (Press “SET”).
- Open the “o36 DO4 configuration” and select the function associated to DO4 output and press “SET”
- Open the “071 DO2 configuration” and select the function associated to DO2 output and press “SET”.
- Navigate back to parameter “r12 Main switch” and set it in “ON” position to start control.
- Go through other parameters default settings and change wherever needed.
Technical specifications
| Features | Description |
| Purpose of control | Operating temperature sensing control suitable for incorporation into commercial air- conditioning and refrigeration applications |
| Construction of control | Incorporated control |
| Power supply | 115 V AC / 230 V AC 50/60 Hz, galvanic isolated low voltage regulated power supply |
| Rated power | Less than 0.7 W |
| Inputs | Sensor inputs, Digital inputs, Programming key Connected to SELV limited energy <15 W |
| Allowed sensors types | NTC 5000 Ohm at 25 °C, (Beta value=3980 at 25/100 °C – EKS 211) NTC 10000 Ohm at 25 °C, (Beta value=3435 at 25/85 °C – EKS 221) PTC 990 Ohm at 25 °C, (EKS 111) Pt1000, (AKS 11, AKS 12, AKS 21) |
| Sensors included in Kit Solution | NTC 10000 Ohm at 25 °C, cable length: 1.5 m |
| Accuracy | Measuring range: -40 – 105 °C (-40 – 221 °F) |
| Controller accuracy: ±1 K below -35 °C, ±0.5 K between -35 – 25 °C ±1 K above 25 °C |
|
| Type of action | 1B (relay) |
| Output | DO1 – Relay 1: 16 A, 16 (16) A, EN 60730-1 10 FLA / 60 LRA at 230 V, UL60730-1 16 FLA / 72 LRA at 115 V, UL60730-1 |
| DO2 – Relay 2: 8 A, 2 FLA / 12 LRA, UL60730-1 8 A, 2 (2 A), EN60730-1 |
|
| DO3 – Relay 3: 3 A, 2 FLA / 12 LRA, UL60730-1 3 A, 2 (2 A), EN60730-1 |
|
| DO4 – Relay 4: 2 A | |
| Display | LED display, 3 digits, decimal point and multi- function icons, °C + °F scale |
| Operating conditions | -10 – +55 °C (14 – 131 °F), 90% Rh |
| Storage conditions | -40 – +70 °C (-40 – +158 °F), 90% Rh |
| Protection | Front: IP65 (Gasket integrated) Rear: IP00 |
| Environmental | Pollution degree II, non-condensing |
| Overvoltage category | II – 230 V supply version – (CE, UL recognized) III – 115 V supply version – (UL recognized) |
| Resistance to heat and fire | UL94-V0 Temperature for ball pressure test statement According to Annex G (EN 60730-1) |
| EMC category | Emission: IEC/EN 61000 6-3 Immunity: IEC/EN 61000 6-2 |
| Approvals | UL recognition (US & Canada) (UL 60730-1) CQC CE (LVD & EMC Directive) EAC NSF ROHS2.0 HACCP temperature monitoring in compliance with EN13485 Class I, when used with AKS 12 sensor |
Parameter List
| Function | Code | Min | Max | AP0 | AP1 | AP2 | AP3 | AP4 | AP5 | AP6 | AP7 |
| Configuration | cFg | ||||||||||
| Main switch (-1=Service 0=OFF, 1=ON,) | r12 | -1 | 1 | 1 | 1 | 1 | 1 | 1 | 1 | 1 | 1 |
| Predefined applications | o612 | AP0 | AP7 | AP0 | AP1 | AP2 | AP3 | AP4 | AP4 | AP6 | AP7 |
| Cooling/Heating (rE=Cooling, Ht= Heating) | o072 | rE | Ht | rE | rE1 | rE1 | rE1 | rE1 | rE1 | rE | Ht1 |
| Sensor type selection (n5=NTC 5K,n10=NTC10K, ptc=PTC, pt1=PT1000) | o062 | n10 | pt1 | n10 | n10 | n10 | n10 | n10 | n10 | n10 | n10 |
| DO2 config (dEF=Defrost; ALA=alarm; Lig=Light) | o712 | dEF | Lig | dEF | ALA1 | dEF1 | dEF1 | dEF1 | dEF1 | dEF | ALA1 |
| DO4 config (Lig=Light, ALA=Alarm) | o362 | Lig | ALA | Lig | Lig | Lig | Lig | Lig | Lig | Lig | Lig |
| Reference | r-– | ||||||||||
| Setpoint (unit: °C) | r00 | -100 | 200 | 2 | 4 | 2 | -20 | 2 | -24 | 2 | 50 |
| Differential (unit: K) | r01 | 0.1 | 20 | 2 | 2 | 2 | 2 | 2 | 2 | 2 | 4 |
| Maximum set point limitation (unit: °C) | r02 | -100 | 200 | 50 | 6 | 4 | -18 | 4 | -20 | 50 | 70 |
| Minimum set point limitation (unit: °C) | r03 | -100 | 200 | -35 | 2 | 0 | -24 | 0 | -26 | -35 | 30 |
| Display offset (unit: K) | r04 | -10 | 10 | 0 | 0 | 0 | 0 | 0 | 0 | 0 | 0 |
| Display Unit (°C/ °F) | r05 | -C | -F | -C | -C | -C | -C | -C | -C | -C | -C |
| Calibration of Sair (unit: K) | r09 | -20 | 20 | 0 | 0 | 0 | 0 | 0 | 0 | 0 | 0 |
| Main switch ( -1=Service 0=OFF, 1=ON,) | r12 | -1 | 1 | 1 | 1 | 1 | 1 | 1 | 1 | 1 | 1 |
| Night Set back (unit: K) | r13 | -50 | 50 | 0 | 0 | 0 | 0 | 0 | 0 | 0 | 0 |
| Reference displacement offset temp. (unit: °C) | r40 | -50 | 20 | 0 | 0 | 0 | 0 | 0 | 0 | – | 0 |
| Pull down duration (unit: min) | r96 | 0 | 960 | 0 | 0 | 0 | 0 | 0 | 0 | – | – |
| Pull down limit temperature (unit: °C) | r97 | -100 | 200 | 0 | 0 | 0 | 0 | 0 | 0 | – | – |
| Function | Code | Min | Max | AP0 | AP1 | AP2 | AP3 | AP4 | AP5 | AP6 | AP7 |
| Alarm | A-– | ||||||||||
| Delay for temp alarm during normal conditions (unit: min) | A03 | 0 | 240 | 30 | 45 | 30 | 30 | 30 | 30 | 30 | 10 |
| Delay for temp alarm during pull-down/start up/ defrost (unit: min) | A12 | 0 | 240 | 60 | 90 | 60 | 60 | 60 | 60 | 60 | – |
| High temp. alarm limit (unit: °C) | A13 | -100 | 200 | 8 | 10 | 8 | -15 | 8 | -15 | 8 | 80 |
| Low temp. alarm limit (unit: °C) | A14 | -100 | 200 | -30 | 0 | -2 | -30 | -2 | -30 | -30 | 20 |
| DI1 delay (Time delay for selected DI1 function) (unit: min) | A27 | 0 | 240 | 30 | 30 | 30 | 30 | 30 | 30 | 30 | 30 |
| DI2 delay (Time delay for selected DI2 function) (unit: min) | A28 | 0 | 240 | 30 | 30 | 30 | 30 | 30 | 30 | 30 | 30 |
| Condenser High alarm limit (unit: °C) | A37 | 0 | 200 | 80 | 80 | 80 | 80 | 80 | 80 | – | – |
| Condenser High block limit (unit: °C) | A54 | 0 | 200 | 85 | 85 | 85 | 85 | 85 | 85 | – | – |
| Voltage protection | A72 | no | YES | no | no | no | no | no | no | no | no |
| Minimum cut-in voltage (unit: V) | A73 | 0 | 270 | 0 | 0 | 0 | 0 | 0 | 0 | 0 | 0 |
| Minimum cut-out voltage (unit: V) | A74 | 0 | 270 | 0 | 0 | 0 | 0 | 0 | 0 | 0 | 0 |
| Maximum voltage (unit: V) | A75 | 0 | 270 | 270 | 270 | 270 | 270 | 270 | 270 | 270 | 270 |
| Defrost | d-– | ||||||||||
| Defrost Method (no=None, nAt=Natural, EL = Electric; gAS=Hot gas) | d01 | no | gAS | EL | nAt | EL | EL | EL | EL | EL | – |
| Defrost stop temperature (unit: °C) | d02 | 0.0 | 50.0 | 6.0 | – | – | – | 6.0 | 6.0 | 6.0 | – |
| Defrost Interval | d03 | 0 | 240 | 8 | 6 | 8 | 12 | 8 | 12 | 8 | – |
| Function | Code | Min | Max | AP0 | AP1 | AP2 | AP3 | AP4 | AP5 | AP6 | AP7 |
| Max defrost Time (unit: min) | d04 | 0 | 480 | 30 | 45 | 15 | 15 | 30 | 30 | 30 | – |
| Defrost delay at power up (or DI signal) (unit: min) | d05 | 0 | 240 | 0 | 0 | 0 | 0 | 0 | 0 | – | – |
| Drip delay (unit: min) | d06 | 0 | 60 | 0 | 0 | 0 | 0 | 0 | 0 | 21 | – |
| Fan delay after defrost (unit: min) | d07 | 0 | 60 | 0 | 0 | 0 | 0 | 0 | 0 | 51 | – |
| Fan start temperature after defrost (unit: °C) | d08 | -50 | 50 | -5 | 501 | 501 | 501 | -5 | -5 | NA | – |
| Fan during defrost | d09 | OFF | on | on | on | OFF | OFF | OFF | OFF | OFF | – |
| Defrost stop sensor | d10 | non | dEF | non | non1 | non1 | non1 | dEF1 | dEF1 | non | – |
| Accumulated Compressor runtime to start defrost (0=OFF) (unit: hour) | d18 | 0 | 96 | 0 | 0 | 0 | 0 | 0 | 0 | – | – |
| Defrost on demand (20=OFF) (unit: K) | d19 | 0 | 20 | 20 | – | – | – | 20 | 20 | – | – |
| Defrost delay after pull down cycle (unit: min) | d30 | 0 | 960 | 0 | 0 | 0 | 0 | 0 | 0 | – | – |
| Fan control | F-– | ||||||||||
| Fan at compressor cutout | F01 | FAo | FPL | FAo | FAo | FAo | FAo | FAo | FAo | FAo | FAo |
| Fan stop evap. Temperature (unit: °C) | F04 | -50 | 50 | 50 | – | – | – | 50 | 50 | 501 | – |
| Fan ON Cycle (unit: min) | F07 | 0 | 180 | 2 | 2 | 2 | 2 | 2 | 2 | 21 | 2 |
| Fan OFF cycle (unit: min) | F08 | 0 | 180 | 2 | 2 | 2 | 2 | 2 | 2 | 21 | 2 |
| Compressor | c-– | ||||||||||
| Compressor minimum ON time (unit: min) | C01 | 0 | 30 | 0 | 0 | 0 | 0 | 0 | 0 | 0 | 0 |
| Compressor minimum OFF time (unit: min) | C02 | 0 | 30 | 2 | 2 | 2 | 2 | 2 | 2 | 2 | 2 |
| Compressor /Heater OFF delay at open door (unit: sec) | C04 | 0 | 900 | 900 | 900 | 900 | 900 | 900 | 900 | 601 | 900 |
| Zero crossing selection (YES / NO) | C70 | no | YES | YES | YES | YES | YES | YES | YES | YES1 | YES |
| Function | Code | Min | Max | AP0 | AP1 | AP2 | AP3 | AP4 | AP5 | AP6 | AP7 |
| Others | o-– | ||||||||||
| Delay of outputs at startup (unit: sec) | o01 | 0 | 600 | 10 | 10 | 10 | 10 | 10 | 10 | 101 | 10 |
| DI1 configuration | o02 | nC | Sc | nC | nC | nC | nC | nC | nC | nC | nC |
| Serial address (unit: no) | o03 | 0 | 247 | 0 | 0 | 0 | 0 | 0 | 0 | – | 0.0 |
| Password (unit: no) | o05 | 0 | 999 | 0 | 0 | 0 | 0 | 0 | 0 | 0 | 0 |
| Sensor type selection (n5=NTC 5K, n10= NTC10K, ptc=PTC, pt1=PT1000) | o062 | n10 | ptc | n10 | n10 | n10 | n10 | n10 | n10 | n10 | n10 |
| Cooling / Heating (rE=Cooling, Ht= Heating) | o072 | rE | Ht | rE | rE1 | rE1 | rE1 | rE1 | rE1 | rE | Ht1 |
| Display Resolution | o15 | 0.1 | 1.0 | 0.1 | 0.1 | 0.1 | 0.1 | 0.1 | 0.1 | 0.11 | 0.1 |
| DO4 config (Lig=Light, ALA=Alarm) | o362 | Lig | ALA | Lig | Lig | Lig | Lig | Lig | Lig | Lig | Lig |
| DI2 configuration | o37 | nC | Pud | nC | nC | nC | nC | nC | nC | nC | nC |
| Light Control on= Always on, dAn = Day/ Night, doo=Based on door action |
o38 | on | doo | on | on | on | on | on | on | on | on |
| Predefined applications | o612 | AP0 | AP7 | AP0 | AP1 | AP2 | AP3 | AP4 | AP4 | AP6 | AP7 |
| Save settings as factory | o67 | no | YES | no | no | no | no | no | no | – | no |
| DO2 config (dEF=Defrost; ALA=alarm; Lig=Light) | o712 | dEF | Lig | dEF | ALA1 | dEF1 | dEF1 | dEF1 | dEF1 | dEF | ALA1 |
| Display during defrost | o91 | Air | -d- | -d- | -d- | -d- | -d- | -d- | -d- | -d-1 | – |
Note: DI1 & DI2 configuration list as follows –
nC= Not configured; Sdc = Status display output,
doo = Door alarm with resumption, doA = Door alarm without resumption,
SCH = Main switch, nig = Day/Night mode, rFd = Reference displasement, EAL = External alarm,
dEF = Defrost, Pud = Pull down; Sc = Condensor Sensor (only for DI1)
1) This option is a default setting in the controller and cannot be changed.
2) This parameter can only be set when regulation is stopped, i.e. “r12” is set to 0.
| Function | Code | Min | Max | AP0 | AP1 | AP2 | AP3 | AP4 | AP5 | AP6 | AP7 |
| Polarity | P-– | ||||||||||
| DI1 input polarity (nc / no) no = normally open, nc = normally closed | P73 | no | nc | no | no | no | no | no | no | no | no |
| DI2 input polarity (nc / no) no = normally open, nc = normally closed | P74 | no | nc | no | no | no | no | no | no | no | no |
| Invert alarm relay (0= normal, 1= invert relay action) | P75 | 0 | 1 | 0 | 0 | 0 | 0 | 0 | 0 | – | 0.0 |
| Key board lock (no / yes) (0=no, 1=yes) | P76 | no | YES | no | no | no | no | no | no | – | no |
| Code | Alarms | Description |
| E29 | Sair sensor error | Air temperature sensor error |
| E27 | Def sensor error | S5 Evaporator sensor is defect or electrical connection is lost |
| E30 | Sc sensor error | Sc Condenser sensor is defect or electrical connection is lost |
| A01 | High temp alarm | Air temperature in cabinet is too high |
| A02 | Low temp alarm | Air temperature in cabinet is too low |
| A99 | High Volt alarm | Supply voltage is too high (compressor protection) |
| AA1 | Low Volt alarm | Supply voltage is too low (compressor protection) |
| A61 | Condenser alarm | Condenser temp. too high – check air flow |
| A80 | Cond. block alarm | Condenser temp. too high – manual reset of alarm required1) |
| A04 | Door alarm | Door has been open for too long |
| A15 | DI Alarm | External alarm from DI input |
| A45 | Standby Alarm | Control has been stopped by “r12 Main switch” |
1) The condenser block alarm can be reset by setting r12 Main switch OFF and ON again or by powering down the controller.
Safety Standards
Check if the supply voltage is correct before connecting the instrument.
Do not expose to water or moisture: Use the controller only within the operating limits avoiding sudden temperature changes with high atmospheric humidity to prevent the formation of condensation.
Disposal of the Product
The appliance (or the product) must be disposed in accordance with the local waste disposal legislation.
EU design registration
002566703-0001
DanfossA/S
Climate Solutions • danfoss.com • +45 7488 2222
Anyinformation, includng, but not limited to in formation on selection of product, its application or use, product design, weight, dimensions, capacity or any other technical data in product manuals catalogues descriptions, advertisements, etc. and whether made available in writing, orally, electronically, on line or via download, shall be considered informative, and is only binding if and to the extent, explicit reference is made in a quotation or order confirmation. Danfoss cannot accept any responsibility for possible errors in catalogues, brochures, videos and other material Danfoss reserves the right to alter its products without notice. This also applies to products ordered but not delivered provided that such alterations can be made without changes to form, fit or function of the product.
All trademarks in this material are property of Danfoss A/5 or Danfoss group companies Danfoss and the Danfoss logo are trademarks of Danfoss A/5. All rights reserved.
© Danfoss | Climate Solutions | 2024.06
AN19438642089705-000401
Documents / Resources
 |
Danfoss ERC 214 Electronic Refrigeration Control [pdf] Installation Guide ERC 214, 080R9314, ERC 214 Electronic Refrigeration Control, ERC 214, Electronic Refrigeration Control, Refrigeration Control |