Danfoss Beam Underfloor Heating Control

Specifications
- Power: 24V
- Communication: M-bus
Product Usage Instructions
- For on-wall mounting, follow the provided dimensions for proper installation.
- Ensure proper ceiling mounting to securely install the product.
- Connect the power input to a 24V source and the communication line to the M-bus.
- The address ID is indicated by Black, Red, Yellow, and White colors. Make a note of the address ID for future reference.
- The product features LED indicators for M-Bus wired communication and LoRa wireless communication.
- Follow the instructions for factory reset and pairing with Spark.
Pairing with Spark
- Follow the provided steps for pairing the product with Spark either on-site or via M-Bus communication.
Example
- Power on the Spark and enter pairing mode.
- Return to the main interface after successful pairing.
- Exit pairing mode on Beam after 3 minutes.
- Use M-bus communication to check the pairing.
Safety Note
- Read and follow all safety instructions provided in the manual before assembly and commissioning.
- Ensure only qualified personnel perform assembly, start-up, and maintenance work.
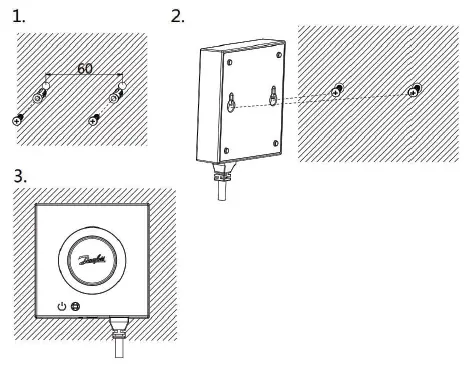
Mounting
On-wall mounting
Ceiling mounting

- Double-sided adhesive tape and fixed support need to be purchased separately as accessories.
Dimension

Wiring
- Power: 24V
- Communication: M-bus

Address ID
- Address ID laser on the side of Beam, which can be removed from it for recording or saving.

Introduction

- LED1 is the indicator for M-Bus wired communication.
- LED2 is the indicator for LoRa wireless communication.
- Press “RST/PAIR” button for 15s for a factory reset.
- Press “RST/PAIR” button for 6s for pairing with Spark.

Pairing with Spark
A: Pairing on-site
- Power on the Beam. Press the “RST/PAIR” button for 6s to enter pairing mode; the LED2 (LoRa) light will flash. It will wait 3 minutes for pairing.
B: Pairing via M-Bus
- Address ID laser on the side of Spark and Beam, can be removed for record and then write the Spark address ID into Beam via M-BUS.
Example
- Power on the Spark. Press “<” and “>” buttons for 6s to enter pairing mode, the LoRa symbol and address ID will flash.
- Spark will return to the main interface after pairing succeeds. The LoRa symbol will be displayed in the upper right corner of the interface. The room temperature will be displayed on the interface.
- Beam will exit pairing mode after 3 minutes.
- Use M-bus communication to check the pairing.

Safety Note
To avoid injury and damage to persons and devices, these instructions must be carefully read and observed before assembly and commissioning. Necessary assembly, start-up, and maintenance work must be performed only by qualified, trained, and authorized personnel.
Switch off the power line before wiring.
- Connect via a safety isolating transformer
- Galvanic separations shall be provided for segments crossing buildings.
- This product should be dismantled, and its components sorted if possible, in various groups before recycling or disposal. Always follow the local disposal regulations.
![]()
CONTACT
- Climate Solutions
- danfoss.cn
- +86 400 061 9988
- chinacs@danfoss.com
FAQ
- Q: Do I need to purchase additional accessories for mounting?
- A: Yes, double-sided adhesive tape and fixed support need to be purchased separately for mounting.
- Q: How do I reset the product to factory settings?
- A: Press the RST/PAIR button for 15 seconds for a factory reset.
Documents / Resources
 |
Danfoss Beam Underfloor Heating Control [pdf] Installation Guide Beam Underfloor Heating Control, Underfloor Heating Control, Heating Control |