![]() Instruction
Instruction
Type AKS 41 ver. 4.0
AKS 41 Series Liquid Level Transmitter

Electrical connection

Measuring range
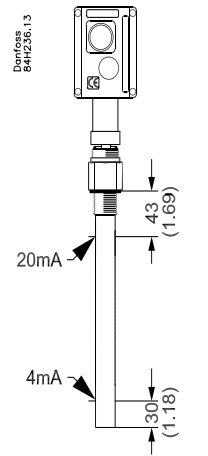
Factory setting:
The rod comes factory calibrated for R717(NH 3 ) / R718(H O), so that it will cover 4 to 20 mA throughout the rod’s whole measuring range. Any disturbances in connection with the level measurement will be damped internally.
R717 (NH 3 ) / R718 (H 2 O)
It is not necessary to change the settings.
The factory setting can be used.
R22 / R404A / R134a/R744 (CO 2 )
Setting for the required refrigerant must be made by following the procedure described in next section.
R_ _ _ _
If an alternative refrigerant other than the listed is used, a new Min/max calibration of the level transmitter is required.
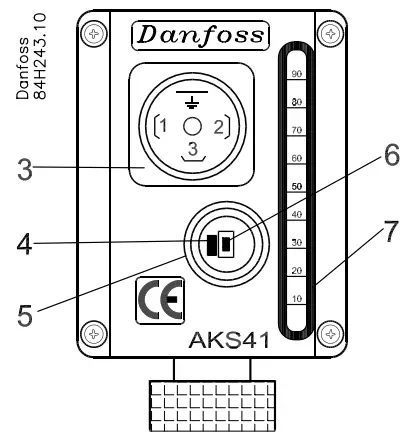
3 DIN connection
4 Green LED
5 Calibration cover
6 Calibration pushbutton
7 OPTION: LED Bargraph for indication of liquid level.
Setting of the AKS 41
The setting may be carried out before the level transmitter is mounted on the plant.
- To give in the refrigeration mode setting push the calibration pushbutton and keep it pressed while 24 V a.c. is connected and then release the pushbutton.
NOTE!
 This sequence must be observed. If the supply voltage is connected before the calibration pushbutton is activated, the signal damping will be changed. Please observe that when used in R718, over time a lime coating on the outer reference pipe can be experienced. Danfoss recommend removing this lime coating on regular basis.
 - Release the calibration pushbutton. Observe the present refrigerant setting and measure the 4-20 mA output signal.
1 flash of Green LED – output signal is
~ 5 mA = R717 / R718 (factory setting)
2 flashes of Green LED – output signal is ~ 6 mA = R22
3 flashes of Green LED – output signal is ~ 7 mA = R404A
4 flashes of Green LED – output signal is ~ 8 mA = R134a
5 flashes of Green LED – output signal is ~ 9 mA = R744 - Activate the calibration pushbutton to select required refrigerant. Each activating will cause AKS 41 to step to next refrigerant according to below sequence:
~ 5 mA = R717 / R718 (factory setting)
~ 6 mA = R22
~ 7 mA = R404A
~ 8 mA = R134a
~ 9 mA = R744 - When the current corresponds to the required refrigerant, wait 10 seconds until the green LED is constant ON (not flashing).
This indicates that the required refrigerant has been selected. - To leave the setting mode isolate the voltage supply to the level transmitter.
Go through step 1, 2 and 5 if you wish to control the setting.
Signal damping
Signal damping is factory-set at 15 seconds.
This setting can be altered by activating the calibration switch. The setting range is 1 to 120 seconds. Settings can also be made whilst the system is operating.
Procedure:
- Connect the supply voltage.
- Push the calibration switch once for each second by which you want to increase the damping.
Example:
1. push 1 sec.
2. pushes2 sec. etc.
120. pushes120 sec.
121. pushes120 sec.
10 seconds after the last push, the value will be saved in the memory and the green LED will start flashing again. After 10 seconds, a further push will start 1-second signal damping again. (If the damping setting is set too high, restart the procedure from step 1).
Adjusting the min. /max. calibration points:
Min. calibration:
- Bring the refrigerant liquid level to desired minimum level.
- Press the calibration pushbutton and keep it activated in approx. 5 seconds, until green LED stopps flashing.
- Activate, within the next 10 seconds, the calibration pushbutton once (If calibration pushbutton is not activated within 10 seconds, it will automatically leave calibration mode and return to normal operation) Green LED is ON in a few seconds, and then flashing. Output is now 4 mA and AKS 41 is in normal operation
Max. calibration:
- Bring the refrigerant liquid level to desired maximum level.
- Press the calibration pushbutton and keep it activated in approx. 5 seconds, until green LED stopps flashing.
- Activate, within the next 10 seconds, the calibration pushbutton two times, with 1 second in between. (If calibration pushbutton is not activated within 10 seconds, it will automatically leave calibration mode and return to normal operation) Green LED is ON in a few seconds, and then flashing. Output is now 20 mA and AKS 41 is in normal
operation
Min. calibration when minimum refrigerant level must be different from 4 mA:
- Bring the refrigerant liquid level to desired minimum level.
- Press the calibration pushbutton and keep it activated in approx. 5 seconds, until green LED stopps flashing.
- Activate, within the next 10 seconds, the calibration pushbutton once and keep it activated. (If calibration pushbutton is not activated within 10 seconds, it will automatically leave calibration mode and return to normal operation)
- Observe the output mA signal increasing fast starting at 4 mA.
- Release the calibration pushbutton when the output signal is approx. 0.5 mA from the desired point.
- All the next activations will increase the output signal by approx. 0.05 mA
- Approx. 10 seconds after the latest activation the LED starts flashing
- Output now corresponds to the value measured at the latest activation.
Max. calibration when maximum refrigerant level must be different from 20 mA:
- Bring the refrigerant liquid level to desired maximum level.
- Press the calibration pushbutton and keep it activated in approx. 5 seconds, until green LED stopps flashing.
- Activate, within the next 10 seconds, the calibration pushbutton two times, with 1 second in between, and keep it activated (If calibration pushbutton is not activated within 10 seconds, it will automatically leave calibration mode and return to normal operation)
- Observe the output mA signal decreasing fast starting at 20 mA.
- Release the calibration pushbutton when the output signal is approx. 0.5 mA from the desired point.
- All the next activations will decrease the output signal by approx. 0.05 mA
- Approx. 10 seconds after the latest activation the LED starts flashing
- Output now corresponds to the value measured at the latest activation.
Reset to factory setting
AKS 41 can always be reset to factory setting regardless of any revised calibration values.
- Press the calibtation pushbutton and keep it activated in min. 20 sec, until green LED starts flashing
- Release calibtation pushbutton
- When LED starts flashing, reset to factory setting is completed.
AKS 41 is now operating according to the factory settings.
Danfoss can accept no responsibility for possible errors in catalogues, brochures and other printed material.
Danfoss reserves the right to alter its products without notice. This also applies to products already on order provided that such alterations can be made without subsequential changes being necessary in specifications already agreed.
All trademarks in this material are property of the respective companies. Danfoss and the Danfoss logotype are trademarks of Danfoss A/S.
All rights reserved.
DKRCI.PI.SC0.A2.53 / 520H0077
© Danfoss A/S (IR/MWA), 02-2010
Documents / Resources
 |
Danfoss AKS 41 Series Liquid Level Transmitter [pdf] Instructions AKS 41-3, AKS 41-5, AKS 41-8, AKS 41-10, AKS 41-12, AKS 41-15, AKS 41-17, AKS 41-22, AKS 41-30, AKS 41 Series Liquid Level Transmitter, AKS 41 Series, Liquid Level Transmitter, Level Transmitter, Transmitter |