1. Introduktion
This manual provides essential information for the safe and effective operation, maintenance, and troubleshooting of your VEVOR Electric T Post Driver, model JH-60E. Please read this manual thoroughly before initial use and retain it for future reference.

Image 1.1: The VEVOR Electric T Post Driver in operation, demonstrating its powerful impact for driving posts.
Produktegenskaber:
- Fast Piling: Equipped with a 2200W motor, this electric post driver delivers high hammering force with an impact frequency of up to 1900 BPM and 85J of impact energy, ensuring efficient post installation.
- Interchangeable Sleeves: Includes two pile sleeves with diameters of 55mm (2.17 in) and 70mm (2.76 in), allowing adaptation to various post sizes. The hammerhead design facilitates easy and efficient piling.
- Start med et enkelt tryk: The machine starts instantly with a single button press, eliminating warm-up time and enhancing operational efficiency.
- Brugervenligt design: Features an anti-slip handle for comfortable grip and shock-absorbing springs to minimize engine vibrations, contributing to smoother operation and reduced user fatigue.
- Alsidig anvendelse: Suitable for installing orchard trellises, farm fencing, road barriers, riverbank construction, and general fence posts.
2. Sikkerhedsinstruktioner
Always adhere to basic safety precautions to reduce the risk of injury or damage when operating this electric post driver.
- Personligt beskyttelsesudstyr (PPE): Always wear safety glasses, hearing protection, heavy-duty gloves, and steel-toed boots when operating the machine.
- Arbejdsområde: Ensure the work area is clear of bystanders, especially children and pets. Maintain a stable footing and be aware of your surroundings.
- Elektrisk sikkerhed: Connect the post driver to a properly grounded power outlet. Do not operate in wet conditions or expose the tool to rain. Inspect the power cord for damage before each use.
- Værktøjshåndtering: Hold the post driver firmly with both hands using the anti-slip handles. Be prepared for the tool's weight (approximately 45.4 lbs / 20.6 kg) and impact force.
- Post Material: This tool is designed for driving posts into suitable ground. Avoid driving posts into sandy, rocky, or root-filled ground, as this can damage the tool or prevent effective piling.
- Opretholdelse: Disconnect the power supply before performing any maintenance, cleaning, or when changing accessories.
- Opbevaring: Opbevar værktøjet et tørt og sikkert sted utilgængeligt for børn.
3. Pakkens indhold
Bekræft, at alle nedenstående varer er inkluderet i din pakke. Hvis der mangler eller er beskadigede varer, skal du kontakte VEVORs kundesupport.
- VEVOR Electric T Post Driver (Model JH-60E) × 1
- 55mm (2.17 in) Iron Sleeve × 1
- 70mm (2.76 in) Iron Sleeve × 1
- Skruenøgle × 1
- Hex Wrenches (4mm, 5mm, 6mm) × 3
- Brugervejledning × 1
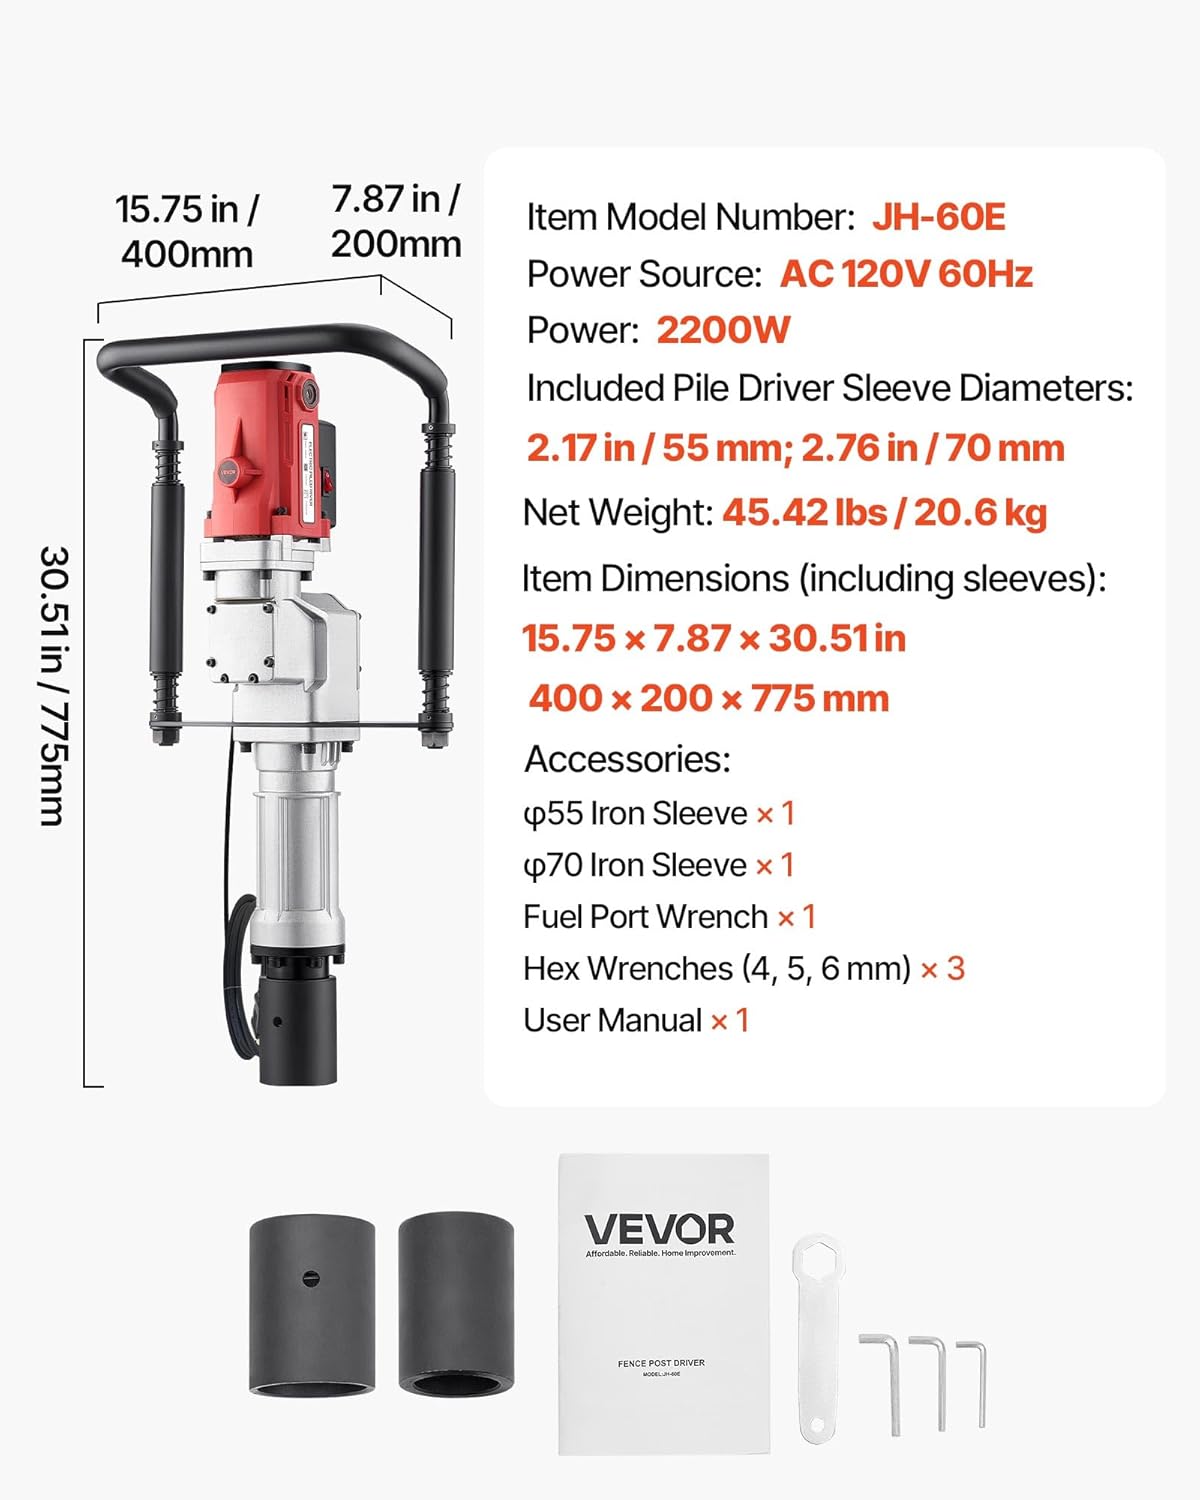
Billede 3.1: Overview of the VEVOR Electric T Post Driver and its included accessories.
4. Opsætning
Follow these steps to prepare your electric post driver for operation.
- Udpakning: Fjern forsigtigt alle komponenter fra emballagen. Undersøg for eventuelle forsendelsesskader.
- Håndtagssamling: Attach the anti-slip handles to the main body of the post driver using the provided hardware. Ensure they are securely fastened.
- Sleeve Selection and Installation:
- Measure the diameter of the post you intend to drive.
- Select the appropriate sleeve (55mm or 70mm) that best fits your post. The sleeve should fit snugly around the post to ensure efficient impact transfer.
- Align the chosen sleeve with the front cylinder of the post driver and twist it into place until it is securely seated.

Image 4.1: Selecting and installing the correct piling sleeve for your post.
- Strømtilslutning: Connect the power cord to a suitable AC 120V 60Hz grounded power outlet. Ensure the power switch on the tool is in the 'OFF' position before plugging it in.
5. Betjeningsvejledning
Proper operation ensures safety and maximizes the efficiency of your post driver.
- Positioning the Post: Place the post firmly in the desired location. Ensure the post is vertical and stable before beginning to drive.
- Placing the Driver: Carefully lower the post driver over the top of the post, ensuring the installed sleeve fits securely around the post. Hold the handles firmly with both hands.
- Start af maskinen: Press the 'One-Touch Start' button or switch to activate the post driver. The machine will begin to hammer immediately.

Image 5.1: The 'One-Touch Start' button for immediate operation.
- Driving the Post: Apply steady, downward pressure on the handles while the machine is operating. Allow the driver's impact force to do the work. Guide the post driver to keep the post straight.
- Overvågning af fremskridt: Continue driving until the post reaches the desired depth or stability.
- Stop af maskinen: Release the 'One-Touch Start' button or switch to turn off the post driver.
- Vigtige overvejelser:
- Avoid driving posts into extremely hard, rocky, sandy, or root-filled ground, as this can reduce efficiency and potentially damage the tool.
- The vibration-reducing handles and shock-absorbing springs are designed to enhance comfort during operation. Maintain a firm grip to control the tool effectively.

Image 5.2: User operating the post driver, demonstrating the vibration reduction features.
- This tool is suitable for various post types including angle steel, round steel, square steel, and bamboo.

Billede 5.3: Eks.amples of versatile piling scenarios for different post materials.
6. Vedligeholdelse
Regular maintenance ensures the longevity and optimal performance of your VEVOR Electric T Post Driver.
- Rensning: After each use, disconnect the power and clean the exterior of the tool with a dry cloth. Remove any dirt, dust, or debris from the sleeves and impact mechanism.
- Inspektion: Periodically inspect the power cord for cuts, fraying, or damage. Check all fasteners (bolts, screws) for tightness and tighten if necessary. Inspect the sleeves for wear or damage.
- Smøring: Refer to the specific lubrication points in the detailed user manual (if provided separately) for any required lubrication. Generally, the internal hammering mechanism may require periodic lubrication.
- Opbevaring: Store the post driver in a clean, dry, and secure location. Protect it from moisture and extreme temperatures.
7. Fejlfinding
Dette afsnit omhandler almindelige problemer, du kan støde på. Kontakt VEVORs kundesupport, hvis du har problemer, der ikke er nævnt her.
| Problem | Mulig årsag | Løsning |
|---|---|---|
| Værktøjet starter ikke | Ingen strømforsyning; Beskadiget netledning; Defekt afbryder | Kontroller strømtilslutningen og stikkontakten; Undersøg netledningen for skader; Kontakt service, hvis afbryderen er defekt. |
| Reduceret slagkraft | Incorrect sleeve size; Ground too hard/rocky; Internal mechanism issue | Ensure correct sleeve fit; Relocate post to more suitable ground; Contact service for internal inspection. |
| Overdreven vibration/støj | Loose components; Worn parts; Incorrect operation | Check and tighten all fasteners; Inspect sleeves for wear; Ensure proper technique; Contact service if issue persists. |
| Post not driving effectively | Ground conditions; Post material; Insufficient downward pressure | Avoid unsuitable ground (sandy, rocky, roots); Ensure post material is compatible; Apply steady downward pressure. |
8. Specifikationer
Technical specifications for the VEVOR Electric T Post Driver JH-60E.
| Feature | Specifikation |
|---|---|
| Varemodelnummer | JH-60E |
| Strømkilde | AC 120V 60Hz |
| Magt | 2200W |
| Påvirkningsfrekvens | Up to 1900 BPM |
| Effektenergi | 85J |
| Included Pile Driver Sleeve Diameters | 2.17 in / 55 mm; 2.76 in / 70 mm |
| Nettovægt | 45.42 lbs / 20.6 kg |
| Item Dimensions (including sleeves) | 15.75 x 7.87 x 30.51 tommer / 400 x 200 x 775 mm |
9. Garanti og support
VEVOR er forpligtet til at levere kvalitetsprodukter og kundetilfredshed.
For warranty information, technical support, or to inquire about replacement parts, please contact VEVOR customer service through their official website or the retailer where the product was purchased. Please have your model number (JH-60E) and purchase date available when contacting support.


