1. Introduktion
This manual provides detailed instructions for the assembly, operation, and maintenance of the SmallRig Advanced Camera Cage Kit (Model 3669-CF). This kit is designed to enhance stability during handheld shooting and offers a wide range of accessory mounting options for Sony Alpha 7 V, Alpha 7R V, Alpha 7 IV, and Alpha 7 S III cameras.
2. Hvad er der i æsken
The SmallRig Advanced Camera Cage Kit includes the following components:
- 1 x bur
- 1 x HDMI Cable Tie
- 1 x Locating Handle for ARRI
- 1 x Sidehåndtag
- 1 x unbrakonøgle

Image: All components included in the SmallRig Advanced Camera Cage Kit.
3. Opsætning og montering
Follow these steps to correctly assemble and attach the cage kit to your camera.
3.1. Camera Preparation
- Ensure your camera's lens is removed or a small lens is attached to allow clearance during cage installation.
- For cameras like the Sony Alpha 7S III or Alpha 7 IV, remove the split ring (shoulder strap hook) on the left side of the camera to use the side locking plate.
3.2. Attaching the Camera Cage
- Align your Sony Alpha 7 V, A7R V, A7 IV, or A7S III camera with the cage.
- Slide the camera into the cage.
- Secure the camera to the cage using the integrated 1/4"-20 screw located at the bottom of the cage. Use the provided hex key for tightening.
- Depending on your camera model, attach the appropriate side locking plate (one for Alpha 7S III, one for Alpha 7 IV) to prevent twisting. These plates attach to the camera's strap eyelet.
- Ensure the camera is firmly seated and does not move within the cage.

Image: Three-Point Locking mechanism for securing the camera within the cage.

Image: Wide compatibility with modular design, illustrating the different locking sliders for various Sony Alpha cameras.
Video: Demonstration of attaching the SmallRig cage to a Sony A7IV camera.
3.3. Tilslutning af HDMI-kablet Clamp
- Locate the HDMI cable clamp.
- Monter clamp onto the left side of the cage using the 1/4"-20 screw and two locating pins.
- Insert your HDMI cable into the clamp and tighten the thumbscrew to secure it. This prevents accidental disconnections and protects the camera's HDMI port.
Note: This cable clamp is not compatible with Sony Alpha 1. When used on the Alpha 7R V camera, the HDMI Cable Clamp interferes with the synchroterminal interface.
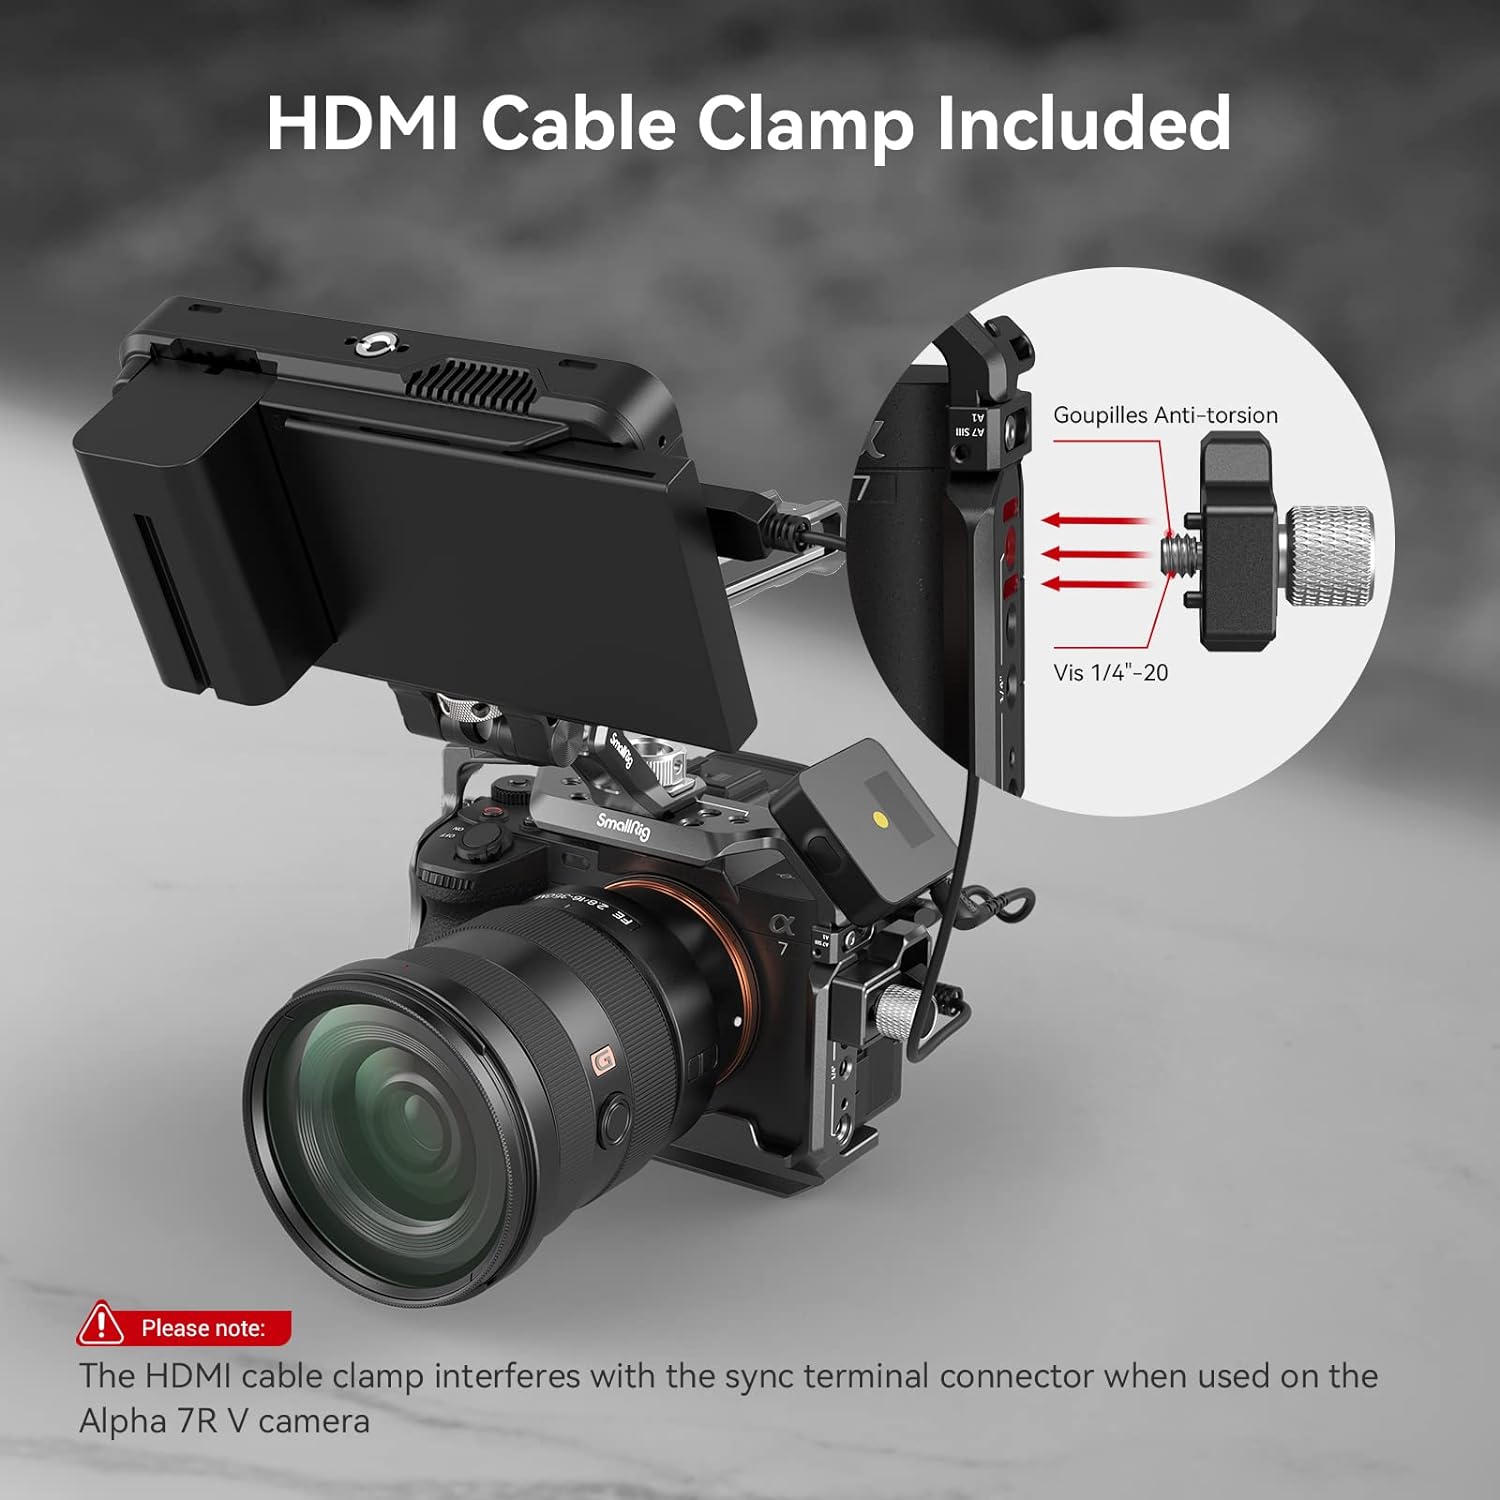
Image: HDMI Cable Clamp included with the kit, demonstrating its attachment and function.
3.4. Attaching the Top Handle
- The top handle attaches to the top of the cage via a standard ARRI locating mount.
- Align the handle with the ARRI locating holes on the top of the cage and secure it with the integrated screw.

Image: Ergonomic top handle design, showing various threaded holes and cold shoe mount.
3.5. Attaching the Side Handgrip
- The side handgrip attaches to the NATO rail on the side of the cage.
- Løsn clamp on the side handgrip, slide it onto the NATO rail, and tighten the clamp to secure it in your desired position.
- The height of the handgrip can be adjusted vertically for optimal comfort.
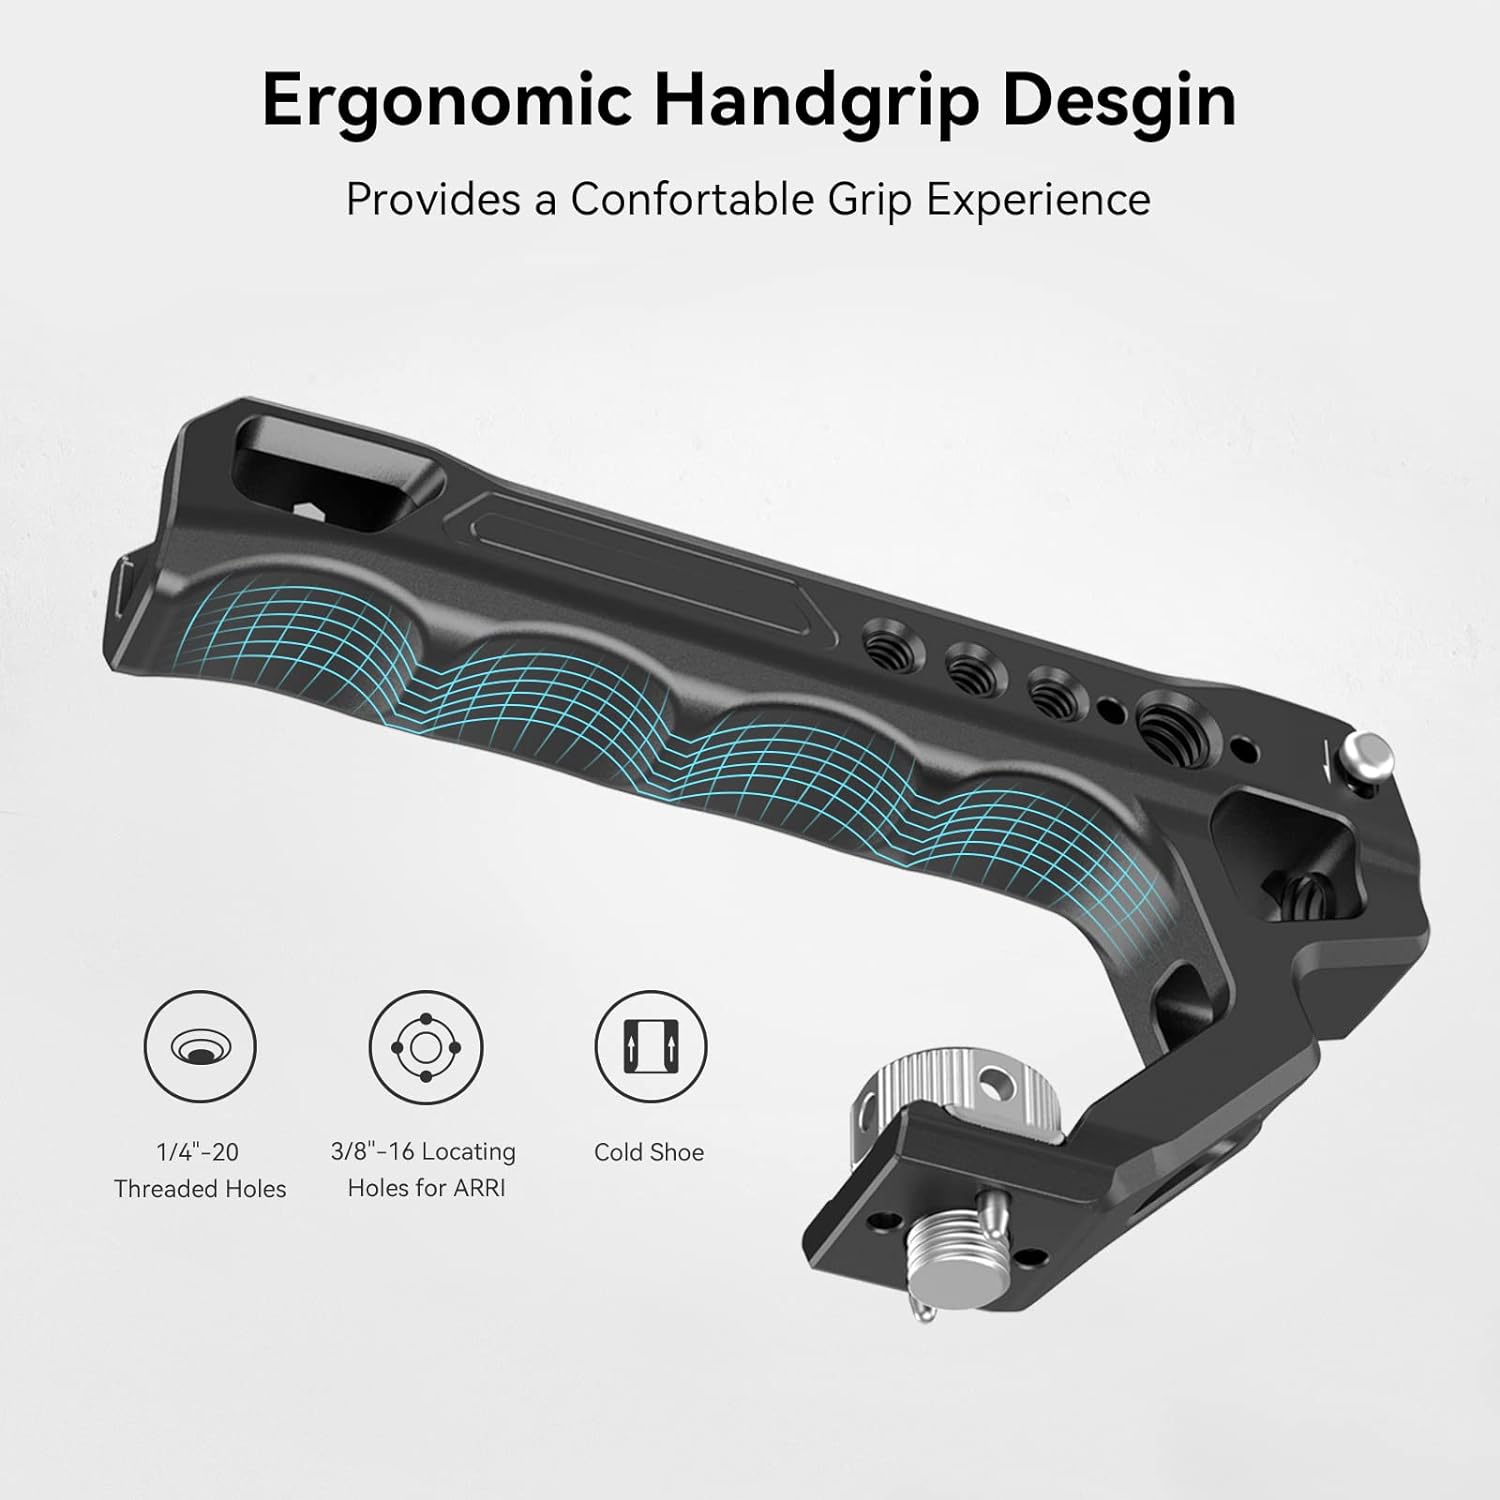
Image: Aluminum side handle, highlighting its comfortable grip and adjustable mounting.
4. Operating the Camera Cage Kit
The SmallRig Advanced Camera Cage Kit provides enhanced functionality and protection for your camera.
4.1. Enhanced Stability and Handling
- Øverste håndtag: Ideal for low-angle shots and easy carrying. It reduces arm strain during extended shooting sessions.
- Side Handgrip: Features a silicone insert for a better grip, increasing stability for handheld shooting. It can be adjusted vertically for optimal comfort.
4.2. Flere monteringspunkter
The cage offers various mounting interfaces for attaching accessories:
- 1/4"-20 gevindhuller: Numerous points for attaching monitors, magic arms, lights, and other accessories.
- 3/8"-16 ARRI Locating Holes: Provides secure, anti-twist mounting for ARRI-standard accessories.
- Cold Shoe-beslag: Integrated cold shoe mounts on the cage and handles for microphones, LED lights, and other shoe-mounted accessories.
- NATO-jernbane: Located on the side of the cage for quick attachment and detachment of NATO-compatible accessories, such as the side handgrip.
- Remhuller: Allows for attachment of neck or hand straps (sold separately).
- QD-stikkontakt: For quick-release sling swivels.

Image: Multiple mounting points available on the camera cage for various accessories.
4.3. Unobstructed Access
The cage is designed to maintain full access to the camera's controls, buttons, hot shoe, and battery compartment, allowing for quick battery changes without removing the camera from the cage.
Image: The cage design ensures precise holes and accurate calibration for full access to camera controls and battery.
5. Vedligeholdelse
- Regularly inspect all screws and connections to ensure they are tight. Use the provided hex key for tightening.
- Clean the cage with a soft, dry cloth. Avoid abrasive cleaners or solvents that could damage the finish.
- Store the cage in a dry, dust-free environment when not in use.
- The built-in protective pads should be checked periodically for wear and tear.
6. Fejlfinding
- Camera not fitting securely: Ensure the correct side locking plate is used for your specific camera model (Alpha 7S III or Alpha 7 IV). Verify that the integrated 1/4"-20 screw at the bottom is fully tightened.
- HDMI kabel Clamp interferens: If using the Alpha 7R V camera, be aware that the HDMI Cable Clamp may interfere with the synchroterminal interface. Adjust placement or consider alternative cable management if necessary. The clamp is not compatible with Sony Alpha 1.
- Tilbehør monteres ikke sikkert: Check that the accessory's mounting screw or mechanism matches the cage's interface (e.g., 1/4"-20, 3/8"-16 ARRI, cold shoe, NATO rail). Ensure all screws are tightened.
7. Specifikationer
| Feature | Detalje |
|---|---|
| Modelnummer | 3669-CF |
| Kompatibilitet | Sony Alpha 7 V, Alpha 7R V, Alpha 7 IV, Alpha 7 S III |
| Materiale | Aluminiumslegering, rustfrit stål, silikone |
| Produktdimensioner | 211.5 x 176.5 x 135 mm (D x B x H) |
| Varens vægt | 1.23 pund (556 gram) |
| Farve | Sort |
| Montering af point | 1/4"-20 threads, 3/8"-16 ARRI locating holes, Cold Shoe, NATO Rail, QD Socket |
8. Garanti og support
For garantioplysninger og teknisk support, besøg venligst den officielle SmallRig-side. webwebstedet eller kontakt deres kundeservice. Gem din købskvittering til eventuelle garantikrav.
Officiel SmallRig-butik: SmallRig-butik på Amazon


