1. Introduktion
Thank you for choosing an Indesit appliance. This user manual provides essential information for the safe and efficient operation, installation, and maintenance of your Indesit TWE 71252 S EU front-loading washing machine. Please read these instructions carefully before using the appliance and keep them for future reference. Proper use and maintenance will ensure optimal performance and extend the lifespan of your washing machine.
2. Sikkerhedsoplysninger
Generel sikkerhed:
- Dette apparat er kun beregnet til husholdningsbrug.
- Do not allow children to play with the appliance. Supervise children to ensure they do not climb into the drum.
- Tag altid stikket ud af apparatet, inden du rengør eller udfører vedligeholdelse.
- Do not operate the washing machine if the power cord or plug is damaged, or if the appliance itself is faulty. Contact qualified service personnel.
- Sørg for, at apparatet er korrekt jordet.
Installationssikkerhed:
- Remove all transit bolts and packaging materials before use. Failure to do so can cause severe damage.
- Install the appliance on a firm, level floor. Adjust the feet to ensure stability.
- Sørg for tilstrækkelig ventilation omkring apparatet.
- Tilslut vandtilløbsslangen til en koldtvandshane. Sørg for, at alle tilslutninger er tætte for at forhindre lækager.
- The drain hose must be securely fixed to prevent displacement during operation.
3. Produktet er slutview
Your Indesit TWE 71252 S EU washing machine features a user-friendly design with essential components for efficient laundry care.

Figur 3.1: Front view of the Indesit TWE 71252 S EU washing machine. This image shows the overall design, including the control panel at the top, the detergent dispenser on the left, and the main loading door in the center.
Nøglekomponenter:
- Kontrolpanel: Located at the top, featuring digital touch controls, push buttons, and a rotary knob for program selection.
- Vaskemiddel dispenser: A pull-out drawer for adding detergent and fabric softener.
- Indlæsningslåge: Front-loading door for adding and removing laundry.
- Tromme: Stainless steel interior where laundry is washed.
- Afløbsfilter: Placeret nederst foran, tilgængelig for rengøring.

Figur 3.2: Close-up of the detergent dispenser and control panel. This view highlights the various compartments within the dispenser for pre-wash, main wash, and softener, along with the program selection knob and digital display.

Figur 3.3: Indre view of the stainless steel drum. This image shows the perforated surface of the drum, designed for effective washing and rinsing, and the agitator paddles.
4. Installation og opsætning
Korrekt installation er afgørende for din vaskemaskines ydeevne og levetid.
4.1 Udpakning:
- Fjern forsigtigt al emballage, inklusive polystyrenbasen og eventuel beskyttelsesfilm.
- Remove the transit bolts located at the rear of the machine. These bolts secure the drum during transport and must be removed before operation. Keep them for future transport if needed.
4.2 Positionering:
- Place the washing machine on a flat, stable surface, away from direct sunlight or heat sources.
- Adjust the adjustable feet at the bottom of the machine to ensure it is perfectly level. Use a spirit level to verify.
- Ensure there is sufficient space around the machine for ventilation and ease of access.
4.3 Vandtilslutning:
- Connect the supplied water inlet hose to the cold water tap. Hand-tighten the connection, then use a wrench for a quarter turn.
- Connect the other end of the inlet hose to the water inlet valve at the back of the washing machine.
- Position the drain hose into a standpipe or over the edge of a sink, ensuring it is securely fixed to prevent it from falling out during draining. The height of the drain point should be between 65 cm and 100 cm from the floor.
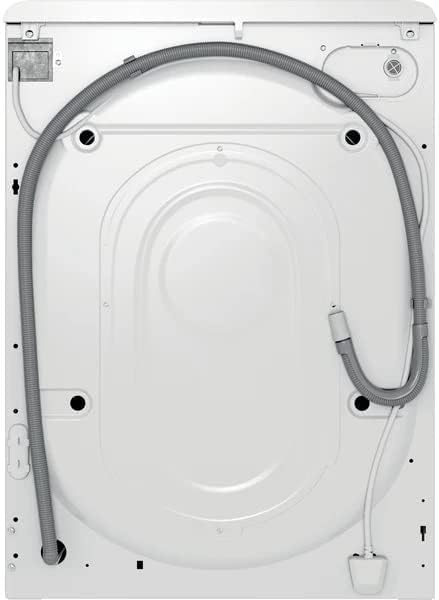
Figur 4.1: Bag view of the washing machine. This image illustrates the connections for the water inlet hose (typically blue or white) and the drain hose, along with the power cable.
4.4 Elektrisk tilslutning:
- Sæt netledningen i en korrekt jordet stikkontakt.
- Do not use extension cords or multi-plugs.
4.5 First Wash Cycle:
- Before washing clothes, run an empty wash cycle to clean the drum and remove any manufacturing residues.
- Add a small amount of detergent to the main wash compartment.
- Select a short, hot wash program (e.g., 60°C cotton cycle) and start the machine.
5. Betjeningsvejledning
Følg disse trin for effektiv og sikker drift af din vaskemaskine.
5.1 Ilægning af vasketøj:
- Åbn læssedøren.
- Sorter vasketøjet efter stoftype, farve og tilsmudsningsgrad.
- Load laundry loosely into the drum, ensuring not to overload. The 7kg capacity refers to dry laundry weight.
- Luk døren godt, indtil den klikker i.
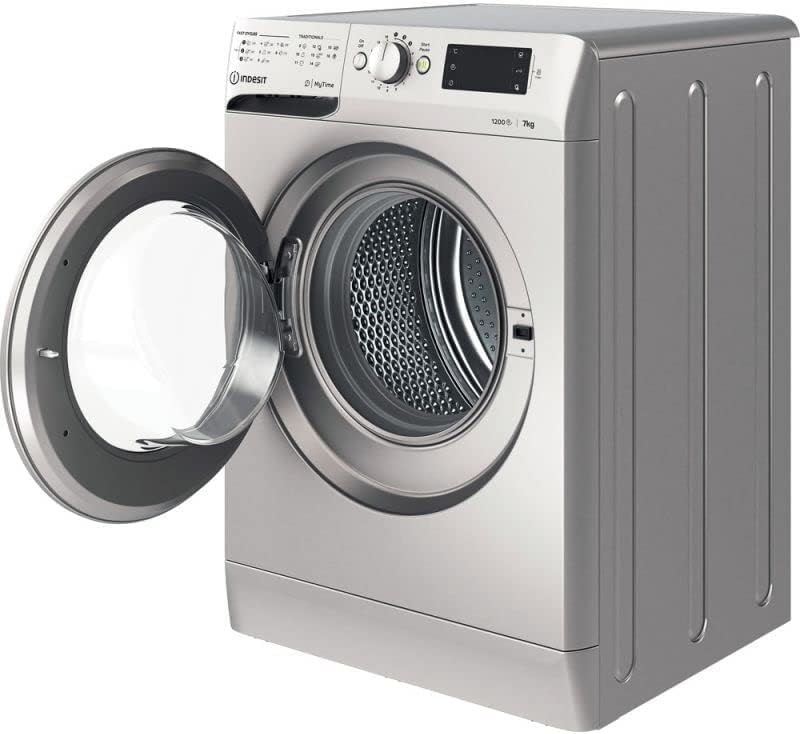
Figur 5.1: Front view of the washing machine with the door open. This image shows the wide opening for easy loading and unloading of laundry into the drum.
5.2 Tilsætning af vaskemiddel og tilsætningsstoffer:
- Træk vaskemiddelskuffen ud.
- Add the appropriate amount of detergent to the main wash compartment (usually marked 'II' or 'Main Wash').
- If using fabric softener, pour it into the designated compartment (usually marked with a flower symbol or 'Softener'). Do not exceed the 'MAX' level.
- Luk forsigtigt dispenserskuffen.
5.3 Valg af program:
- Turn the rotary knob on the control panel to select the desired wash program. The machine offers various programs for different fabric types and soil levels, including a 'Quick Wash' option.
- Use the digital touch controls and push buttons to adjust additional settings such as temperature, spin speed (up to 1200 RPM), or delay start, if available for the selected program.
5.4 Start af en cyklus:
- Press the 'Start/Pause' button to begin the wash cycle. The indicator light will illuminate.
5.5 Pausing/Canceling a Cycle:
- To pause a cycle, press the 'Start/Pause' button. The indicator light will flash.
- To cancel a cycle, press and hold the 'Start/Pause' button for a few seconds, or turn the program selector knob to 'Off' and then back to a new program.
5.6 End of Cycle:
- The machine will signal the end of the cycle (e.g., with an audible alert or a specific display message).
- Åbn døren og tag vasketøjet ud med det samme for at forhindre krølning.asing and odors.
- Lad døren stå på klem, så tromlen kan lufttørre.
6. Vedligeholdelse og rengøring
Regelmæssig vedligeholdelse sikrer optimal ydeevne og hygiejne.
6.1 Rengøring af sæbeskuffen:
- Træk sæbeskuffen helt ud.
- Fjern alle aftagelige dele, og skyl dem under rindende vand.
- Rengør skuffens kabinet med en børste.
- Saml skuffen igen, og sæt den i igen.
6.2 Rengøring af tromlen:
- Run a maintenance wash cycle (e.g., a hot cycle with a drum cleaning agent or white vinegar) every few months to prevent odor and residue buildup.
6.3 Rengøring af dørtætningen:
- Wipe the rubber door seal after each wash to remove lint, dirt, and moisture. This prevents mold and odors.
6.4 Rengøring af afløbsfilteret:
- Periodically clean the drain filter to prevent blockages and ensure proper drainage.
- Open the cover at the bottom front of the machine.
- Placer en lav beholder nedenunder for at opsamle eventuelt resterende vand.
- Slowly unscrew the filter, allowing water to drain.
- Fjern fnug, mønter eller fremmedlegemer fra filteret og dets hus.
- Rinse the filter under running water and screw it back in firmly. Close the cover.

Figur 6.1: Close-up of the drain filter access. This image shows the removable cap that covers the drain filter, which needs to be regularly cleaned to prevent blockages.
6.5 External Cleaning:
- Tør maskinens ydre af med en blød, damp klæde. Brug ikke slibende rengøringsmidler eller opløsningsmidler.
7. Fejlfinding
Før du kontakter kundeservice, kan du prøve disse enkle løsninger på almindelige problemer.
| Problem | Mulig årsag | Løsning |
|---|---|---|
| Maskinen starter ikke | No power; Door not closed; Program not selected; Start/Pause button not pressed. | Kontroller strømforsyningen; Sørg for, at døren er helt lukket; Vælg et program; Tryk på Start/Pause. |
| Vandet fyldes ikke | Vandhanen er lukket; Tilløbsslangen er bøjet; Vandtrykket er for lavt. | Åbn vandhanen; Ret slangen ud; Kontroller vandtrykket i husholdningen. |
| Vand løber ikke ud | Afløbsslange bøjet eller blokeret; Afløbsfilter blokeret. | Straighten or clear drain hose; Clean the drain filter (see Section 6.4). |
| Overdreven vibration/støj | Transportbolte ikke fjernet; Maskinen er ikke i vater; Ujævn belastning. | Remove transit bolts (if not already); Adjust feet to level machine; Redistribute laundry evenly. |
| Vaskemiddelrester på tøjet | Too much detergent; Detergent dispenser blocked; Insufficient rinse. | Reduce detergent amount; Clean dispenser; Select an extra rinse option if available. |
8. Specifikationer
Detailed technical specifications for the Indesit TWE 71252 S EU washing machine.
| Feature | Specifikation |
|---|---|
| Model | TWE 71252 S EU |
| Mærke | Indesit |
| Kapacitet | 7 kg |
| Maksimal spinhastighed | 1200 RPM |
| Dimensioner (H x B x D) | 85 cm x 59.5 cm x 54 cm |
| Vægt | 66.5 kg |
| Energieffektivitet | A+++ 90% |
| Trommemateriale | Rustfrit stål |
| Kontroltype | Digital Touch, Push Button, Rotary Knob |
| Installationstype | Frit stående |
| Farve | Sølv |
| Særlige funktioner | Durable, Quick Wash Option |
| Inkluderede komponenter | Vaskemaskine |
9. Garanti og support
For warranty information, please refer to the warranty card provided with your appliance or contact your retailer. Keep your proof of purchase (receipt or invoice) as it will be required for any warranty claims.
If you encounter issues that cannot be resolved using the troubleshooting guide, please contact Indesit customer service or an authorized service center. Do not attempt to repair the appliance yourself, as this may void your warranty and pose safety risks.


