1. Introduktion
The DNT Grabstar AV is a standalone video digitizer designed to convert analog video signals from sources like VCRs, camcorders, and DVD players into digital MP4 files. This device allows you to preserve your old video memories by saving them directly to an SD card, USB flash drive, or external USB hard drive without requiring a computer. It features a built-in 3.5-inch color display for monitoring and playback, and supports both Composite (RCA) and S-Video inputs for optimal quality.
Vigtig: Always ensure your device is running the latest firmware. You can check your current firmware version in the device menu. The recommended firmware version is v210317dnt (dated 17.03.2021).
2. Pakkens indhold
Kontroller venligst, at alle nedenstående varer er inkluderet i din pakke:
- 1 x DNT Grabstar AV Video Digitizer
- 1 x USB Power Adapter (5V DC/1A)
- 1 x USB-opladerkabel (Micro USB)
- 1 x AV Cable (3 x RCA male to 3 x RCA male)
- 1 x brugermanual

Image: DNT Grabstar AV device with its power adapter, USB cable, and RCA cable.
3. Enhed overview
Familiarize yourself with the various components and controls of your DNT Grabstar AV.

Billede: Forside view of the DNT Grabstar AV, displaying the 3.5-inch screen and control panel with Menu, Back, OK, directional buttons, Mode, and Rec/Stop buttons.
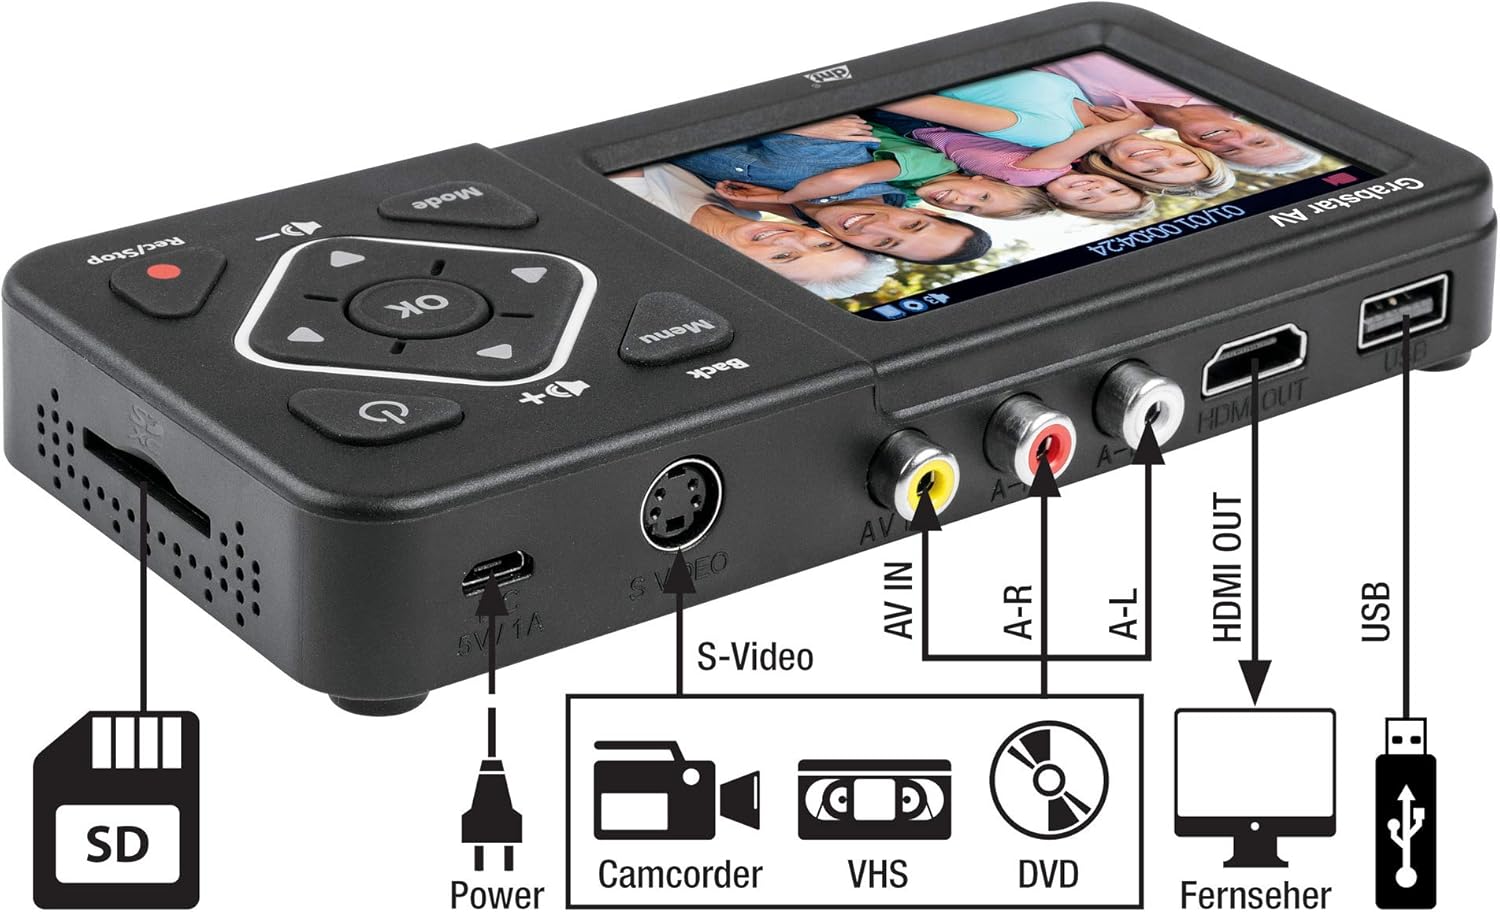
Billede: Vinklet view of the DNT Grabstar AV, highlighting the S-Video input, AV IN (RCA) ports, HDMI OUT, USB port, Micro USB power input, and SD card slot.
Kontrol og porte:
- 3.5-tommer farveskærm: For live monitoring and playback of recordings.
- Menu-knap: Accesses the device settings and options.
- Tilbage knap: Vender tilbage til den forrige menu eller skærm.
- Retningsknapper (op, ned, venstre, højre): Naviger gennem menuer og juster indstillinger.
- OK knap: Bekræfter valg.
- Mode knap: Skifter mellem optagelses- og afspilningstilstande.
- Optag/Stop-knap: Initiates and terminates video recording.
- Lydstyrkeknapper (+/-): Adjusts the built-in speaker volume.
- Power knap: Tænder eller slukker for enheden.
- DC 5V/1A (Micro USB): Strømindgangsport.
- S-Video Input: For connecting video sources with S-Video output.
- AV IN (RCA): Composite video (yellow) and stereo audio (red/white) input ports.
- HDMI OUT: Connects to a TV or monitor for external display.
- USB-port: For connecting USB flash drives or external USB hard drives.
- SD-kortplads: Til isætning af SD/SDHC-hukommelseskort.
4. Opsætning
Follow these steps to prepare your DNT Grabstar AV for use:
- Strømtilslutning: Connect the supplied USB power adapter to the Micro USB port (DC 5V/1A) on the device and plug it into a power outlet.
- Insert Storage Media: Insert an SD/SDHC memory card (Class 10 or higher, up to 128 GB) into the SD card slot, or connect a USB flash drive (up to 128 GB) or an external USB hard drive (up to 4 TB) to the USB port. Ensure the storage media is formatted to FAT32, NTFS, or exFAT.
- Connect Analog Video Source:
- Composite (RCA): Use the supplied AV cable to connect the yellow video output from your source device (VCR, camcorder, DVD player) to the yellow AV IN port on the Grabstar AV. Connect the red and white audio outputs from your source to the corresponding red (A-R) and white (A-L) AV IN audio ports.
- S-video: If your source device has an S-Video output, connect an S-Video cable to the S-Video port on the Grabstar AV. For audio, you must still connect the red and white audio RCA cables from your source to the Grabstar AV's A-R and A-L ports. S-Video only transmits video.
- (Optional) Connect to TV: Til view the input signal or recorded videos on a larger screen, connect an HDMI cable from the HDMI OUT port on the Grabstar AV to an HDMI input on your television or monitor.
5. Betjeningsvejledning
5.1 Tænd/sluk
Press and hold the Power button (⑁) on the device for a few seconds to turn it on or off.
5.2 Optagelse af video
- Vælg input: Ensure your analog video source is connected and powered on. The Grabstar AV will automatically detect the input signal (Composite or S-Video). The live video feed should appear on the 3.5-inch display.
- Start Source Playback: Begin playing the video on your source device (e.g., press Play on your VCR).
- Start optagelse: Tryk på Rec/Stop (●) button on the Grabstar AV. A red recording indicator will appear on the screen, and the recording duration will be displayed.
- Monitor Recording: Observe the recording on the device's screen or an external TV connected via HDMI.
- Stop optagelse: Tryk på Rec/Stop (●) button again to stop the recording. The device will save the video file to your inserted storage media.
Automatic Recording Function: The device supports automatic recording durations of 60, 90, 120, or 150 minutes. This can be configured in the device's menu settings.
Bemærk om File Størrelse: Pga file system limitations (especially FAT32), individual recorded files are limited to a maximum size of 4 GB. If a recording exceeds this limit, the device will automatically split it into multiple 4 GB files.
Optagelsesopløsning: The Grabstar AV supports recording resolutions of 720x576p, 720x480p, and 640x480p. For analog sources, higher recording resolutions do not necessarily improve the visual quality, as the native resolution of analog material is inherently low. Selecting a higher resolution than the source material may not yield better results and can sometimes lead to less optimal digitization.
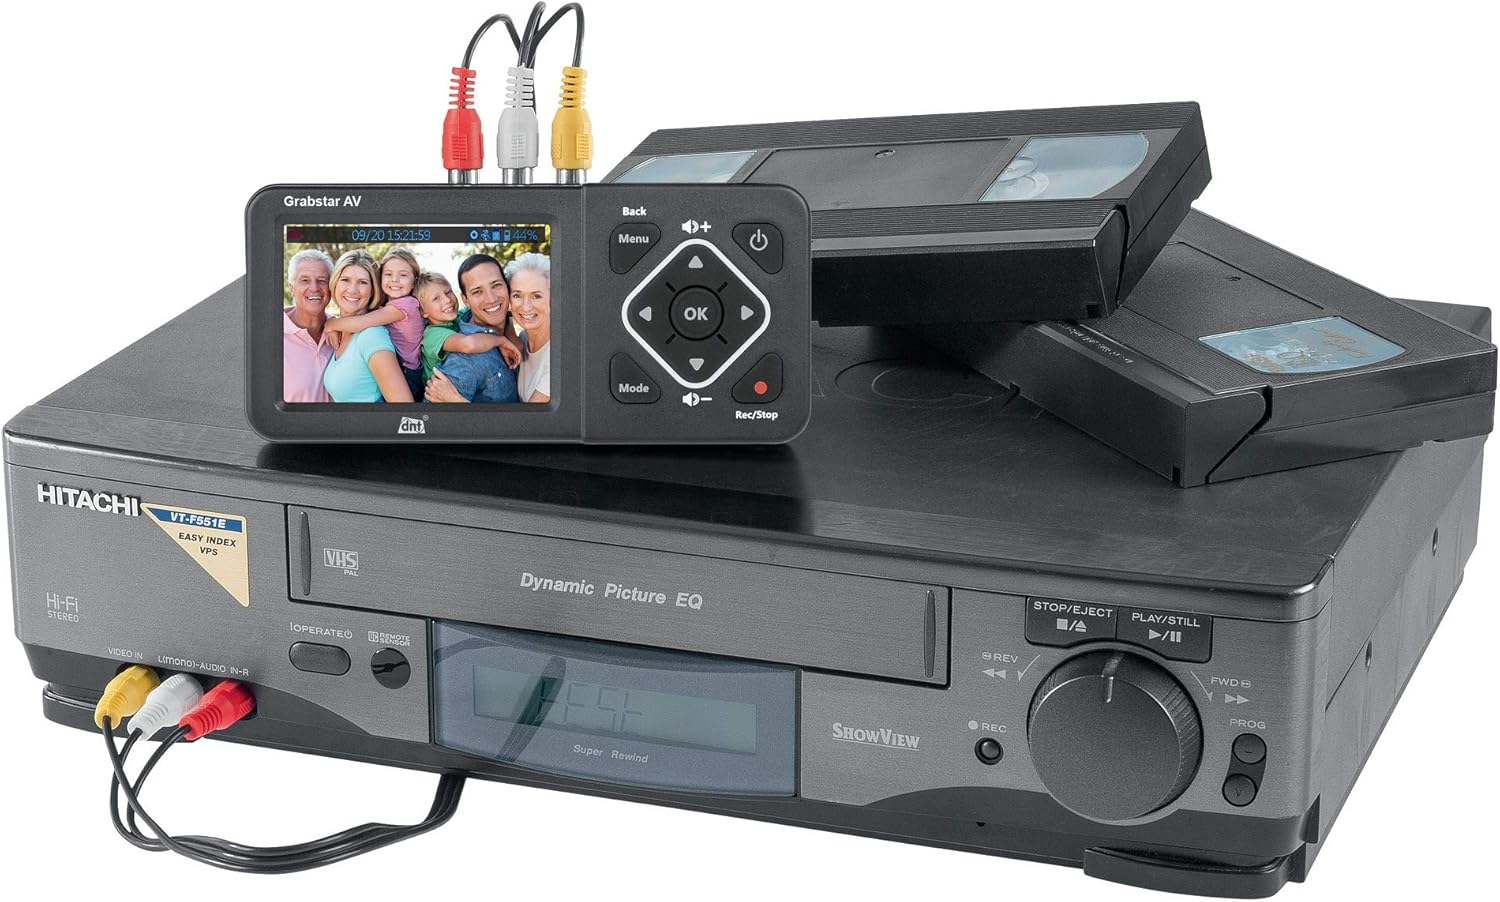
Image: The DNT Grabstar AV connected to a VHS player, demonstrating the process of digitizing old video tapes.
5.3 Afspilning
To play back recorded videos:
- Tryk på Mode knappen for at skifte til afspilningstilstand.
- Use the directional buttons to navigate through your recorded files.
- Tryk på OK knappen for at starte afspilning af det valgte file.
- If connected to a TV via HDMI, the video will be displayed on the external screen.
5.4 File Ledelse
You can access and manage your recorded MP4 files directly on the inserted SD card or USB storage device. Connect the storage media to a computer to transfer, edit, or back up your digitized videos.
6. Vedligeholdelse
6.1 Rengøring
Wipe the device with a soft, dry cloth. Do not use liquid cleaners or abrasive materials, as they may damage the screen or casing.
6.2 firmwareopdateringer
Periodically check the DNT website for available firmware updates. Updates can improve performance, add features, or resolve issues. Firmware updates are typically performed via USB or SD card. Refer to the DNT support resources for detailed instructions on how to update your device's firmware.
7. Fejlfinding
If you encounter issues with your DNT Grabstar AV, refer to the following common problems and solutions:
- Intet signal vist:
- Ensure your source device (VCR, camcorder) is powered on and playing video.
- Verify that all video cables (Composite or S-Video) are securely connected to both the source device and the Grabstar AV.
- Check the input selection on the Grabstar AV if there is an option to manually switch.
- Undersøg kablerne for skader.
- No Audio During Recording or Playback:
- Ensure the red (A-R) and white (A-L) audio RCA cables are correctly connected from your source device to the Grabstar AV. Even when using S-Video for video, audio must be connected via RCA cables.
- Check the volume level on the Grabstar AV using the volume buttons.
- Verify the audio output settings on your source device.
- Recording Not Starting or Stopping Unexpectedly:
- Ensure a compatible storage device (SD card, USB drive) is inserted and has sufficient free space.
- Check the formatting of your storage media (FAT32, NTFS, exFAT).
- Confirm that a stable video signal is present before pressing the record button. The device will only record if it detects an active input signal.
- For external hard drives, ensure they have their own power supply if required.
- Dårlig videokvalitet:
- The quality of the digitized video is highly dependent on the quality of the original analog source material and playback device.
- Ensure video tapes or other media are clean and in good condition.
- Use S-Video connection if available on your source device for potentially better video quality compared to Composite (RCA).
- Storage Media Not Recognized:
- Ensure the SD card or USB drive is inserted correctly.
- Verify the storage media is formatted to a supported file system (FAT32, NTFS, exFAT).
- Try a different SD card or USB drive to rule out media issues.
8. Specifikationer
| Feature | Specifikation |
|---|---|
| Produkttype | Analog video digitizer |
| Vise | 3.5-inch (8.9 cm) Color Screen |
| Video standard | PAL, NTSC |
| Understøttede inputopløsninger | 720x576i/50Hz (625 lines), 720x480i/60Hz (525 lines) |
| Optagelsesopløsninger | 720x576p, 720x480p, 640x480p |
| Optagelsesformat | MP4 (H.264) |
| Optagelsesstørrelse | Up to 150 MB/minute |
| Indgange | 1 x FBAS/RCA (3 x RC), 1 x S-Video |
| Udgange | 1 x HDMI udgang |
| Lagerporte | 1 x USB, 1 x SD/SDHC slot |
| Understøttede lagringstyper | SD/SDHC memory card (up to 128 GB), USB flash drive (up to 128 GB), USB hard drive (up to 4 TB) |
| Understøttet File Systemer | FAT32/NTFS/exFAT (max. 4 GB/file) |
| Strømforsyning | 5V DC/1A (via USB power adapter) |
| Indbygget højttaler | Yes, 1 W RMS |
| Dimensioner (B x H x D) | 160 x 75 x 25 mm |
| Vægt | 156 g (ca. 5.5 ounces) |
9. Garanti og support
The DNT Grabstar AV comes with a standard manufacturer's warranty. Please refer to the warranty information provided with your purchase for specific terms and conditions. For technical support, firmware updates, or further assistance, please visit the official DNT webwebsted eller kontakt deres kundeserviceafdeling.


