1. Důležité bezpečnostní pokyny
Please read all instructions before using this sewing machine. This machine is intended for household use only.
NEBEZPEČÍ – Abyste snížili riziko úrazu elektrickým proudem:
- Spotřebič by nikdy neměl být ponechán bez dozoru, když je zapojen do zásuvky.
- Bezprostředně po použití a před čištěním vždy odpojte tento spotřebič z elektrické zásuvky.
- Před opětovným připojením vždy odpojte napájecí kabelampIng. Vyměňte žárovku za stejný typ s jmenovitým výkonem 15 wattů (110-120V oblast) nebo 15 wattů (220-240V oblast).
VAROVÁNÍ – Abyste snížili riziko popálenin, požáru, úrazu elektrickým proudem nebo zranění osob:
- Nedovolte, aby byl používán jako hračka. Při používání tohoto spotřebiče dětmi nebo v jejich blízkosti je nutná zvýšená pozornost.
- Používejte tento spotřebič pouze k účelu, ke kterému je určen, jak je popsáno v tomto návodu. Používejte pouze příslušenství doporučené výrobcem, jak je uvedeno v tomto návodu.
- Nikdy nepoužívejte tento spotřebič, pokud má poškozenou šňůru nebo zástrčku, pokud nefunguje správně, pokud upadl nebo byl poškozen nebo spadl do vody. Vraťte spotřebič nejbližšímu autorizovanému prodejci nebo servisnímu středisku ke kontrole, opravě, elektrickému nebo mechanickému seřízení.
- Nikdy neprovozujte spotřebič se zablokovanými vzduchovými otvory. Udržujte ventilační otvory šicího stroje a nožního ovladače bez nahromadění vláken, prachu a uvolněné látky.
- Držte prsty mimo všechny pohyblivé části. Jehla je obzvláště opatrná.
- Vždy používejte správnou stehovou desku. Nesprávná destička může způsobit zlomení jehly.
- Nepoužívejte ohnuté jehly.
- Během šití látku netahejte ani netlačte. Mohlo by dojít k vychýlení jehly a jejímu zlomení.
- Always unplug sewing machine off ("O") when making any adjustments in the needle area, such as threading needle, changing needle, threading bobbin, or changing presser foot, and the like.
- Při odstraňování krytů, mazání nebo při provádění jakýchkoli jiných servisních úprav prováděných uživatelem uvedených v návodu k obsluze vždy odpojte šicí stroj od elektrické zásuvky.
- Nikdy neupouštějte ani nevkládejte žádné předměty do žádného otvoru.
- Nepoužívejte venku.
- Nepoužívejte zařízení, kde se používají aerosolové spreje nebo kde se podává kyslík.
- Pro odpojení otočte všechny ovládací prvky do polohy vypnuto („O“) a poté vytáhněte zástrčku ze zásuvky.
- Neodpojujte tahem za kabel. Při odpojování uchopte zástrčku, nikoli kabel.
- Hladina akustického tlaku za normálních provozních podmínek je 75 dB(A).
- Always turn off the machine or unplug when the machine is not operating properly.
- Na nožní ovladač nikdy nic nepokládejte.
- If the supply cord to the foot controller is damaged, it must be replaced by the manufacturer or its service agent or a similar qualified person in order to avoid a hazard.
- Tento spotřebič není určen pro použití osobami (včetně dětí) se sníženými fyzickými, smyslovými nebo duševními schopnostmi nebo nedostatečnými zkušenostmi a znalostmi, pokud na ně nedohlíží osoba odpovědná za jejich bezpečnost nebo jim nebyla poskytnuta instrukce ohledně používání spotřebiče.
- Děti by měly být pod dozorem, aby bylo zajištěno, že si se spotřebičem nebudou hrát.
USCHOVEJTE TYTO POKYNY
Image: Important Safety Instructions page from the Singer 2250 manual, detailing electrical and general safety warnings.
2. Nastavení
2.1 Příslušenství
The Singer 2250 sewing machine comes with a set of standard accessories and supports various optional accessories for different sewing tasks.
- Standardní příslušenství: All purpose foot, Button sewing foot, Zipper foot, Screwdriver, Seam ripper/brush, Pack of needles, Bobbin (3), Darning plate, Spool holder.
- Optional Accessories (not supplied with machine, available from SINGER® retailers): Edge/quilting guide, Zipper foot, Straight stitch foot, Overcasting foot, Hemmer foot, Blind hem foot, Satin stitch foot, Cording/embroidery foot, Second spool pin, Spool pin felt.
2.2 Navíjení cívky
- Place thread and corresponding spool holder onto the spool pin.
- Snap the thread into the thread guide.
- Wind the thread counterclockwise around the bobbin winder tension disc.
- Thread the bobbin as illustrated and place it on the spindle.
- Push the bobbin spindle to the right.
- Hold the thread end.
- Step on the foot control pedal to begin winding.
- Cut the thread once the bobbin is full.
- Push the bobbin spindle to the left and remove the wound bobbin.
Poznámka: When the bobbin winder spindle is in the "bobbin winding" position, the machine will not sew and the hand wheel will not turn. To start sewing, push the bobbin winder spindle to the left (sewing position).

Image: Manual page illustrating standard and optional accessories, and a step-by-step guide for winding the bobbin.
2.3 Connecting to Power Source
Ensure the machine's power switch is in the "O" (off) position. Insert the machine plug into the electrical outlet. Always use a grounded outlet.
2.4 Raising the Presser Foot Lifter
The presser foot lifter is located at the back of the needle bar area. Lift it to raise the presser foot for placing fabric, and lower it to hold the fabric in place for sewing.
3. Provoz
3.1 Choosing Your Pattern
The Singer 2250 features a Pattern Selector Dial to choose various stitch patterns.
- Stitches indicated in black on the diagram correspond to the Pattern Selector Dial.
- For patterns indicated with the "S" color, turn the Pattern Selector Dial to "S", then use the Stitch Length Dial to adjust the desired stitch length.
- The Pattern Selector Dial can be turned in either direction.
3.2 Stitch Length Dial
The Stitch Length Dial controls the length of straight stitches and the density of zig-zag stitches.
- For Straight Stitching: Turn the Pattern Selector Dial to the straight stitch symbol. The stitch length increases as the dial approaches "4". Use longer stitches for heavier fabrics and thicker needles, shorter stitches for lighter fabrics and finer needles.
- For Zig-Zag Stitching: Turn the Pattern Selector Dial to "~~~ ". The density of zig-zag stitches increases as the setting of the stitch length dial approaches "0". Dense zig-zag stitches are known as satin stitches.

Image: Manual page detailing how to choose stitch patterns and adjust stitch length for various sewing applications.
3.3 Navlékání nitě do stroje
Proper threading is crucial for smooth sewing. Follow these general steps:
- Nasaďte cívku nitě na kolík cívky.
- Provlékněte nit horními vodítky nitě.
- Protáhněte nit napínacími kotouči.
- Bring the thread up through the take-up lever.
- Veďte nit dolů vodítkem nitě na jehelní tyči.
- Navlékněte jehlu zepředu dozadu.
- Raise the bobbin thread by turning the handwheel towards you, catching the bobbin thread with the needle thread.
- Pull both threads under the presser foot and towards the back.
3.4 Sewing on Buttons
To sew buttons using your Singer 2250:
- Namontujte oddělovací desku.
- Change the all-purpose foot to the button sewing tool.
- Position the fabric and button under the foot.
- Lower the button to the desired position and lower the foot.
- Set the Pattern Selector Dial on "---" and sew a few securing stitches.
- Select one of the two narrow zig-zag patterns (between 0.5 and 1.5) and sew through both holes of the button. Turn the handwheel to check needle clearance.
- Slowly sew the button with about 10 stitches.
- Select pattern "---" again and sew a few securing stitches.
- If a shank is required, place a darning needle on top of the button and sew.
- For buttons with 4 holes, sew through the front two holes first, then sew backwards and then sew through the back two holes.
3.5 Installing the Removable Extension Table
The removable extension table provides a larger work surface and also serves as an accessory box.
- Instalace: Hold the removable extension table horizontally and push it in the direction of the arrow until it clicks into place.
- Odebrání: Pull the extension table towards the left.
- The inside of the removable extension table can be used as an accessory box. To open, flip the cover down.
4. Údržba
4.1 Darning Plate
The darning plate is used for specific tasks like darning or free-hand embroidery.
- Instalace: Install the darning plate as illustrated in the manual.
- Odstranění: Pro běžné šití vyjměte vyšívací desku.
- For free-motion sewing, a darning/embroidery foot (optional accessory) is recommended.
4.2 Inserting & Changing Needles
Regularly change your needle, especially if sewing problems occur. Use SINGER® Brand Needles for best results.
- Turn the power switch to off ("O").
- Povolte jehlu třamp šroub.
- Insert the new needle with the flat side of the shaft facing the back, pushing it up as far as it will go.
- Utáhněte jehlu třamp šroub.
Pozor: Needles must be in perfect condition. Problems can occur with bent needles, damaged points, or blunt needles.
4.3 Changing the Bulb
To change the light bulb, ensure the machine is unplugged. Replace the bulb with the same type rated 15 watts (110-120V area) or 15 watts (220-240V area).
4.4 Čištění
Regularly clean the lint and dust from the bobbin case area and feed dogs using the provided brush. Ensure the machine is unplugged before cleaning.
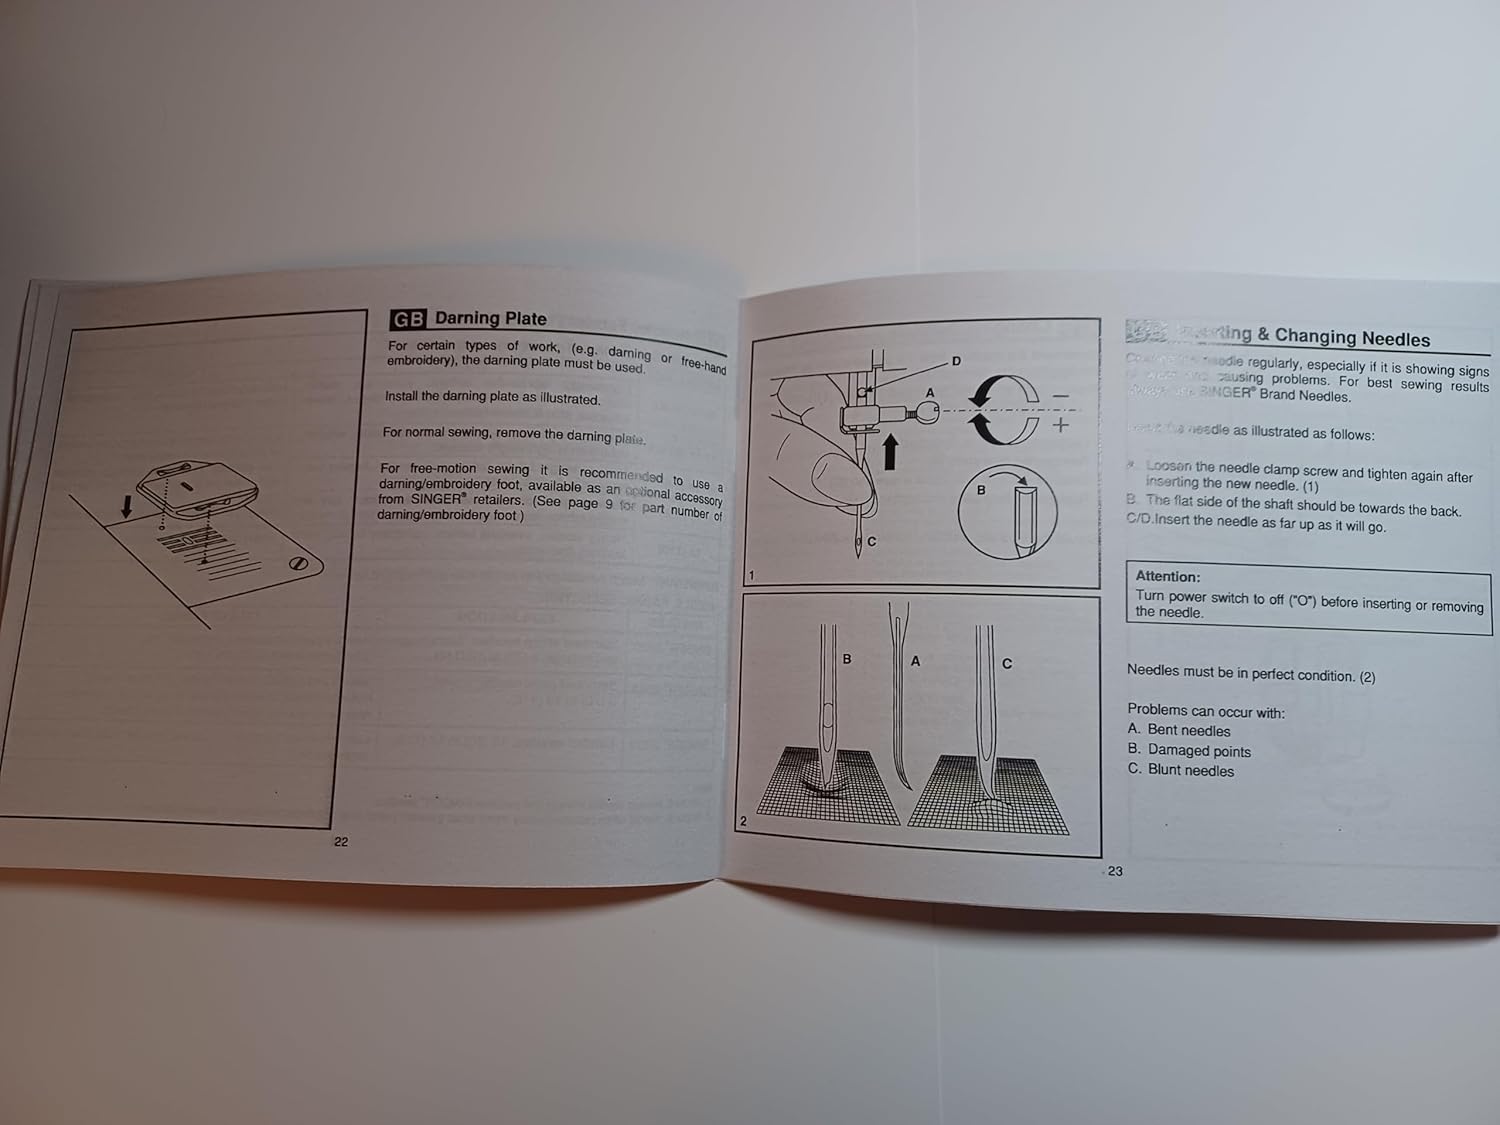
Image: Manual page illustrating procedures for sewing on buttons, installing the extension table, using the darning plate, and changing needles.
5. Řešení problémů
If you encounter issues with your Singer 2250, refer to the following common problems and solutions:
- Vynechané stehy: Ensure the needle is inserted correctly, not bent, and is the appropriate size for the fabric and thread. Re-thread the machine.
- Přetržení nití: Check for correct threading, proper tension, a bent or blunt needle, or burrs on the needle plate or bobbin case.
- Zvrásnění látky: Adjust tension settings, use the correct needle size, or ensure the presser foot pressure is appropriate for the fabric.
- Stroj nepodává látku: Check if the feed dogs are raised. Ensure the presser foot is lowered.
- Hlučný provoz: Clean and lubricate the machine as per maintenance instructions. Check for loose parts or a bent needle.
For persistent problems, contact an authorized Singer service center.
6. Specifikace
| Rozměry produktu | 8.5 x 5.5 x 0.1 palce |
| Hmotnost položky | 3 unce |
| Číslo modelu | SINGER 2250 Manual |
| Výrobce | TabSynth Design (for reproduction manual) |
| ASIN | B0G19M5M63 |
7. Záruka a podpora
This instruction manual is a reproduction for the Singer 2250 Sewing Machine. For warranty information regarding your Singer 2250 sewing machine, please refer to the original documentation provided with your machine or contact Singer customer support directly.
For support related to the operation or maintenance of your Singer 2250, please consult this manual. If further assistance is needed, contact an authorized Singer service center or your local Singer dealer.


