Fluval Connect App

- Bluetooth version: BLE 4.0 and above
- Mobile System Requirements:
- Android 6.0 and above
- iOS 13.0 and above
Product Usage Instructions
Before You BeginConnecting Your Light:
- Plant 4.0 & Reef 4.0 / Plant PRO / Plant 3.0 & Reef 3.0:
- Connect LED light into transformer, then plug transformer into power outlet.
- Touch switch button on light unit will illuminate after turning power on.
- Aquasky 3.0 / Roma & Shaker 2.0 / Siena 2.0 / Aquasky 2.0 / Roma & Shaker / Siena / V&V:
- Connect LED light into transformer, then plug transformer into power outlet.
- Plant Nano 4.0 & Reef Nano 4.0 / Plant Nano 3.0 & Reef Nano 3.0:
- Attach LED to over-the-glass mounting bracket.
- Connect LED light into transformer, then plug transformer into power outlet.
Operation Instructions
- Within the Google Play Store (Android users) or App Store (iOS users), search for FluvalConnect and install the free app.
App Operation and Settings
- After installation, select the FluvalConnect icon to open the app.
- When opening the app for the first time, select Register to create an account with access to all functionalities, or select Skip to operate your devices without an account, which offers limited control features.
- Skip Mode: If you prefer local control only, you can select the ‘Skip’ button on the main screen upon entering the app. This allows you to bypass the login process and add Fluval devices step-by-step. Note that in Skip Mode, control is limited and some functionalities may not be available.
APP OVERVIEW
Overview
- The FluvalConnect app is designed to operate both your Fluval new generation aquarium lamp and 15t Generation Bluetooth LED series via Bluetooth Mesh, Bluetooth+Wi-Fi (Aquasky 3.0), Bluetooth only (1s Generation LED series) wireless technology, granting total control of the LED unit and its various light effects.
Applicable Models
New LED Lighting Series

Bluetooth (1st Generation) LED Lighting Series 
BEFORE YOU BEGIN
- Mobile System Requirements Bluetooth version BLE 4.0 and above Android 6.0 and above / iOS 13.0 and above
- Connecting Your Light Plant 4.0 & Reef 4.0 / Plant PRO / Plant 3.0 & Reef 3.0 Connect LED light into transformer, then plug transformer into power outlet.
 Aquasky 3.0 / Roma & Shaker 2.0 / Siena 2.0 / Aquasky 2.0 / Roma & Shaker / Siena / V&V Connect LED light into transformer, then plug transformer into power outlet.
Plant Nano 4.0 & Reef Nano 4.0 / Plant Nano 3.0 & Reef Nano 3.0
- Attach LED to over-the-glass mounting bracket.
- Connect LED light into transformer, then plug transformer into power outlet.

OPERATION INSTRUCTIONS
App Installation
Download the FluvalConnect App
Within the Google Play Store (Android users) or App Store (iOS users), search for “FluvalConnect” and install the free app.

App Operation and Settings
- After installation, select the “FluvalConnect” icon to open the app:

- When opening the app for the first time, select “Register” to create an account with access to all functionalities, or select “Skip” to operate your devices without an account, which offers limited control features.
Skip Mode: If you prefer local control only, you can select the ‘Skip’ button on the main screen upon entering the app. This allows you to bypass the login process and add Fluval devices step-by-step. Note that in Skip Mode, control is limited and some functionalities may not be available.
Register and Login Modes: You can also register a new account using your email address. A verification code will be sent to your email, allowing you to set a password and create your account. Once registered, you may use Login Mode for all subsequent app visits, proving you with access to all functionalities.
App and Lamp Connection
(Login and Skip Mode have the same connection steps, only Wi-Fi remote features are not available for Aquasky 3.0 LEDs under Skip Mode.)
- Ensure LED lamp is powered on and Bluetooth connectivity on your mobile device is also enabled.
- Select the “Device” icon and then select the “+” in the right bottom corner of the screen.
- Next, verify your Fluval device model and select the related icon. The app will then scan your immediate surroundings for compatible Fluval lamps. For example, the Aquasky 3.0 LED has been selected below.

- The app will scan lights nearby and show compatible devices on screen. Select the one you wish to connect to.
- Rename your device (optional) and select ‘OK’ to complete the connecting process.

- Select the added device to enter the control interface.

Description of the Function Key
“Man” (Manual) Mode
Aquasky 3.0
- Manual mode button.
- Brightness adjustment – slide over the dimming dial to control intensity
- Power button: Turn the lamp on and off.
- Color channels:
Tap all 4 color dots to adjust intensity of all channels simultaneously or select 1 color dot at a time to adjust channel intensity independently. - P1, P2, P3, and P4 allow you to Program (Save) up to to 4 manually-entered light spectrums. After manually entering desired color intensity levels, press and hold these buttons to save settings.
Note: P1 and P2 default settings feature 100% intensity for all color channels, until new settings are overwritten. - Dynamic weather effect buttons. (Slide LEFT or RIGHT to see all available options or press
 the button)
 - Control mode display: Aquasky 3.0 LED series can be controlled via Bluetooth or Wi-Fi. The illuminated icon indicates the current control mode.


Plant & Reef 4.0 / Plant & Reef Nano 4.0 / Plant Pro
- Manual mode button.
Brightness adjustment – slide the dimming dial to control intensity - Power button: Turn the lamp on and off.
- Color channels:
Tap all 4 color dots to adjust intensity of all channels simultaneously or select 1 color dot at a time to adjust channel intensity independently. - P1, P2, P3, and P4 allow you to Program (Save) up to 4 manually-entered light spectrums. After manually entering desired color intensity levels, press and hold these buttons to save settings.
Note: P1 and P2 default settings feature - 100% intensity for all color channels, until new settings are overwritten.
- New dynamic weather effect buttons.
Roma & Shaker 2.0
Roma & Shaker 2.0 feature the same “Man” (Manual) mode control interface as Aquasky 3.0. See section 3.4.1.1.
Note: Roma & Shaker 2.0 do not include Wi-Fi feature.
Siena 2.0
Siena 2.0 features the same “Man” (Manual) mode control interface as Plant & Reef 4.0 / Plant & Reef Nano 4.0 / Plant PRO. See section 3.4.1.2
Description of the Function Keys (cont.)
“Auto”(Automatic) mode
Aquasky
Auto mode
- Auto mode button.
- 24-hour running time graph – visually represents current settings.
- Customize lighting schedule and color channel intensities.
- Export – allows user to export (engage) preset or customized files saved within the app.
- Save as – allows user to save desired settings.
- Preview – Runs through current 24-hour light.
- Dynamic Effects – Select and schedule dynamic effects within a specific time period and day(s) of the week. After running a dynamic effect, it will return to automatic mode by default cycle within 1 minute.
- Control mode display: Aquasky 3.0 LED series can be controlled via Bluetooth or Wi-Fi. The illuminated icon indicates the current control mode.
- Current applied preset.
- Lamp setting page.

See previous page for reference

Aquasky Dynamic Settings
- Dynamic effect enable button.
- Start time setting.
- End time setting.
- Repeat setting. Select one or multiple days to run the selected effect.
- Dynamic effect selection. Select one effect only that you want to apply to the light.
Note: As not all mobile devices are the same, slide UP or DOWN to find the ‘Save’ button if you do not see it. - Cancel – cancels the current screen command and returns to the previously saved parameters.
- Save – retains the current screen command.

Plant & Reef 4.0 / Plant & Reef Nano 4.0 / Plant PRO
- Auto mode button.
- The 24-hour running time graph – visually represents current settings.
- Customize lighting schedule and color channel intensities.
- Export – allows user to export (engage) preset or customized files saved within the app.
- Save as – allows user to save desired settings.
- Preview – Runs through current 24-hour light.
- Dynamic Effects – Select and schedule dynamic effects within a specific time period and day(s) of the week. After running a dynamic effect, it will return to automatic mode by default, and cycle within 1 minute.
- Current applied preset.
- Lamp setting page.

See previous page for reference (Section 3.4.2.2) Color channels:
Tap all 4 color dots to adjust intensity of all channels simultaneously or select 1 color dot at a time to adjust channel intensity independently. Sleep time enable button.
Roma & Shaker 2.0
Roma & Shaker 2.0 feature the same “Auto” mode control interface as Aquasky 3.0. See section 3.4.2.1.
Note: Roma & Shaker 2.0 do not include Wi-Fi feature.
Siena 2.0
Siena 2.0 features the same “Auto” mode control interface as Plant & Reef 4.0 / Plant & Reef Nano 4.0 / Plant PRO. See section 3.4.2.2.
Description of the Function Keys (cont.)
“Pro”(Professional) mode
Aquasky 3.0
- Pro mode button.
- The 24-hour running time graph – visually represents current settings.
- Timepoints – Displays the various timepoints set throughout the 24-hour light cycle.
- Timepoints overview – View all timepoints. Allows for deletion of any individual timepoint when desired.
- Add timepoint – The app permits up to 12 individual timepoints to be set.
- Export – allows user to export (engage) preset or customized files saved within the app.
- Save as – allows user to save desired settings.
- Preview – Runs through current 24-hour light.
- Dynamic Effects – Select and schedule dynamic effects within a specific time period and day(s) of the week. After running a dynamic effect, it will return to automatic mode by default cycle within 1 minute.
- Control mode display: Aquasky 3.0 LED series can be controlled via Bluetooth or Wi-Fi. The illuminated icon indicates the current control mode.
- Lamp setting page.

Plant & Reef 4.0 / Plant & Reef Nano 4.0 / Plant PRO
- Pro mode button.
- The 24-hour running time graph – visually represents current settings.
- Timepoints – Displays the various timepoints set throughout the 24-hour light cycle.
- Timepoints overview – View all timepoints. Allows for deletion of any individual timepoint when desired.
- Add timepoint – The app permits up to 12 individual timepoints to be set.
- Export – allows user to export (engage) preset or customized files saved within the app.
- Save as – allows user to save desired settings.
- Preview – Runs through current 24-hour light.
- Dynamic Effects – Select and schedule dynamic effects within a specific time period and day(s) of the week. After running a dynamic effect, it will return to automatic mode by default cycle within 1 minute.
- Current applying preset.
- Lamp setting page.

Roma & Shaker 2.0
Roma & Shaker 2.0 features the same “Pro” mode control interface as Aquasky 3.0. See section 3.4.3.1.
Note: Roma & Shaker 2.0 do not include Wi-Fi feature.
Siena 2.0
Siena 2.0 features the same “Pro” mode control interface as Plant & Reef 4.0 / Plant & Reef Nano 4.0 / Plant PRO. See section 3.4.3.2.
Editing in “Pro” Mode
- Press to adjust intensity and start time.
- Press and hold (2-3 seconds) to delete the timepoint.


- Slide LEFT and RIGHT or select
 to view timepoints not currently shown on screen.
 - Select the Overview icon to view all timepoints and delete any as desired.
- Add timepoint – The app permits up to 12 individual timepoints to be set. Set the Start time, adjust to the desired intensity, and save.
- Dynamic effects setting – See section 3.4.2.1.1.1

Previous Bluetooth (1st Generation) LED Lighting Series- App and Lamp Connection
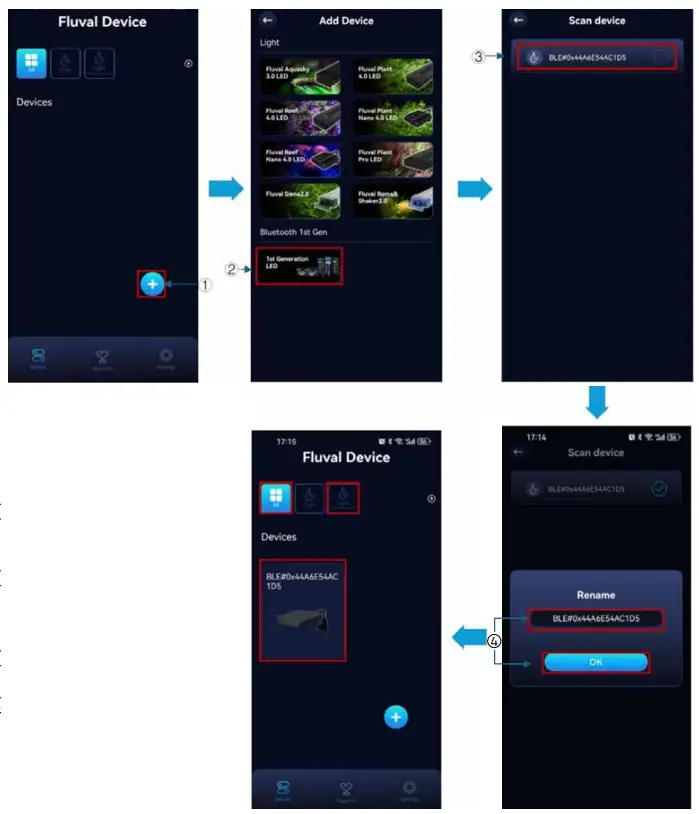
Ensure lamp is powered on and Bluetooth connectivity is enabled to your mobile device.
- Select the “Device” icon and press “+” in the bottom right corner of the screen.
- Select the ‘1ST Generation LED’ icon to scan your immediate surroundings for compatible previous generation Fluval lamps.
- Select the device you want to connect to.
- Rename your device (optional) and select ‘OK’ to complete the connecting process.
- Select the added device to enter the control interface.
Note:
- Previous generation lamps (i.e. Plant & Reef 3.0, Plant Nano & Reef Nano 3.0, etc.) do not include dynamic effects.
- Man/Auto/Pro mode for previous generation LEDs feature the same control interface as newer generation LEDs. Pro Mode offers up to a maximum of 10 timepoints.
- Previous generation Aquasky 2.0 LED does not include Wi-Fi remote control features.
- Previous generation LEDs can be found under ‘Device’ or ‘Light Bluetooth 1st Gen’ section.
Lamp Settings
Aquasky 3.0
Aquasky 3.0 Lamp Settings
- Rename: Rename your device.
- Control mode: Switches control mode between Bluetooth and Wi-Fi.
- Version: The current firmware version of the device.
- OTA update: Update lamp firmware here (when available).
- Find: Select “Find” at the bottom of the screen to confirm current LED(s) under control. This is particularly useful when operating several devices. The connected lamp(s) will flash on and off several times.
- Delete: Delete a connected lamp from screen view and current login account (in Login Mode), or delete a connected lamp from screen view only (in Skip Mode).

Aquasky 3.0 Control Mode Switch
- Bluetooth Control Mode: The Aquasky 3.0 LED connects via Bluetooth by default. You will see ‘Bluetooth control mode’ highlighted in the Settings menu page.
- Wi-Fi Control Mode: In settings, select ‘Wi-Fi control mode’ and enter your Wi-Fi network name and password (2.4GHz supported ONLY). After configuration success, you will see a Wi-Fi icon, and ‘Wi-Fi control mode’ will now be highlighted in the Settings menu page.

Plant & Reef 4.0 / Plant & Reef Nano 4.0 / Plant PRO
- All LEDs feature the same functionality as the
- Aquasky 3.0 LED series, with the exception to Control mode.
1ST Generation LED series
Previous Bluetooth 1st Generation LEDs do not feature OTA update.

Roma & Shaker 2.0
Roma & Shaker LEDs feature the same functionality as the Aquasky 3.0 LED series, with exception to Control mode.
Siena 2.0
Siena 2.0 LED features the same functionality as the Aquasky 3.0 LED series, with exception to Control mode.
Light Group (Aquasky 3.0) – Operate multiple lamps within a group
- Select ‘Light’ icon of the top of the screen.
- Select ‘
 ’ icon at the bottom of the screen to enter the light group setting interface.
 - Select the lamps you want to control, name your group, and select the ‘Group’ button.
- You’ll find saved light groups under the ‘Light’ category. Select your desired group to enter the control page.
- Visit light group settings interface to confirm which lights are included in the group. Here, you can select to ‘Ungroup’ (cancel) the light group, if desired.
Note :
- Aquasky 3.0 LEDs must be operated in Wi-Fi control mode to be controlled within a light group.
- If you delete any light from your device list that belonged to a light group, you may receive a pop-up notice asking you to create a new group if the previous group is now empty.

Firmware OTA Update
Aquasky 3.0

- For Aquasky 3.0 LED, ensure the device is under Wi-Fi control as OTA updates are ONLY available in this mode.
- Visit ‘light setting ’>’ OTA update’, and follow the step-by-step guidance to complete the updating process.
- If the update fails, select “Try again” to re-attempt the update process.
- Note: If the ‘Try again’ button does not appear on screen or the OTA update cannot be closed after a failed attempt, you may need to close and re-enter the app.

Plant & Reef 4.0 / Plant & Reef Nano 4.0 / Plant PRO / Roma & Shaker 2.0 / Siena 2.0


- Ensure Bluetooth connectivity is enabled on your mobile device.
- Visit ‘light setting’>’OTA update’, and follow the step-by-step guidance to complete the OTA update process
- If the update fails, select “Try again” to re-attempt the update process.
Note: If the ‘Try again’ button does not appear on screen or the OTA update cannot be closed after a failed attempt, you may need to close and re-enter the app.
REMOVE THE LAMP
Method 1: Visit light settings page and select ‘Delete’ to delete the lamp from the current device list. Method 2: Under the device list, press and hold (2-3 seconds) to delete the lamp from the current device list.
ACCOUNT INFORMATION

- Visit ‘Settings’ and select the profile image to enter in the account interface.
- Upload a profile image from your camera or photo library.
- Rename your account.
- Current account email registered with the FluvalConnect app.
- Change your account password.
- Sign out of your account.
FORGOT PASSWORD
Visit Login > Forgot password, and follow the step-by-step guidance to complete the new password process.

OTHER INFORMATION
Support
- Access FAQ and Troubleshooting features to find immediate answers to common queries regarding the app and its usage.
- User manual: Access detailed guidance on lamp and app operation.
- Helpful videos: Find useful advice on lamp and app operation in video format.
- Contact us: Get in touch with FluvalConnect app support via our website, email, or social media platforms.

Settings Interface
Login Mode
- Account Profile.
- App language settings.
- Current app operating version. Please visit the Google Play or App Store to download and install updated versions, if available.
- About Rolf C Hagen Inc. and the FluvalConnect app.

Skip Mode
- App language settings.
- Current app operating version. Please visit the Google Play or App Store to download and install updated versions, if available.
- About Rolf C Hagen Inc. and the FluvalConnect app.
- Register: Register (create) a FluvalConnect app account.
- Login: Once you have registered (created) a FluvalConnect account, you may enter the app here on all subsequent visits to access the user interface.

FAQS
A: The app requires Bluetooth version BLE 4.0 and above and is compatible with Android 6.0 and above, as well as iOS 13.0 and above.Q: How do I connect my LED lights?
A: Depending on the model, you will need to connect the LED light into a transformer and then plug the transformer into a power outlet. Specific instructions are provided for different models in the user manual.
Q: How can I operate the app without creating an account?
A: You can choose to operate the app in Skip Mode, which allows you to control your devices without creating an account. However, note that functionality may be limited in this mode.
Documents / Resources
 |
Connect Fluval Connect App [pdf] User Manual 16650, 16651, 16652, 16653, 16654, 16655, 16656, 16638, 16640, 16641, 16642, 16643, 16885, 16886, 16887, 16888, 16905, 16906, 16907, 16908, 16895, 16986, 16897, 16898, 16875, 16879, A13350, A13351, A13352, A13353, A13248, A13249, A13256, A13257, A13258, 14550, 14551, 14552, 14553, 14554, 14555, 14556, 549, 14531, 14532, Fluval Connect App, Connect App, App |