![]()
 VISIOTECH VC-1 PRO CAM MANAGER
USER MANUAL
INTRODUCTION
This user manual details the Visiotech VC-1 PRO Cam Manager Windows Application.
The manual introduces the Cam Manager Software, it describes the operational features and the user interface in detail.
SOFTWARE SPECIFICATION & FEATURES:
The Visiotech VC-1-PRO Cam Manager Windows Application is used for the following functions:
- Unlock the VC-1 Pro Camera with user authentication.
- View video and photo files from the VC-1 Pro.
- View video and photo files previously downloaded from the VC-1 Pro.
- Manage video and photo files using the integrated playlist feature.
- Download and delete video and photo files from the VC-1 Pro.
- Configure the VC-1 Pro camera.
- Upgrade the VC-1 Pro’s firmware.
MINIMUM PC REQUIREMENTS
The VC-1 PRO Cam Manager software is compatible with Windows 10 or 11.
Minimum Hardware Requirements:
CPU: No less than Intel i5, 8th Generation
RAM: No less than 8GB
Storage (Program): No less than 2GB
Storage (Footage): No less than 500GB
SOFTWARE INSTALLATION:
The Visiotech VC-1-PRO Cam Manager Application can be downloaded from this link: https://www.comvision.net.au/wp-content/uploads/VC-1-PRO_Software.zip
- Once the Software is downloaded, double-click “CamManagerVC1Pro.msi” to start the installation.
The installation file will be located in your PC’s download folder:  Click on NEXT.
- Read and Accept the Terms & Conditions for this software.
- Click on Next.

- Press next to accept the installation folder or press change to change the location.

- Click on Install to complete installation. Click yes to any pop-up messages.

- Once the software installation is complete, click on Finish.
- Check the “Launch Camera Manager VC1-Pro” for the software to start when you click on “Finish.”

LOGIN PAGE:
Start the VC-1 Pro Cam Manager software by double clicking on the Desktop icon: You will be prompted to logon:
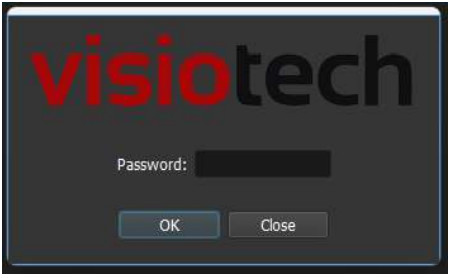 Enter the User Password to logon to the VC-1 Pro Body Camera and unlock the device.
The default Password is: 000000
CAM MANAGER MAIN SCREEN:
On start-up the Cam Manager will load the Video Playlist and the Images Playlist from your VC-1 Pro and you will be presented with the main Media screen of the application.  The Media screen is used to play and manage the video and images files located on your VC-1 Pro body camera.
The Configuration screen is used to configure VC-1 Pro, monitor the battery level, synchronise the Time and Date on the VC-1 Pro, and update the VC-1 Pro firmware.
Pressing the HELP button (?) launches the Help and About screen.
This screen details the Software Version and presents a web link to load the latest version of this manual.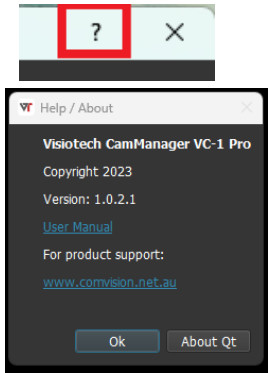
MAIN SCREEN MEDIA TAB:
 In the Media tab, all video files stored in the VC-1 Pro body camera are loaded and presented in the Videos playlist. All photo files stored in the VC-1 Pro body camera are loaded and presented in the Images tab.
Files are presented in ascending order with the oldest files at the top.
VIDEO PLAYLIST TAB:
To play a video file, double click on the file you wish to play in the Video Tab.  After a video is finished, the program will automatically start playing the next video file in the playlist.
 During the Video playback you can adjust the brightness, contrast, hue and saturation of the video using the following controls.
Change brightness up or down. Change Contrast.
 Change the Hue of the footage.
 Change the Saturation of the footage.
 Each adjustment control can be reset back to original by right clicking on the control bar and selecting reset.
 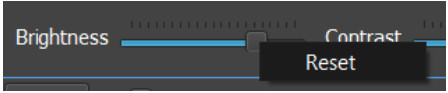 The timeline slider bar details the total length of the video and shows the location of where the playback is within the timeline.
 ![]() Playback speed can be adjusted using the LHS drop down speed control:
Playback speed can be adjusted using the LHS drop down speed control: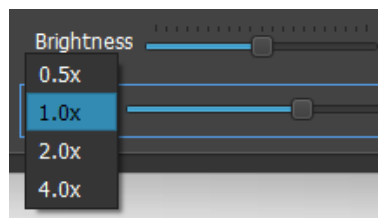 Available playback speeds are:
- Half speed 0.5x
- Normal speed 1.0x
- Double speed 2.0x
- Quad speed 4.0x
The video control area provides the following functions: 
 |
Stop Play. |
 |
Play Video Selected. |
 |
Pause current Play. |
 |
Move to previous Video in playlist. |
 |
Play Next Video in playlist. |
 |
Mute Volume. |
 |
Volume Slider to change Volume. |
 |
Import Button used to import videos into the playlist. |
 |
Export button used to save footage from the VC-1 Pro camera to your PC. |
IMAGES TAB:
To view photo files, click on the Images tab and you will be presented with a list of all photos located on the VC-1 Pro camera.  To load a photo, double click on a file within the Images list. Users can also use the up and down keys to move through the list and use the enter key to load a photo on screen.
Other functions used with Images are:
![]() Import Button, used to import Images into the Images list.
Import Button, used to import Images into the Images list.
![]() Export button, used to save Photos from the camera to your PC.
Export button, used to save Photos from the camera to your PC.
DELETING FILES:
To delete files off the VC-1 Pro body camera, select one or multiple files within the Videos or Images playlist, Right Click in the selected area (blue area) and click the Delete popup.
Standard file selection keys such as “Ctrl” and “Alt” on your keyboard will allow fast multi-selection with your mouse. You will be prompted to confirm the delete:
 Pressing “YES” will permanently delete the files from the VC-1 Pro camera.
CONFIGURE TAB
The configuration tab is used to configure the VC-1 Pro camera, change the Logon Password, Synchronise the Time & Date, monitor the cameras battery level, and update the cameras firmware.
Each time a change is made, users need to click the “Apply” button for the setting to take place. 
IDENTIFICATION SECTION:
This section of the configuration screen details the Camera Name, the Version of the firmware loaded on the VC-1 Pro and the watermark that is embedded into the cameras video recordings and photos.
The watermark can be changed by entering the watermark details and pressing the “Apply” button.
TIME SYNCHRONISATION SECTION:
To synchronise the time and date on the VC-1 Pro body camera to the same time as your PC, press the “Synchronise” button.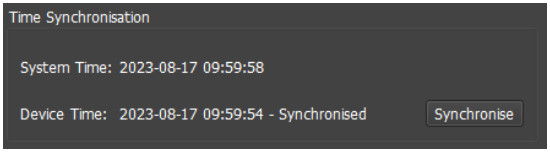
CHANGE PASSWORD SECTION:
To change the logon password of the VC-1 Pro body camera, enter the new password into the “User password” field and confirm it in the “Confirm” field. Then press the “Apply” button.
Do not forget this password! It is used to lock the VC-1 Pro camera to prevent unauthorised access. The camera will need to be returned to your supplier for a full factory reset if this password is misplaced.”
Charges may apply for this process.
(Default password is: 000000)
WI-FI SETTINGS SECTION:
This section is used to change the Camera Wi-Fi connection Password.
Min 8 characters.
To change this password, enter the new password into the “WiFi Password” and then press the “Apply” button.
(Default password is: 1234567890)
OTHER SETTINGS SECTION:
This section is used to configure the camera options that best suit your optional requirements.  Record Split: Used to select from 3, 5, or 10 minute recording files.
- The camera will automatically split continues recordings into these file lengths.
Video Resolution: Used to select VGA (480p), 720p or 1080p video resolution.
- The higher resolutions produce better quality video, but the cameras on-board storage will run out faster due to the larger file sizes.
Record on Startup: Used to Enable or Disable the camera to automatically start recording when the camera is turned on.
Loop Recording: Used to enable the camera to overwrite the oldest footage automatically when the storage on the camera is full.
Photo Size: Used to configure the resolution of the camera photos: 1, 2, or 3 Megapixel are available.
DashCam Mode: Used to Enable or Disable the camera to automatically turn on and start recording when power is connected to the camera. When power is removed from the camera it will turn off.
- When plugged into the correct port of your car, the camera will turn on and off with your car.
- Please use a charge only cable if your car tries to connect to the VC-1 Pro.
- Standard magnetic mounts can be used to mount the camera on your car dashboard.
WiFi: Enable or Disable the cameras Wi-Fi connectivity. This is required for the Visiotech VC-1 Android App Connectivity.
BATTERY SECTION
![]() Used to see the current battery level of the VC-1 Body Camera.
Used to see the current battery level of the VC-1 Body Camera.
UPDATING FIRMWARE
The Visiotech VC-1 Pro Cam Manager can update the firmware on a VC-1 Pro body camera. Firmware updates will be released by Comvision Pty Ltd.
Caution: This is to be done at your own rise. For the latest firmware release, contact your supplier.
- To update the cameras firmware, click on the folder button and navigate to the folder that contains the firmware update and select the firmware file.
The firmware file will have a file extension of .bfu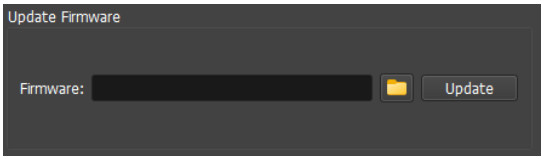
- Once selected, click on the “Update” button.

- If the firmware is correct, a message will pop up to confirm that the camera received the firmware. Press the “OK” button.

- Unplug the VC-1 Pro body camera from the PC and wait for it to turn off.
- Wait for approximately 5 seconds and then turn the camera back on.
- The LED around the large record button will start flashing BLUE.
- When the LED had stopped flashing, the firmware upgrade is complete.
TROUBLE SHOOTING
If you see the following message and you haven’t disconnected the camera, please check your USB cable is connect correctly and is not damaged or faulty.
If the camera is disconnected while the VC-1 Pro Cam Manager software is running, the following message is displayed. The software will shut down once the OK button is clicked. The following message will be displayed if you try to log onto a VC-1 Pro Camera without the camera being plugged into your PC.
If the camera is connected to your PC and the message still appears, check to make sure the camera is powered on and check your USB cable is connect correctly and is not damaged or faulty. The following message means an incorrect password has been entered into the Cam Manager program. If you have changed the password from factory default and have forgotten it, the camera will need to be returned to your supplier for a full factory reset.
Charges may apply for this process.
Cam_Manager Manual 21.08.2023
Copyright – Comvision Pty Ltd
Documents / Resources
 |
COMVISION Visiotech VC-1 Pro Cam Manager Windows Application [pdf] User Manual Visiotech VC-1 Pro Cam Manager Windows Application, Visiotech VC-1 Pro, Cam Manager Windows Application, Visiotech VC-1, Pro Cam Manager Windows Application, Visiotech VC-1 Pro Cam Windows Application, Manager Windows Application |