

CompactTool Raspberry Pi CM4S Compute Module
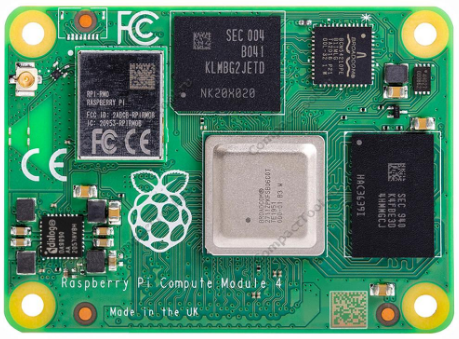
Specifications
| Specification | Details |
|---|---|
| Product Type | Embedded Compute Module |
| Model | Raspberry Pi CM4S Compute Module |
| Brand | CompactTool |
| Processor | Quad-core ARM-based |
| Memory | Configurable RAM options |
| Storage | eMMC or external storage (varies by model) |
| OS Support | Linux-based, including Raspberry Pi OS |
| Connectivity | USB, GPIO, networking, expansion (via carrier board) |
| Wireless Support | Available in some configurations |
| Form Factor | Compact embedded module |
| Application | IoT, industrial control, automation, robotics, embedded |
| Power Supply | Via compatible carrier board |
Features
- Compact Design: Fits into products with space constraints.
- High Processing: ARM-based performance for embedded/automation applications.
- Flexible Integration: Works with a variety of carrier boards for custom layouts.
- Industrial Support: Ideal for smart devices, control and monitoring equipment.
- Multiple Interfaces: Supports USB, displays, networking, sensors, etc. (carrier board dependent).
- Linux Compatibility: Runs Linux-based OS and software.
- Efficient Power Usage: Low power for continuous/embedded applications.
- Developer-Friendly: Supports common Raspberry Pi programming environments
Installation / Setup
- Ensure compatibility between the carrier board and compute module.
- Disconnect power from the carrier board.
- Align and carefully insert the module into the carrier board connector.
- Connect peripherals, storage, display, network, etc.
- Power via the carrier board.
- Install/configure the operating system and required software.
How to Use
Step 1. Download the Official image
- Download Raspbian Official Image
Download URL: https://www.raspberrypi.org/downloads/raspbian/
Username: pi Password: raspberry - Download Ubuntu Mate Official Image
Download URL: https://ubuntu-mate.org/download/
The username and password can be set by yourself after startup - Download Kali Official Image
Download URL: https://www.offensive-security.com/kali-linux-arm-images/
Username: kali (The old version is root) Password: kali(The old version is toor) - Download Retropie Official Image
Download URL: https://retropie.org.uk/download/
Username: pi Password: raspberry
Step 2. Burn Official Image
- Download and install tool software
(If they are already installed, this step can be ignored) SD card format software SDCard Formatter download URL :
https://www.sdcard.org/downloads/formatter_4/
Image burning software Win32DiskImager download URL:
https://sourceforge.net/projects/win32diskimager/ - Format SD card
Insert the SD card into the card reader -> Insert the card reader into the computer -> Open the SDFormatter software -> Select the SD card -> Select quick format (generally select quick format; other options can be selected according to your own needs) -> Click the Format button -> Select “Yes” -> Click OK after formatting. - Brun Image
Open the Win32DiskImager software -> Select the image file to be burned (xxx.img ) -> Select the SD card -> Click the “write” button -> Select “Yes” -> Wait for the burning to complete (the whole process lasts about 10 minutes)
Step 3. Modify the “config.txt” configuration file
Open the “config.txt” file in the root directory of the SD card on the computer. Add the following at the end of the file, save and exit.
max_usb_current=1
hdmi_force_hotplug=1
config_hdmi_boost=7
hdmi_group=2
hdmi_mode=87
hdmi_drive=1
display_rotate=0
hdmi_cvt 1280 800 60 6 0 0 0
Step 4. Insert SD card
After the above steps are completed, pop up the SD card on the computer and insert it into the SD card slot on the back of the Raspberry Pi.
Step 5. Running system
Connect the HDMI interface and touch interface of the display screen to the Raspberry Pi, connect the power supply of the Raspberry Pi, and start the machine to display and touch normally.
Resources
Images Download:
If you have difficulty installing the driver, or if you still can’t use the display properly after installing the driver, Please Try our configured images for testing.
Just download and write the image to the TF card. DO NOT need any driver installation
steps.
- Image
Software
- Panasonic_SDFormatter/putty/Win32DiskImager
Maintenance and Cleaning
- Handle with care; use anti-static precautions.
- Avoid static discharge—use proper ESD protection when handling.
- Keep connector contacts dust-free.
- Store in a dry, temperature-controlled area.
- Don’t touch exposed electronic contacts with bare hands.
- Ensure good ventilation in the final device/enclosure.
Safety Tips
- Disconnect power before installing/removing module.
- Use only compatible carrier boards/power supplies.
- Protect from water, moisture, and conductive materials.
- Don’t force connections; insert gently.
- Use ESD protection during handling.
- Ensure cooling for high-load use.
- Never modify connections while powered.
Troubleshooting
| Problem | Possible Cause | Solution |
|---|---|---|
| Module does not power on | Incorrect install or power issue | Check connection and power input |
| System does not boot | OS setup or storage issue | Verify software and storage configuration |
| No network connection | Network config or hardware issue | Check network settings/interfaces |
| USB devices not detected | Carrier board/software config issue | Confirm USB ports/drivers are enabled |
| Module overheats | Insufficient cooling or heavy load | Improve ventilation, add cooling |
| No display output | Improper display connection/settings | Check interface and system config |
| System freezes | Software or resource issue | Restart and review applications |
Documents / Resources
 | Raspberry Pi CM4S Compute Module |
References
- drive.google.com/drive/folders/1usvucg6U3mIH-dIsC0D4v6LyBBgRPMhr?usp=sharingdrive.google.com
- drive.google.com/drive/folders/1XrAvtHmrB60jdSCbDieQac-23o7Y7fh_?usp=sharingdrive.google.com
- retropie.org.uk/download/retropie.org.uk
- sourceforge.net/projects/win32diskimager/sourceforge.net
- ubuntu-mate.org/download/ubuntu-mate.org
- offensive-security.com/kali-linux-arm-images/www.offensive-security.com
- raspberrypi.org/downloads/raspbian/www.raspberrypi.org
- sdcard.org/downloads/formatter_4/www.sdcard.org
- User Manualmanual.tools