1. Impurtante Information Safety
Leghjite è capite sempre tutti l'avvertimenti di sicurezza, l'istruzzioni, l'illustrazioni è e specificazioni furnite cù questu strumentu elettricu. A mancanza di seguità tutte l'istruzzioni elencate quì sottu pò causà scosse elettriche, incendi è/o ferite gravi.
- Sicurezza di l'area di travagliu: Mantene a vostra zona di travagliu pulita è ben illuminata. E zone ingombre o scure invitanu l'accidenti. Ùn aduprate micca l'utensili elettrici in atmosfere esplosive, cum'è in presenza di liquidi, gas o polvere inflammabili. L'utensili elettrici creanu scintille chì ponu accende a polvere o i fumi.
- Sicurezza elettrica: E spine di l'utensili elettrici devenu currisponde à a presa. Ùn mudificate mai a spina in alcun modu. Ùn maltrattate micca u cavu. Ùn aduprate mai u cavu per purtà, tirà o scollegà l'utensile elettrico. Tenite u cavu luntanu da u calore, l'oliu, i bordi taglienti o e parti in muvimentu.
- Sicurezza persunale: Stay alert, watch what you are doing, and use common sense when operating a power tool. Do not use a power tool while you are tired or under the influence of drugs, alcohol, or medication. Always wear eye protection. Use safety glasses, goggles, or a face shield.
- Uso è cura di l'arnesi: Ùn furzate micca l'utensile elettricu. Aduprate l'utensile elettricu currettu per a vostra applicazione. L'utensile elettricu currettu farà u travagliu megliu è più sicuru à a velocità per a quale hè statu cuncipitu. Scollegate a spina da a fonte di alimentazione è/o cacciate a batteria, se staccabile, da l'utensile elettricu prima di fà qualsiasi aghjustamentu, cambià accessori o almacenà l'utensili elettrichi.
- Usu è cura di a batteria: Ricaricate solu cù u caricatore specificatu da u fabricatore. Un caricatore chì hè adattatu per un tipu di batterie pò creà un risicu di focu quandu s'utilice cù un altru batterie. Aduprate l'utensili elettrici solu cù pacchetti di batterie specificamente designati.
2. Cuntenutu di u pacchettu
Disimballate cù cura tutti l'articuli è assicuratevi di avè ricevutu ciò chì seguita:
- BATAVIA Cordless Drill (BT-CTD001)
- 20V MAX 2.0Ah Lithium-Ion Battery
- Caricatore di batteria 2.4A
- Manuale d'istruzzioni

Image: The BATAVIA Cordless Drill, including the main unit, a 20V MAX 2.0Ah Lithium-Ion battery, and a 2.4A battery charger.
3. Produttu Finituview
Familiarize yourself with the components of your BATAVIA Cordless Drill:
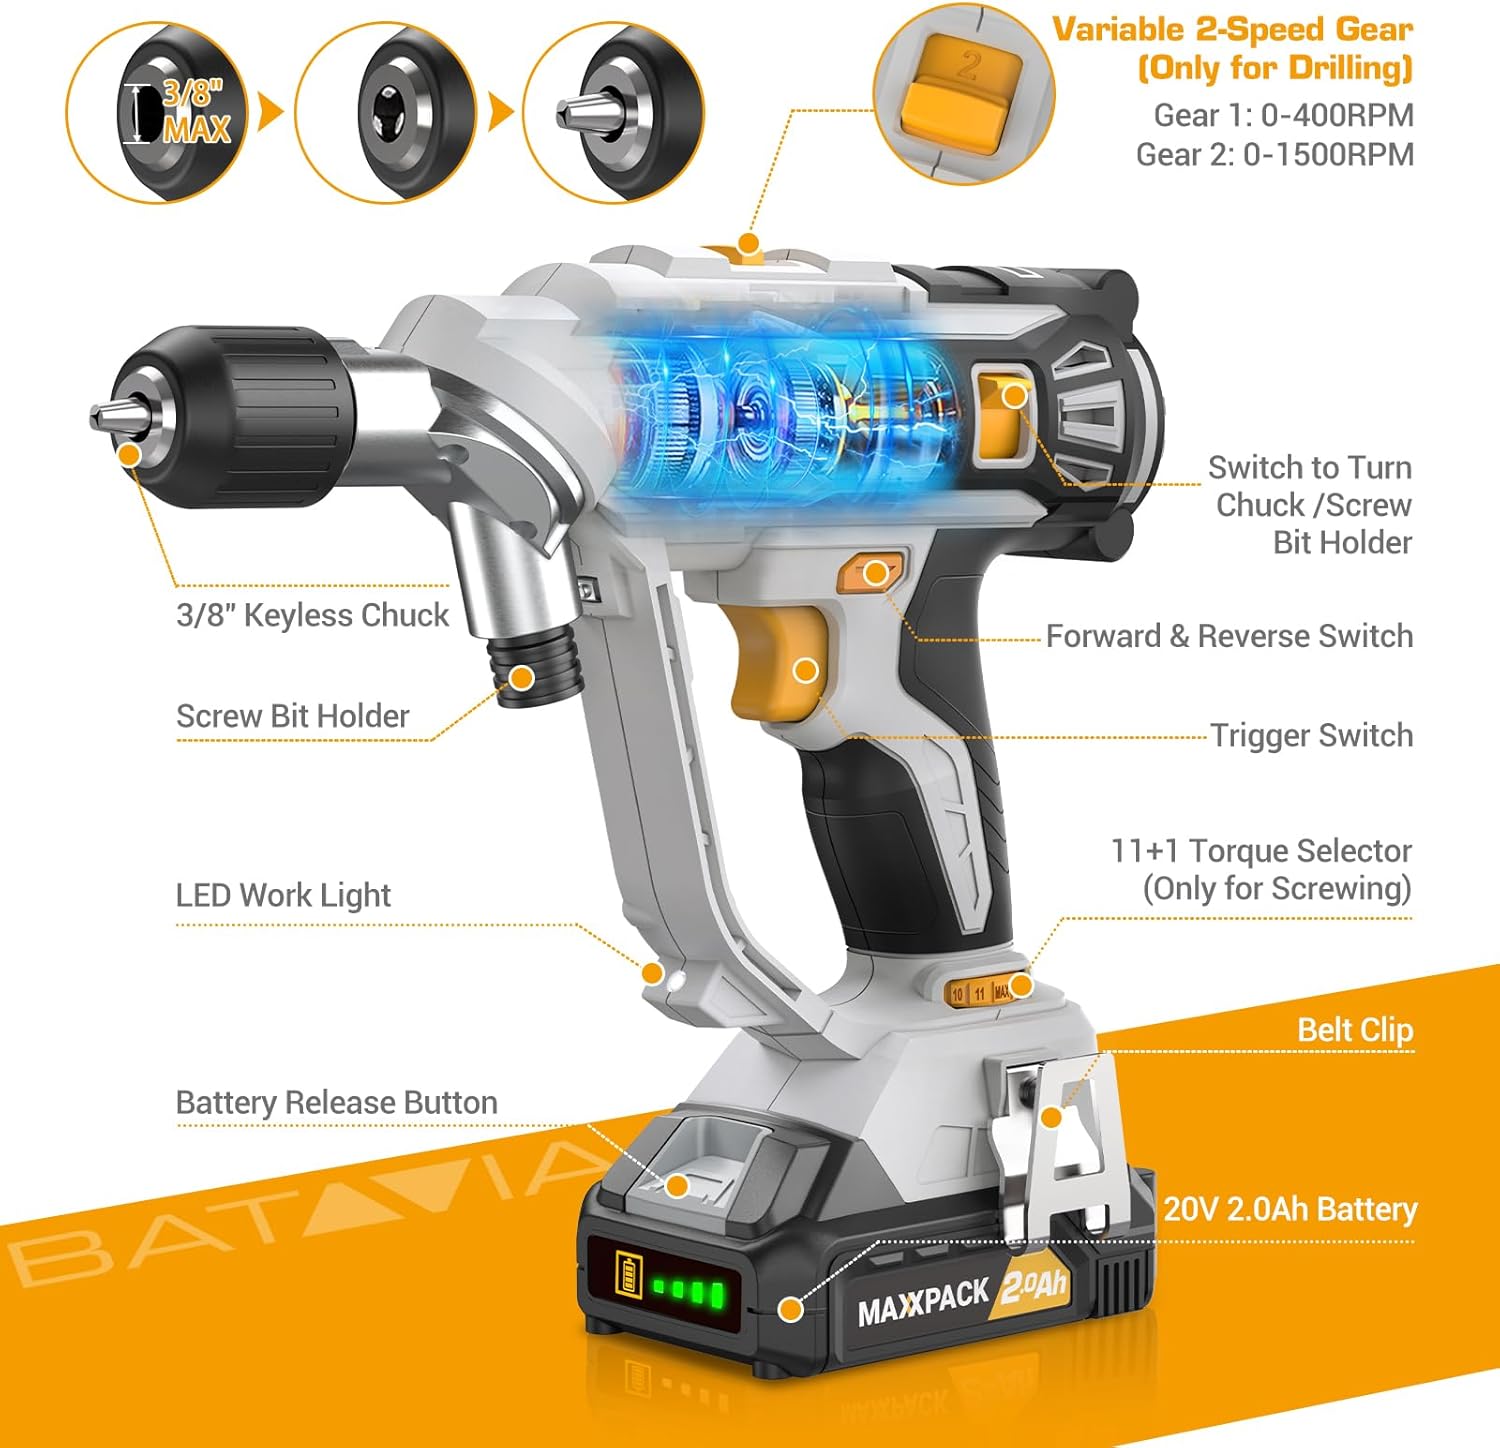
Image: A detailed diagram highlighting key components of the BATAVIA Cordless Drill, including the 3/8" Keyless Chuck, Screw Bit Holder, LED Work Light, Battery Release Button, 20V 2.0Ah Battery, Belt Clip, 11+1 Torque Selector, Trigger Switch, Forward & Reverse Switch, and Variable 2-Speed Gear switch.
- Dual Rotating Chucks: Features both a 3/8" keyless chuck for drilling and a 1/4" hex chuck for driving, allowing quick transitions between tasks.
- 11+1 paràmetri di coppia: Provides precise control for various applications and materials.
- 2 Velocità Variabili: Offers two speed ranges (0-400 RPM and 0-1500 RPM) for optimal performance in different drilling and driving scenarios.
- Automatic LED Work Light: Illumina a zona di travagliu per una migliore visibilità in cundizioni di poca luce.
- Clip per cintura: Attacca cunvenientemente u trapano à a vostra cintura per un accessu faciule.
4. Setup
4.1 Caricà a Batteria
- Ensure the battery is securely inserted into the 2.4A battery charger.
- Inserite u caricatore in una presa elettrica standard di 120V AC.
- The indicator lights on the charger will show the charging status. A full charge typically takes less time due to the 2.4A charger.
- Una volta cumpletamente carica, scollegate u caricatore da a presa è cacciate a batteria.
4.2 Installazione/Rimozione di a Batteria
- To install: Align the battery with the base of the drill handle and slide it in until it clicks securely into place.
- To remove: Press the battery release button located on the front of the battery pack and slide the battery out.
4.3 Using the Dual Rotating Chucks
This drill features a unique dual rotating chuck system for quick changes between drilling and driving tasks.

Image: The BATAVIA Cordless Drill demonstrating its dual rotating chuck feature, allowing users to switch between a drill bit and a screwdriver bit by rotating the chuck assembly.
- For Drilling (3/8" Keyless Chuck): Rotate the front section of the drill head to expose the 3/8" keyless chuck. Insert the drill bit and tighten the chuck by hand until the bit is secure.
- For Driving (1/4" Hex Chuck): Rotate the front section of the drill head to expose the 1/4" hex chuck. Insert the screwdriver bit directly into the hex opening until it locks into place.
5. Operating Instructions
5.1 Setting Torque (11+1 Settings)
The torque selector ring allows you to adjust the amount of rotational force the drill applies. This is crucial for preventing overtightening screws or damaging materials.

Image: The BATAVIA Cordless Drill highlighting its 11+1 torque settings, with recommendations for low settings for small screws/soft materials and high settings for large screws/hard materials.
- Rotate the torque selector ring to choose a setting from 1 to 11. Lower numbers are for smaller screws or softer materials, while higher numbers are for larger screws or harder materials.
- The 'Drill' symbol (often indicated as 'MAX' or a drill icon) bypasses the clutch for maximum torque, suitable for drilling applications.
5.2 Selecting Speed (2 Variable Speeds)
The drill features a 2-speed gearbox to match the speed to the application.

Image: The BATAVIA Cordless Drill showing its adjustable variable 2-speed gear selector. Gear 1 (0-400 RPM) is recommended for large diameter drilling, and Gear 2 (0-1500 RPM) for small diameter drilling.
- Gear 1 (0-400 RPM): Use for high-torque applications, such as driving large screws or drilling large holes in tough materials.
- Gear 2 (0-1500 RPM): Use for high-speed applications, such as drilling small holes or driving small screws quickly.
- The trigger switch provides variable speed control within the selected gear range. Pressing the trigger further increases the speed.
5.3 Interruttore avanti/indietro
The forward/reverse switch is located above the trigger. It controls the direction of rotation.
- Push the switch to the left for forward rotation (for drilling and driving screws).
- Push the switch to the right for reverse rotation (for removing screws or backing out drill bits).
- When the switch is in the center position, the trigger is locked, preventing accidental starting.
5.4 Automatic LED Work Light
The built-in LED light automatically illuminates when the trigger is pressed, providing visibility in dimly lit work areas.
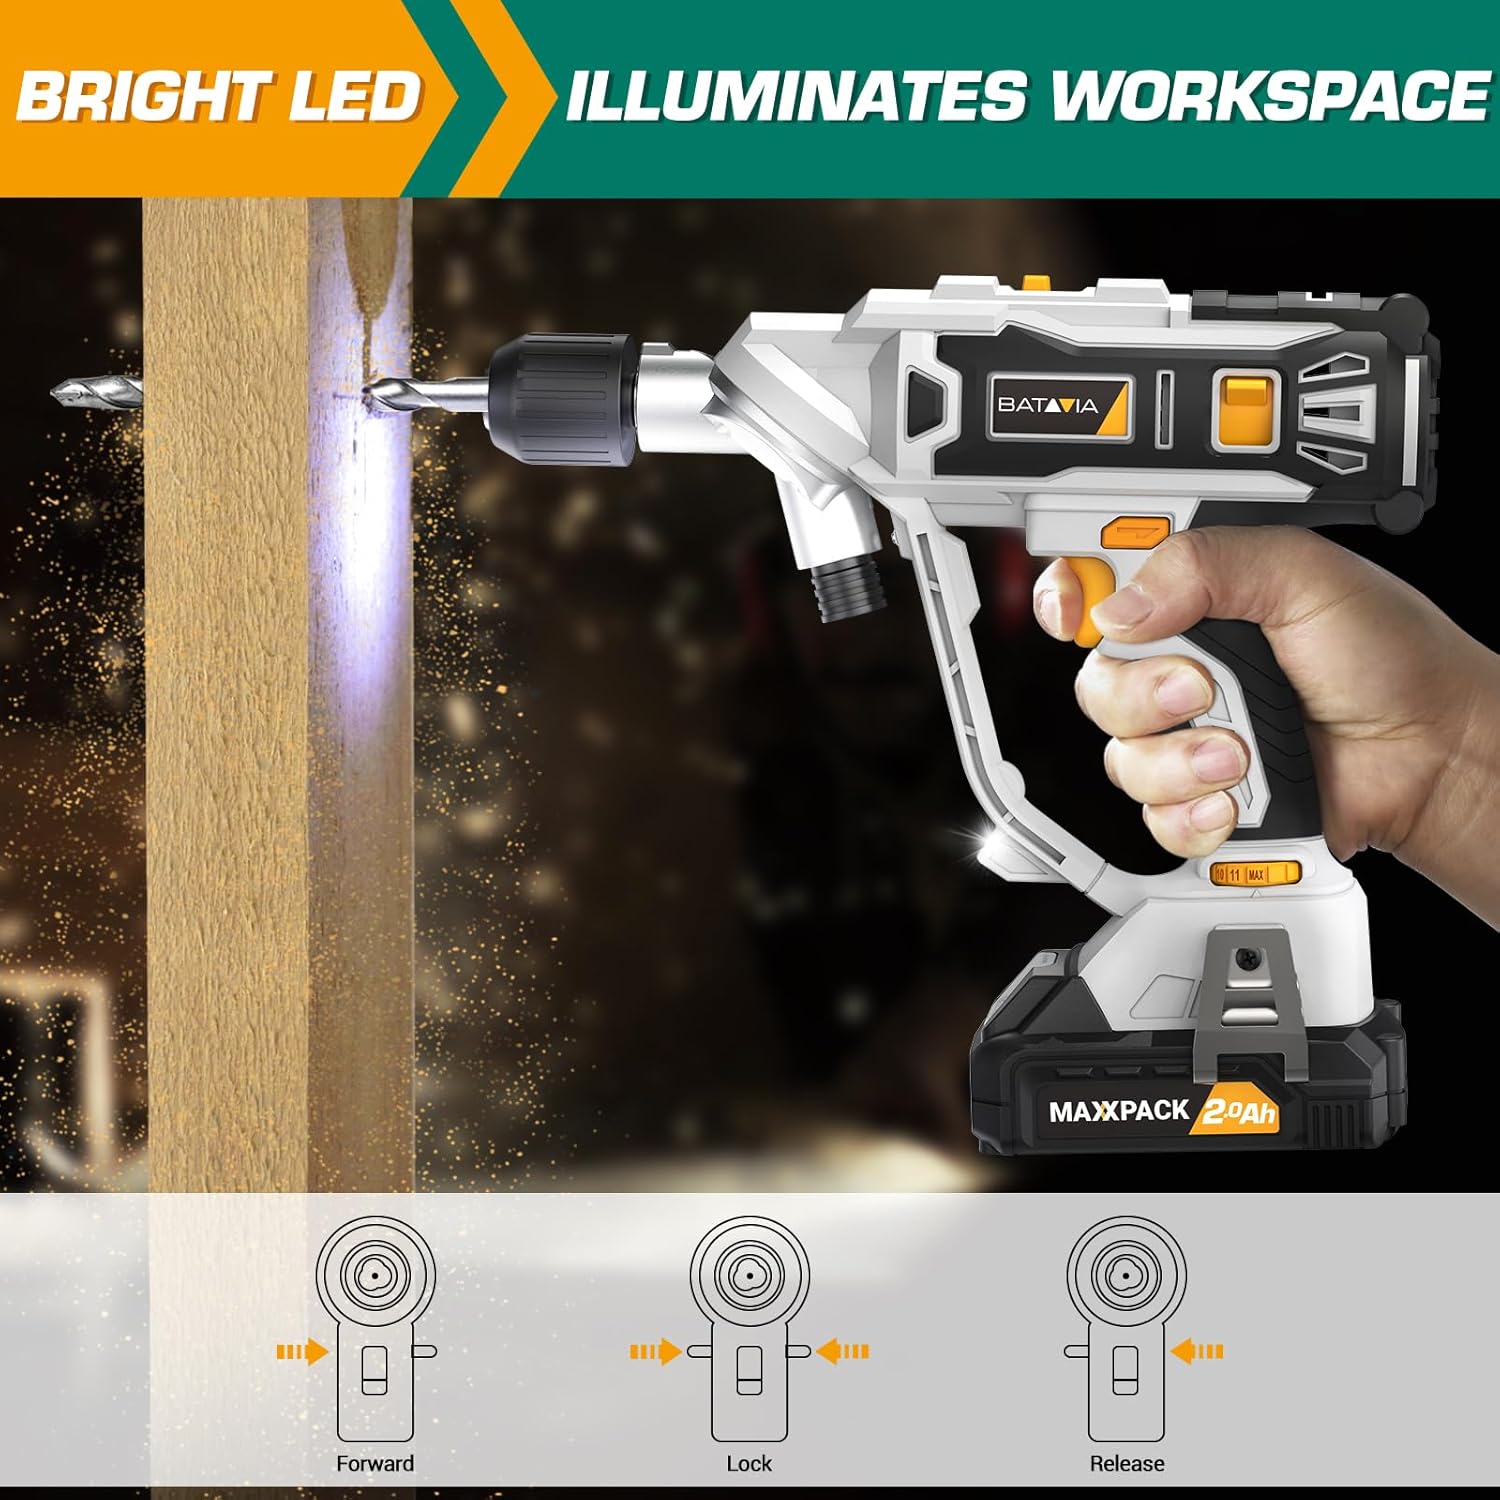
Image: The BATAVIA Cordless Drill in use, with its bright LED light illuminating the work surface, demonstrating its utility in dark or confined spaces.
6. Mantenimentu
Una manutenzione regulare assicura a longevità è e prestazioni ottimali di u vostru trapano.
- Pulizia: Dopu ogni usu, asciugate u trapano cù un pannu pulitu èamp pannu. Ùn aduprate micca prudutti chimichi aggressivi o detergenti abrasivi. Mantene l'aperture di ventilazione libere da polvere è detriti.
- Conservazione: Store the drill, battery, and charger in a cool, dry place, away from direct sunlight and extreme temperatures. Ensure the battery is removed from the drill before storage.
- Cura di a batteria: Do not store batteries in a discharged state. Recharge them periodically if not in use for extended periods.
7. Risoluzione di prublemi
If you encounter issues with your BATAVIA Cordless Drill, refer to the following common problems and solutions:
| Prublemu | Causa Possibile | Soluzione |
|---|---|---|
| U trapanu ùn principia micca. | Battery not charged or not properly inserted. Forward/Reverse switch in locked (center) position. | Ensure battery is fully charged and securely inserted. Move Forward/Reverse switch to forward or reverse position. |
| A batteria ùn hè micca carica. | Caricatore micca cunnessu. Batteria o caricatore difettuosu. | Check power outlet and charger connection. If problem persists, contact customer support. |
| U trapanu ùn hà micca putenza o si ferma durante l'usu. | Batteria bassa. Prutezzione di sovraccaricu attivata. | Recharge battery. Reduce pressure on the drill or use a lower speed setting for tough materials. |
| U mandrinu ùn tene micca bè a punta. | Bit not inserted deep enough. Chuck not tightened properly. | Ensure bit shank is fully inserted into the chuck. Tighten the keyless chuck firmly by hand. |
8. Specificazioni
| Feature | Specificazione |
|---|---|
| Numero di mudellu | BT-CTD001 |
| Marca | Batavia |
| Fonte d'energia | Alimentatu à batteria |
| Tipu di batterie | 20V MAX 2.0Ah Lithium-Ion |
| Caricatore Ampera | 2.4 Amps |
| Velocità di rotazione massima | 1500 RPM |
| Nùmeru di velocità | 2 (0-400 RPM & 0-1500 RPM) |
| Impostazioni di coppia | 11+1 |
| Dimensione massima di Chuck | 3/8 Inches (Keyless Chuck) |
| Materiale | PA6-GF30 |
| Dimensioni di u produttu (L x W x H) | 8.07" x 3.34" x 14.5" |
| Pesu di l'articulu | 5.28 liri |
| Funzioni spiciali | Adjustable Torque, Built-In LED Working Light, Compact, Cordless, Variable Speed |
| Certificazioni | Certificatu ETL |
9. Garanzia è Support
BATAVIA products are designed and manufactured to the highest quality standards. This product is ETL certified, ensuring product quality and safety.
For any questions, technical assistance, or warranty claims, please contact BATAVIA customer service:
- Telefonu: (+1) 866-272-5789
- Operating Hours (EDT): 10am - 7pm
- Operating Hours (PDT): 7am - 4pm
Please have your model number (BT-CTD001) and purchase information ready when contacting support.


