ClearClick Wireless Presentation and Video Broadcasting System User Guide

support@clearclick.com
www.ClearClick.com/Register/
www.ClearClick.com
FCC STATEMENT
This device complies with Part 15 of the FCC Rules. Operation is subject to the following two conditions:
(1) This device may not cause harmful interference, and
(2) This device must accept any interference received, including interference that may cause undesired operation.
Warning: Changes or modifications not expressly approved by the party responsible for compliance could void the user’s authority to operate the equipment.
NOTE: This equipment has been tested and found to comply with the limits for a Class B digital device, pursuant to Part 15 of the FCC Rules. These limits are designed to provide reasonable protection against harmful interference in a residential installation. This equipment generates uses and can radiate radio frequency energy and, if not installed and used in accordance with the instructions, may cause harmful interference to radio communications. However, there is no guarantee that interference will not occur in a particular installation. If this equipment does cause harmful interference to radio or television reception, which can be determined by turning the equipment off and on, the user is encouraged to try to correct the interference by one or more of the following measures:
Reorient or relocate the receiving antenna.
Increase the separation between the equipment and receiver. Connect the equipment into an outlet on a circuit different from that to which the receiver is connected. Consult the dealer or an experienced radio/TV technician for help.
RF warning statement:
This device complies with FCC SAR requirements. The highest reported 1g-SAR for body is W / Kg
Limb Worn Operation:
This device was tested for typical body-worn operations. To comply with RF exposure requirements, a minimum separation distance of 5mm is used between the user’s body , including the antenna. Third-party belt- clips, holsters, and similar accessories used by this device should not contain any metallic components. Body-worn accessories that do not meet these requirements may not comply with RF exposure requirements and should be avoided. Use only the supplied or an approved antenna.
Extend Your Warranty for FREE!
Extend your warranty by one year for free simply by registering your product at:
www.ClearClick.com
Safety Precautions – Important, Please Read:
- Do not disassemble the units.
- Do not permit children to use or play with this device.
- Please note that the devices may become very warm during use.
- Do not operate the unit around water or rain. Do not operate the unit around any unnecessary machines or appliances.
- Unplug the units when not in use.
- Use only the included accessories with the device.
3-Year Warranty
Your purchase comes with a 3-year warranty. This means that if anything goes wrong with the unit (other than accidental damage) within the first 3 years of ownership, we will replace the unit for free, 100% at our cost. Contact us at support@clearclick.com with any issues.
What’s In The Box?

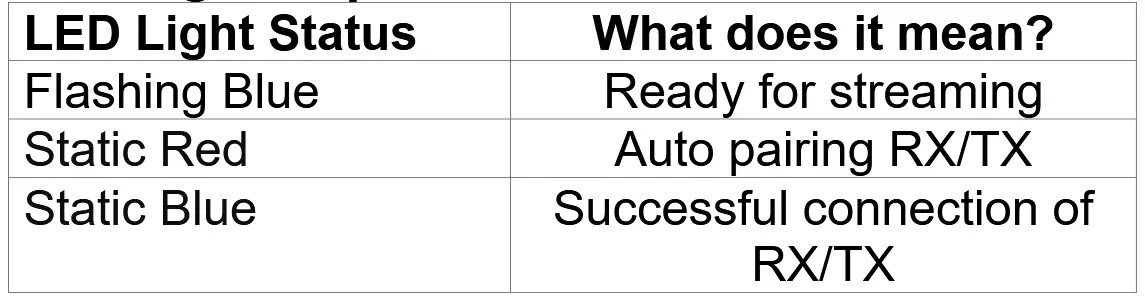
LED Light Explanation
Recommended System Requirements
- PC/Mac/Phone/Netbook/Tablet with USB-C port that supports USB-C video output (DisplayPort Alt Mode).
- Recommended minimum 2018 model year.
- Phones/Tablets must have USB-C port. (Lightning port & micro USB not supported.)
Quick Start Guide
– For PC/Mac or Wired USB-C Connection
- Plug in the receiver (RX) to your TV, monitor, or projector via HDMI.
- Connect the USB-C port of the receiver (RX) to a USB port or power supply for power (required).
- Ensure the receiver (RX) is in “PC/HDMI/AirPlay” mode. (At the top of the screen, it should say “PC/HDMI/AirPlay Mode.”) If not, press the button on the receiver (RX) once to switch to “PC/HDMI/AirPlay” mode.
- Connect a transmitter (TX) to your PC/Mac/Netbook/Phone/Tablet’s USB-C port. Your device must have a fully-featured USB-C port .
Note to Samsung phone/tablet users: You will need to disable SAMSUNG DEX in your phone settings in order to be able to use the TX. - The transmitter (TX) may show a red light while it is booting up. Then the transmitter (TX) will automatically start transmitting video to the receiver (RX). (If not, press the button on the TX to start transmitting video to your TV/monitor/projector).
- Within a few seconds, your TV/monitor/projector will show the video signal that it is receiving from your device.
- To use another transmitter (TX) with another computer, just repeat steps 3-7 with that device.
Quick Start Guide – For iPhone/iPad Users (Airplay)
- Unplug & disconnect any transmitters (TX).
- Plug in the receiver (RX) to your TV, monitor, or projector via HDMI.
- Connect the USB-C port of the receiver (RX) to a USB port or power supply for power (required).
- Ensure the receiver (RX) is in “PC/HDMI/AirPlay” mode. (At the top of the screen, it should say “PC/HDMI/AirPlay Mode.”) If not, press the button on the receiver (RX) once to switch to “PC/HDMI/AirPlay” mode.
- Connect your iPhone/iPad to the WiFi network shown on the top of your TV screen. (For example, SSID: RXxxxxx, Password: 12345678).
- Open the Control Center / System Preferences on your iPhone/iPad to enable AirPlay / Screen Mirroring. Connect to the “RX4K-XXXXX” device. You may also need to press the
 and/or
  icons within the app that you want to “cast” from.
 - You can also plug the transmitter to your phone which supports USB-C DisplayPort directly to send the image to the monitor.
- For more information/instructions on Apple Airplay, please visit: https://support.apple.com/enus/HT204289
Quick Start Guide – For Android Phone/Tablet Users (Miracast)
- Unplug & disconnect any transmitters (TX).
- Plug in the receiver (RX) to your TV, monitor, or projector via HDMI.
- Connect the USB-C port of the receiver (RX) to a USB port or power supply for power (required).
- Ensure the receiver (RX) is in “Miracast” mode. (At the top of the screen, it should say “Miracast Mode.”) If not, press the button on the receiver (RX) once to switch to “Miracast” mode.
- On your Android phone or tablet, you may need to activate the Miracast function. The Miracast function on different brands of phones/tablets may be named differently. For example: WIFI Display, WLAN Display, Wireless Display, Allshare Display, Allshare Cast, Wireless Display.
You may also need to download a Miracast app. - In the Miracast function/app, you may need to open the app settings and enable “Enable wireless display” before you connect.
- Connect to the “RX4K-XXXXX” device.
- Once you are connected to the receiver (RX), your phone screen will be shown on your TV/monitor/projector.
How To Put Your Receiver (RX) On Your Existing WiFi Network (OR Change Settings)
You can add your receiver (RX) on your existing WiFi network so that your smart devices (i.e. iPhone) do not need to connect to the receiver (RX) WiFi network. Instead, these devices can just stay connected to your local network.
- Unplug & disconnect any transmitters (TX).
- Plug in the receiver (RX) to your TV, monitor, or projector via HDMI.
- Connect the USB-C port of the receiver (RX) to a USB port or power supply for power (required).
- Ensure the receiver (RX) is in “PC/HDMI/AirPlay” mode. (At the top of the screen, it should say “PC/HDMI/AirPlay Mode.”) If not, press the button on the receiver (RX) once to switch to “PC/HDMI/AirPlay” mode.
- Connect your computer, phone, or tablet to the RX’s WiFi network shown on the top of your TV screen. (For example, SSID: RXxxxxx, Password: 12345678).
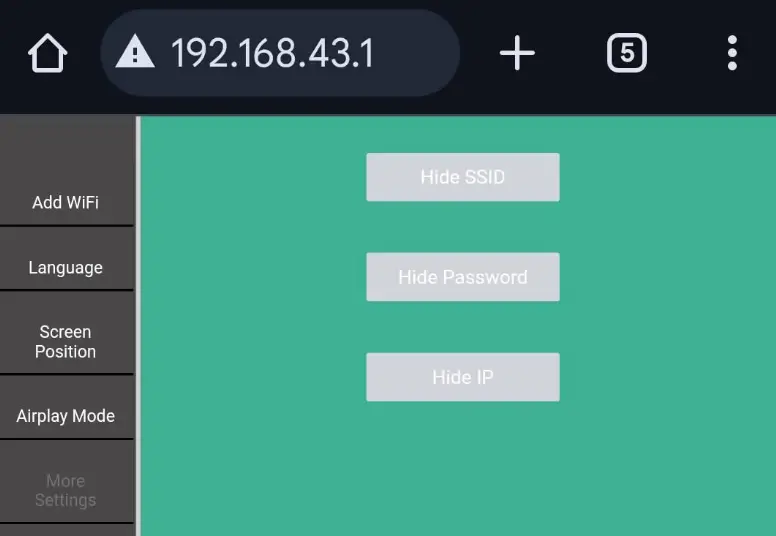
- Open your web browser on your phone, tablet, or computer, and enter the web address/number shown in the right corner. For example, “192.168.1.50.”
- On the screen/website, you can connect your receiver (RX) to your existing WiFi network and/or change the setting.

- You can choose More settings to hide the SSID, Password or IP address.
How To Pair A New Transmitter (TX)
(Note: This step is not necessary for most users.)
Simply follow the same procedure as usual to connect the transmitter (TX) to the receiver (RX). Make sure the transmitter (TX) is connected to your video source (such as a laptop).
After this, the transmitter (TX) will automatically pair to the receiver (RX), but it may take a moment for the transmitter (TX) to turn blue. Then, you can press the button to start transmitting to the receiver (RX).
How To Un-Pair A Transmitter (TX) From a Receiver (RX)
Note: This step is not necessary for most users.) To un-pair a transmitter (TX) from a receiver (RX), long press the transmitter (TX) for five seconds until red light is blinking, then release. Then transmitter (TX) is un-paired from the original receiver (RX).
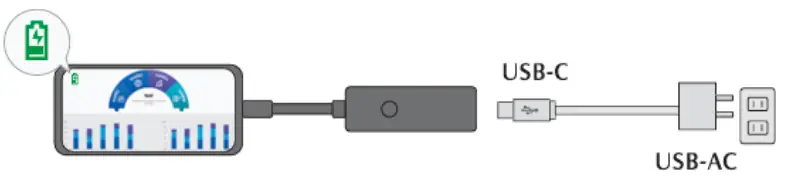
How To Reverse Charge Computer/Phone/Tablet from Transmitter (TX)
Plug in the power adapter and connect to the transmitter (TX). It will then provide reverse charging to the device (up to 60W, subject to power adapter’s specifications).
How To Back Control A Touch Screen Monitor/TV
Use a USB cable that can transmit data to connect a touch screen monitor/TV and the receiver (RX). Then, connect the receiver (RX) to the touch screen with HDMI.
Connect the transmitter (TX) to your PC or Mac’s USB-C port (must support Display Port). If the transmitter (TX) does not automatically start transmitting, press the button on the transmitter (TX). Then you can start to “back control” the laptop from the touch screen.
Technical Specifications

G405C TX (Transmitter):
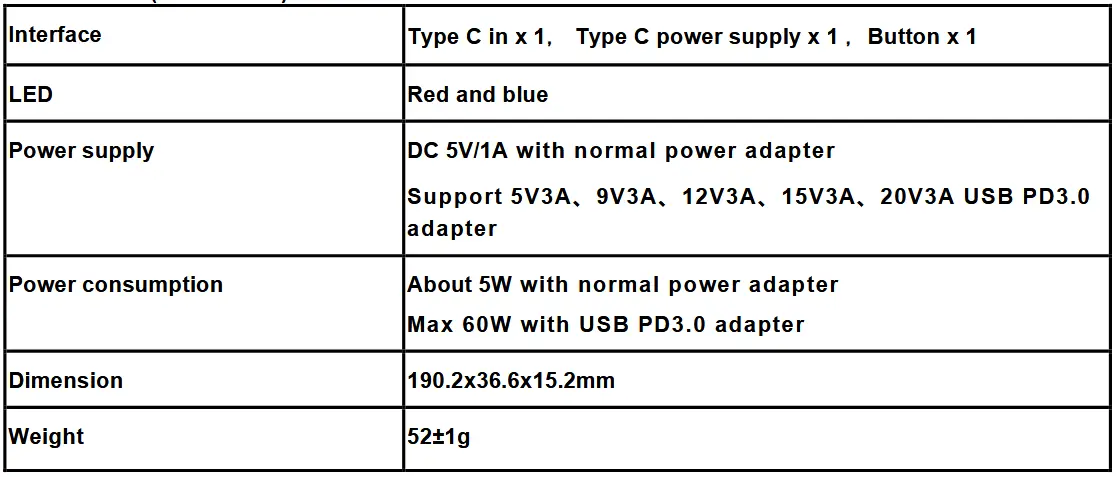
G405RX (Receiver):

![]() www.ClearClick.com
www.ClearClick.com
support@clearclick.com
© 2025 ClearClick Software LLC. All rights reserved.
Documents / Resources
 |
ClearClick Wireless Presentation and Video Broadcasting System [pdf] User Guide Wireless Presentation and Video Broadcasting System, Presentation and Video Broadcasting System, Video Broadcasting System, Broadcasting System |