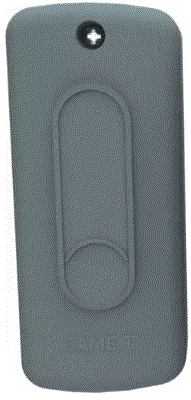
CAME 806SL-0370 2 Channel External Receiver
Product Information
Specifications
- Model: FA01497M4A
- Part Number: 806SL-0370
- Dimensions: 46 x 23 x 108 mm
- Maximum Range: 30 meters
General precautions
- Read the instructions for use.
- Read the instructions carefully before beginning the installation and act in accordance with the manufacturer’s instructions.
- Installation, programming, commissioning and maintenance must only be carried out by qualified, expert staff and in full compliance with the applicable law.
- Wear anti-static clothing and footwear if performing work on the circuit board.
- Only use this product for its intended purpose. Any other use is hazardous.
- The manufacturer cannot be held liable for any damage caused by improper, unreasonable or erroneous use.
- Also check the warnings in the installation and use manuals for the operator the product is associated with.
- In order to avoid accidental contact with live parts, reposition the external operator casing after connecting the product.
- When using the product, do not allow people, including children, to go near the operator or the manoeuvring area.
- Do not use the product in adverse weather conditions .
- The manufacturer CAME S.p.A. declares that the product described in this manual complies with Directive 2014/53/EU.
- The complete wording of the EU declaration of conformity is available at the following Internet address: www.came.com.
- The product, in its original packaging supplied by the manufacturer, must only be transported in a closed environment (railway carriage, containers, closed vehicles).
- If the product malfunctions, stop using it and contact customer services at https://www.came.com/global/en/contact-us or via the telephone number on the website.
- The manufacture date is provided in the production batch printed on the product label. If necessary, contact us at https://www.came.com/global/en/contact-us.
- The general conditions of sale are given in the official CAME price lists.
DECOMMISSIONING AND DISPOSAL
The packaging materials (cardboard, plastic, etc.) should be disposed of as solid urban waste. The product components (metals, control boards, batteries, etc.) must be separated from other waste for recycling. Check your local laws for information on how to dispose of these materials.
DISPOSE OF THE PRODUCT RESPONSIBLY.
- The contents of this manual may be changed at any time and without notice. The measurements, unless otherwise stated, are in millimetres.
- The illustrations in this manual are merely indicative.
Description
S0002P – External, two-channel, 12-24 V AC – DC IP54 control card for keypads and transponder.
Description of parts 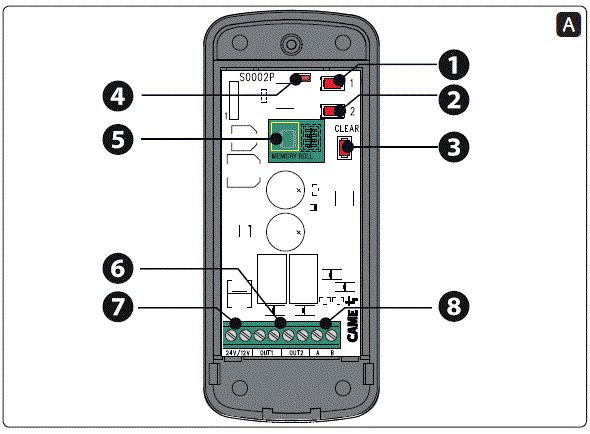
- Save code key for channel 1 (OUT1)
- Save code key for channel 2 (OUT2)
- Delete all code key
- Warning LED
- Expansion board
- Terminals for channel outputs OUT1 and OUT2
- Power supply terminals
- Terminals for connecting accessories
Size
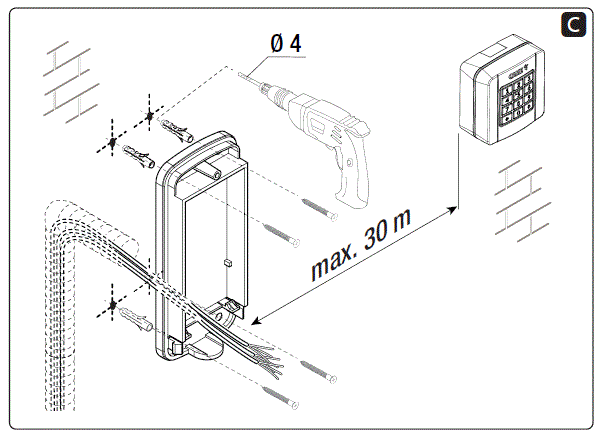
 Installation
- Fix the board container in a place protected from knocks.
- The distance between the S0002P card and the keypad selector or transponder must be max. 30 m.
Connections
Connect up the electrics as shown in the figure.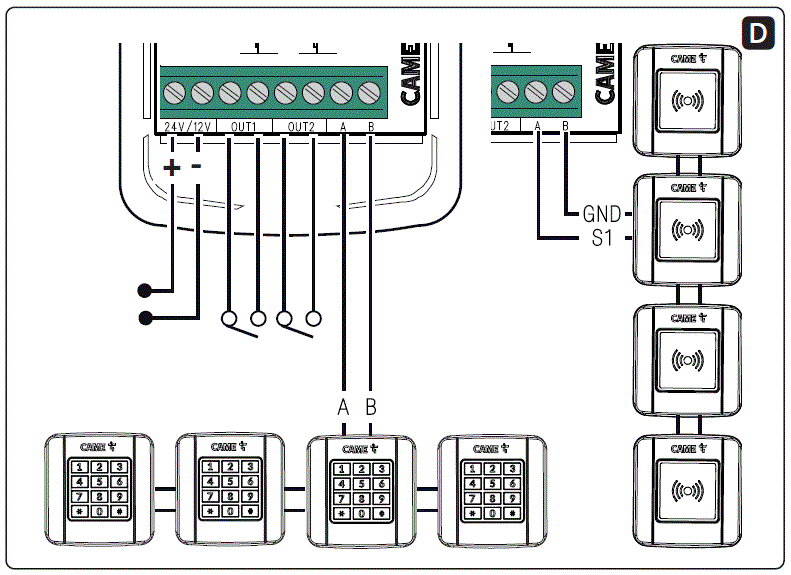
Power supply voltage Keypad/RFID transponder MIFARE Transponder
- 24 V AC/DC 4 2
- 12 V AC/DC 4 1
- With a 24 V AC/DC power supply, connect up to 4 keypad selectors, 4 RFID transponder selectors or 2 Mifare selectors.
- With a 12 V AC/DC power supply, connect up to 4 keypad selectors, 4 RFID transponder selectors or 1 Mifare selector.
- Keypad selectors and RFID transponder selectors ONLY can be used together, up to a maximum of 4 devices. MIFARE selectors CANNOT be used together.
- Use H05RN-F cables that are 60245 IEC 57 (IEC) compliant.
- Incoming current protection / limitation of 500 mA is recommended.
Technical data
| Type | 806SL-0370 |
| Power supply (V AC/DC) | 12 – 24 |
| Protection rating (IP) | 54 |
| Maximum power draw at 24V AC (mA) | 350 |
| Number of relay contacts | 2* |
| 24V DC max relay capacity (A) | 1 |
| Max. users | 250** |
| Operating temperature (°C) | -20 to +55 |
| Device class | III |
| Storage temperature (°C)*** | -25 ÷ +70 |
| Average product life (cycles)**** | 100.000 |
- OUT1 = Monostable, OUT2 = configurable as Monostable (default) / Bistable / Hold-to-run.
- With the expansion board inserted.
- Before installing the product, keep it at room temperature where it has previously been stored or transported at a very high or very low temperature.
- The average product life is a purely indicative estimate. It applies to compliant usage, installation and maintenance conditions. It is also influenced by other factors, such as climatic
and environmental conditions.
Changing the installer password
- The password can only be changed from the keypad selector.
- The installer password is 555 by default. To change the password, please follow the procedure below.
| 1 | Use the keypad to enter the installer password and press the following keys in sequence: (#), (3), (#) | |
| 2 | Enter the new installer password (3-8 digits) followed by the (#) key. | |
| 3 | Confirm the new installer password (3-8 digits) followed by the (#) key. |
|
- To interrupt the procedure, press the (*) key and the selector will emit 3 short beeps; alternatively, wait for 20 seconds.
- The installer password cannot be used as a user code.
Saving the user code associated with OUT1 or OUT2
- The procedure for saving a user code can be performed from the S0002P card or the keypad selector.
- For transponder selectors, codes can only be saved from the S0002P card.
- The S0002P card can be used to save 50 users or, with the expansion board, 250 users ❺.
From the S0002P card
| 1 | Press the save key ❶ | The warning LED will flash slowly. |
| 2 |
|
The warning LED remains on for 1 second. |
- To save the user code associated with OUT2, please follow the same procedure using the save key ❷ from point 1.
- To interrupt the procedure, press the delete all code key ❸ or wait for 20 seconds. The LED will flash 3 times.
From the keypad selector
| 1 | Enter the installer password and press the following keys in sequence: (#), (1), (#). | |
| 2 | Enter the user code (3-8 digits) followed by the (#) key. | |
| 3 |
|
|
- To save the user code associated with OUT2, please follow the same procedure using key (2) from point 1.
- To interrupt the procedure, press the (*) key and the selector will emit 3 short beeps; alternatively, wait for 20 seconds.
Deleting users
Users can only be deleted from the keypad selector.
Single user
| 1 | Use the keypad to enter the installer password and press the following keys in sequence: (#), (7), (#). | |
| 2 | Enter the position number of the user you want to delete (see table E) followed by the (#) key. | |
| 3 | Confirm the position number of the user followed by the (#) key. |
|
To interrupt the procedure, press the (*) key and the selector will emit 3 short beeps; alternatively, wait for 20 seconds.
All users
| 1 | Use the keypad to enter the installer password and press the following keys in sequence: (#), (7), (#) | |
| 2 | Press the (0) key three times followed by the (#) key. | |
| 3 | Press the (0) key again three times followed by the (#) key | A long beep will sound from the selector to confirm. |
To interrupt the procedure, press the (*) key and the selector will emit 3 short beeps; alternatively, wait for 20 seconds.
Changing operating mode on OUT2
The procedure for changing a function on OUT2 can be performed from the S0002P card or the keypad selector.
From the S0002P card
| 1 | Press the delete all code key ❸ (CLEAR). | The warning LED remains on. |
| 2 | Press save key ❶ to activate the monostable function, save key ❷ to activate the Bistable function or the delete all code key ❸ (CLEAR) to activate the hold-to-run function. | The LED will flash 5 times. |
To stop the procedure, wait for 20 seconds. The LED will flash 3 times.
From the keypad selector
| 1 | Enter the installer password and press the following keys in sequence: (#), (4), (#). | |
| 2 | Press key (1) to activate the monostable function, key (2) for the bistable function or (3) for the hold-to-run function followed by the (#) key. | The selector will emit 3 short beeps (monostable function) or a long beep (bistable or hold-to-run function). |
To interrupt the procedure, press the (*) key and the selector will emit 3 short beeps; alternatively, wait for 20 seconds.
Changing the user code (806SL-0280 and 806SL-0290 selectors only)
| 1 | From the keypad, press the (*) key followed by (#). | |
| 2 | Enter the user code to be changed followed by the (#) key. | |
| 3 | Enter the new user code (3-8 digits) followed by the (#) key. | |
| 4 | Confirm the new user code (3-8 digits) followed by the (#) key. |
|
To interrupt the procedure, press the (*) key and the selector will emit 3 short beeps; alternatively, wait for 20 seconds.
Managing the expansion board
Before backing up the user data, make sure the expansion board has been inserted. Disconnect and then restore power to the board.
Backing up data from the S0002P card to the expansion board
| 1 | Press and hold the delete all code key ❸ until the LED starts flashing. | |
| 2 | Press save key ❷ | The warning LED remains on for 1 second. |
Backing up data from the expansion board (first 50 users) to the S0002P card
| 1 | Press and hold the delete all code key ❸ until the LED starts flashing. | |
| 2 | Press save key ❶ | The warning LED remains on for 1 second. |
Restoring factory settings
This procedure deletes all users and resets the installer password and the default OUT2 function.
| 1 | From the S0002P card, press and hold the delete all code key ❸ for 20 seconds while the warning LED stays on. |
Operation
| 1 | Use the keypad selector to enter the code saved followed by the (#) key or put the saved magnetic keycard near the transponder. |
|
Up to 5 code errors are permitted before the card is deactivated for approximately 1 minute.
CAME S.p.A.
- Via Martiri della Libertà, 15
- 31030 Dosson di Casier – Treviso – Italy
- Tel. (+39) 0422 4940
- Fax (+39) 0422 4941
- info@came.com
- www.came.com
FAQ
How do I manage expansion cards?
Refer to the user manual for guidance on managing expansion cards.
What should I do if the LED indicator flashes?
If the LED indicator flashes, consult the troubleshooting section of the user manual for assistance.
Documents / Resources
 |
CAME 806SL-0370 2 Channel External Receiver [pdf] Instructions 806SL-0370, 806SL-0280, 806SL-0290, 806SL-0370 2 Channel External Receiver, 806SL-0370, 2 Channel External Receiver, External Receiver, Receiver |