Callsky CTCP10 Android Tablet User Manual

Getting Started
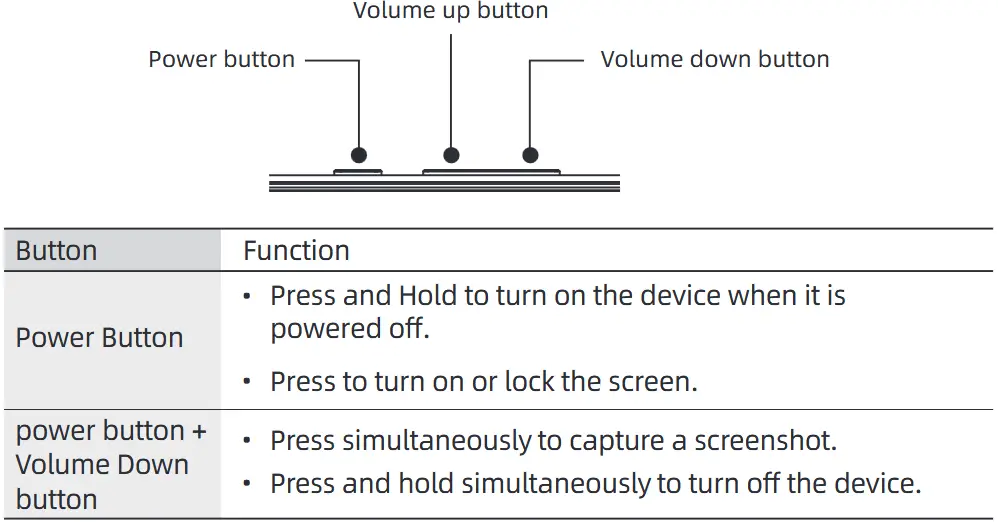
Precautions for Using Your Device
- Use the device in an area free of magnetic interference to ensure normal operation.
- Your device and some separate accessories contain magnets. Keep these items away from credit cards, implanted medical devices, and other items that could be affected by magnets. For medical devices, maintain a distance of more than 15 cm. If you suspect any interference with a medical device, stop using your device and consult your physician or the medical device manufacturer.
- Maintain a safe distance between magnetically sensitive items and your device or accessories containing magnets. Items such as credit cards, passbooks, access cards, boarding passes, and parking passes may be damaged or disabled by the magnets in the device.
- When using the speakers, such as for media playback or speakerphone calls, avoid placing the device close to your ears.
- Ensure that the camera lens is not exposed to strong light sources such as direct sunlight. Exposure to strong light can damage the camera’s image sensor, resulting in irreparable damage and causing dots or spots in photographs.
- If your device’s glass or acrylic body is broken, there may be a risk of injury.
- Dust or foreign materials in the microphone, speaker, or receiver may cause the device’s sound to become quiet or certain features to malfunction. Avoid using sharp object to remove dust or foreign materials, as this could damage the device and affect its appearance.
- Connectivity issues and battery drain may occur under the following conditions:If metallic stickers are attached to the device’s antenna area.
- If a device cover made of metallic material is used.
- If the device’s antenna area is covered by your hands or other objects during use, such as during calls or when using mobile data.
- Covering the air vent hole or the area around the rear camera with an accessory, such as a protective flim or sticker, may cause unwanted noise during calls or media playback.
Hard buttons
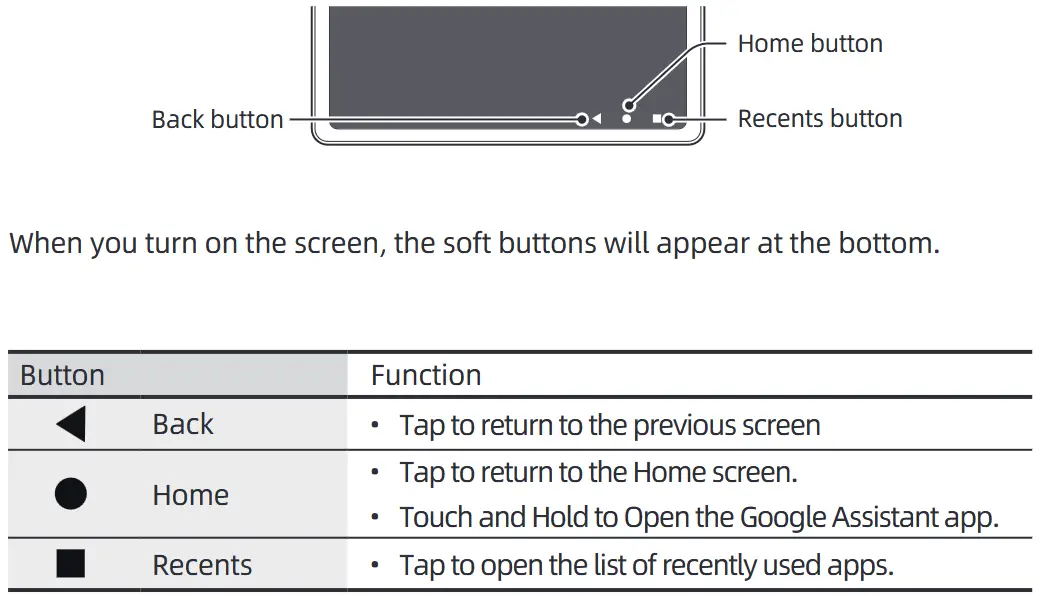
Soft buttons
Charging the Battery
Charge the battery before first use or after long periods of unuse.
Charging
Connect the USB cable to the USB power adapter and plug the cable into the device’s Type-C port.
Once fully charged, unplug the charger from the device.

Reducing Battery Consumption
Yours device offers several options to help conserve battery life:
- Use the device care feature for optimization.
- Press the button when not using the device to trun off the screen.
- Turn on power saving mode.
- Shut down apps that are not in use.
- Trun off Bluetooth when it is not needed.
- Reduce Backlight Time
- Lower Screen Brightness
Battery Charging Tips and Precautions
Only use Callsky-approved chargers, cables, and batteries designed for your tablet. Using incompatible accessories can seriously damage your device. Ensure the charger is connected properly to avoid serious damage. Misuse is not covered under warranty.
Only use the supplied USB Type-C cable. Using a Micro USB cable can damage the device.
Ensure the Type-C port is dry before charging to prevent damage.
Unplug the charger when not in use to save energy. The charger lacks a power switch, so unplugging from the socket is necessary to avoid power waste. Keep the charger close to and easily accessible from the socket while charging. Use an approved charger for guaranteed performance.
If the battery is completely discharged, allow it to charge for a few minutes before turning on the device.
Using multiple apps, network apps, or apps requiring connection to another device will drain the battery quickly. Use these apps after fully charging the battery to avoid losing power during data transfer.
Charging from a computer or other sources may be slower due to lower current.The device can be used while charging, but it will take longer to fully charge.
If the power supply is unstable while charging, the touch screen may not function properly. Unplug the charger if this occurs.
It’s normal for the device and charger to heat up while charging. If the battery gets unusually hot, charging may stop.
If the tablet is not charging correctly, contact customer service:
Website: www.callskylife.com
Email: service@callskylife.com
microSD card
Inserting microSD card
The SD card capacity of your device may differ from other models, and some SD cards may not be compatible with your device depending on the manufacturer and type.
To find out your device’s maximum SD card capacity, please visit the Callsky website at www.callskylife.com.
Steps of inserting MicroSD card
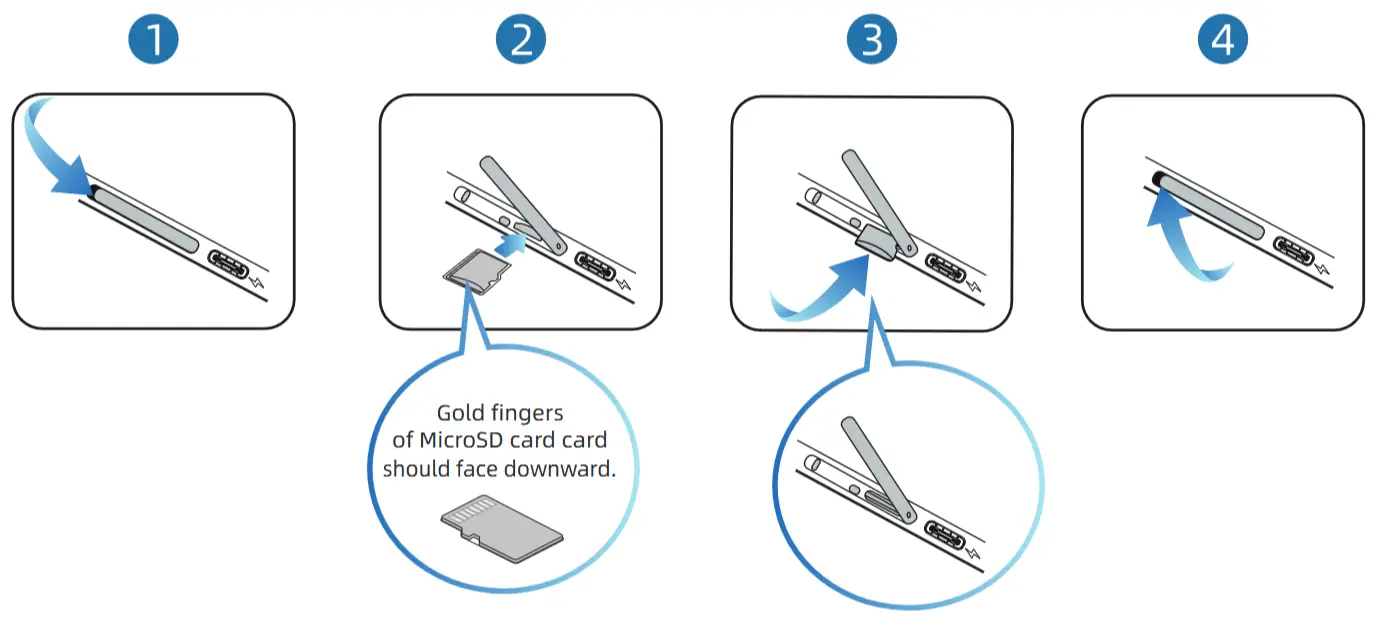
- Open protection cover:
Pull down the protection cover and find the MicroSD card slot. - Insert MicroSD card:
Insert the MicroSD card with correct direction shows in above picture. - Insert MicroSD card to the correct position:
Push the MicroSD card until it clicks and fix into the slot. - Close the protection cover:
Push back the protection cover to the original place.
Important Information for Using an SD Card
Ensure you use only a microSD card with your device.
Not all SD cards are fully compatible with the device. Using an incompatible card may cause damage to the device, the card, or the data stored on it.
Be careful to insert the SD card with the correct orientation.
Make sure the ejection pin is perpendicular to the hole to avoid damaging the device.
Removing the tray will disable the mobile data connection on models with this feature.
Ensure the SD card is firmly fixed in the tray to prevent it from falling out.
Do not insert a wet tray into the device to prevent damage. Always make sure the tray is dry before insertion.
Insert the tray completely into the slot to prevent liquid from entering the device. The device support FAT and exFAT file system for SD card. Card formatted with other file system may need to be reformatted to be recognized by the device. Frequent writing and erasing of data can shorten the lifespan of SD cards.
File Directory: When an SD card is inserted, its file directory will appear in the my Files → SD card folder.
Removing the SD Card
Before taking out the SD card, make sure to unmount it to ensure safe removal.
- Open Settings and tap on Device care → Storage.
- Swipe to the left to go to the SD card page.
- Tap
 and select Unmount.
* Avoid removing external storage, such as an SD card or USB storage, while the device is transferring or accessing data, or immediately after data transfer. Doing so can lead to data corruption or loss and cause damage to the external storage or the device.Callsky is not liable for any losses, including data loss, resulting from improper use of external storage devices.
Formatting the SD Card
An SD card formatted on a computer might not be compatible with the device. It is recommended to format the SD card directly on the device.
- Open Settings and tap on Device care → Storage.
- Swipe to the left to go to the SD card page.
- Tap and select Format.
* Before formatting the SD card, be sure to back up any important data stored on it. The manufacturer’s warranty does not cover data loss resulting from user actions.
SIM Card(For Mobile Network Enabled Models)
To insert the SIM or USIM card provided by your carrier, follow these steps: Inserting the SIM or USIM Card
Inserting the SIM or USIM card

- Loosen the Tray:
Insert the ejection pin into the hole on the tray to release it. - Remove the Tray:
Gently pull the tray out from the tray slot. - Place the SIM/USIM Card:
Position the SIM or USIM card on the tray with the gold-colored contacts facing downwards. Gently press the SIM or USIM card into the tray to secure it. - Reinsert the Tray:
Insert the tray back into the tray slot.
Important Notes
- Make sure the ejection pin is perpendicular to the hole to avoid damaging the device.
- Ensure the card is firmly fixed in the tray to prevent it from falling out.
- Do not insert a wet tray into the device to avoid damage. Ensure the tray is dry before reinserting. Fully insert the tray into the slot to prevent liquid from entering the device.
SIM Manager
To manage your SIM settings:
Open the Settings and tap Connections → SIM manager.
SIM Cards:Activate the SIM card you want to use and customize the SIM card settings.
Initial Setup
When you power on your device for the first time or after performing a factory reset, follow the on-screen prompts to configure your device. Note that if you don’t connect to a Wi-Fi network during this initial setup, some features of the device may not be available.
Wi-Fi
Enable the Wi-Fi feature to connect to a network and gain access to the internet or other networked devices.
Connecting to a Wi-Fi Network
- On the Settings screen, tap Connections → Wi-Fi and trun the switch on.
- Choose a network from the list of available Wi-Fi networks.
Networks with a lock icon require a password.
* Once the device connects to a Wi-Fi network, it will automatically reconnect to that network whenever it is available without needing a password. To stop the device from automatically reconnecting, tap on the network and trun off the Auto reconnect switch.
* If you experience issues connecting to a Wi-Fi network, try restarting the Wi-Fi feature on your device or rebooting the wireless router.
Bluetooth
Use Bluetooth to share data or media files with other Bluetooth-enabled devices. Precautions for Using Bluetooth
Callsky is not liable for the loss, interception, or misuse of data transmitted or received via Bluetooth.
Always ensure you share and receive data with trusted and properly secured devices. Obstacles between devices can reduce the effective operating distance.
Do not use Bluetooth for illegal activities (e.g., pirating files or unauthorized tap communications for commercial purposes). Callsky is not responsible for any consequences arising from the illegal use of the Bluetooth feature.
Pairing with Other Bluetooth Devices
- On the Settings screen, tap Connections → Bluetooth and tap the switch to turn it on.
Detected devices will be displayed in a list. - Choose a device to pair with from the list.
If the device you want to pair with is not listed, put that device into Bluetooth pairing mode. Refer to the user manual of the other device for instructions. Your tablet will be visible to other devices while the Bluetooth settings screen is open. - Accept the Bluetooth connection request on your tablet to confirm the pairing. The devices will be connected once the other device accepts the Bluetooth connection request.
To disconnect the devices, tap the settings icon next to the device name and select Unpair.
Sending and Receiving Data
Many applications support Bluetooth data transfer, allowing you to share items like contacts or media files with other Bluetooth-enabled devices. Below is an example of sending an image to another device:
- Open the Gallery app and choose an image.
- Tap the share icon → Bluetooth and select a device to send the image to. If the desired device is not listed, ask the device owner to enable its visibility option.
- Accept the Bluetooth connection request on the receiving device.
Using the Touch screen
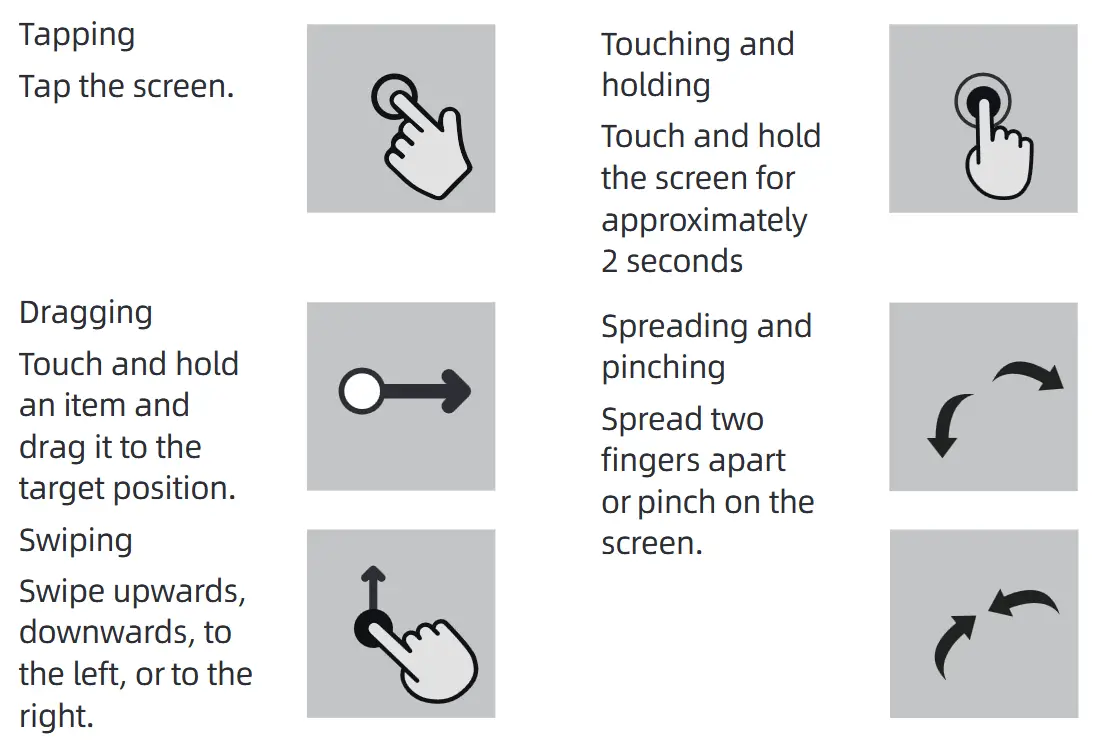
To prevent damage, do not tap the touch screen with sharp objects or apply excessive force with your fingers or any other item.
Avoid letting the touch screen come into contact with other electronic devices. Electrostatic discharges can lead to malfunctions of the touch screen.
The device may not register touch inputs near the edges of the screen, as these areas are outside the touch input zone.
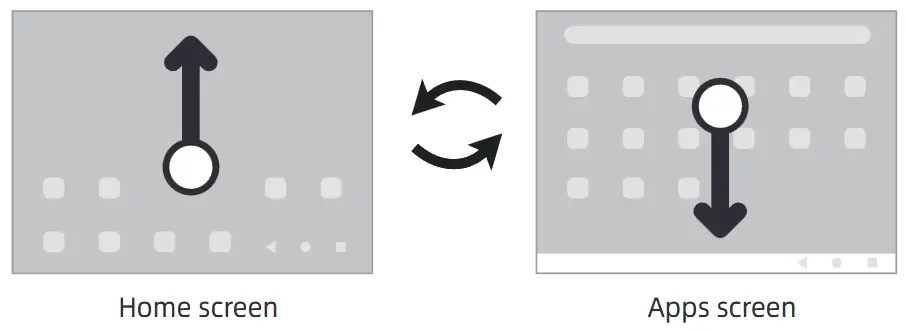
Home screen and Apps screen
The Home screen is the primary interface from which you can access all the device’s features. It shows widgets, shortcuts to applications, and more. The Apps screen showcases icons for all applications, including those recently installed.
Switching Between Home screen and Apps Screen
On the Home screen, swipe up to access the Apps screen.
To go back to the Home screen, swipe down.
Alternatively, press the Home button or the Back button.
Typing text
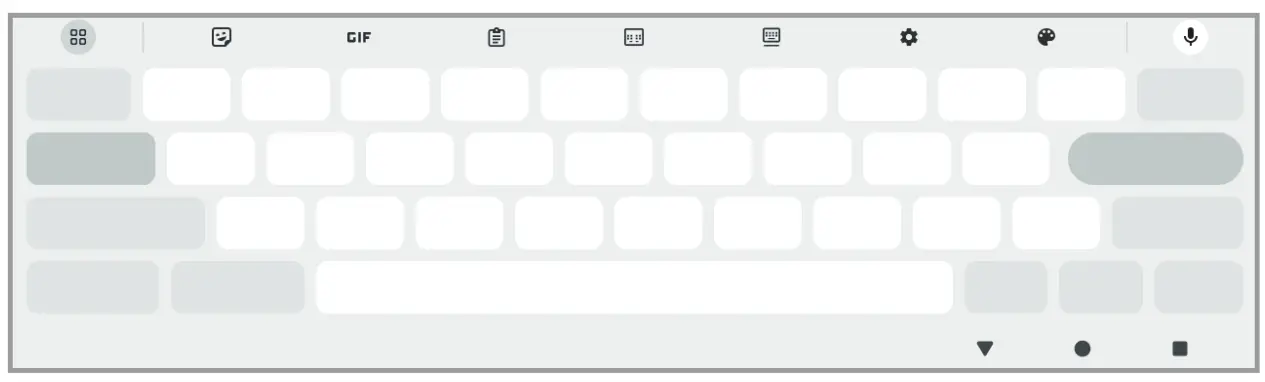
On-screen keyboard
A keyboard will pop up automatically when you type text. However, text entry may not be supported in some languages. To type in text, you need to switch the input language to one of the supported languages.
Changing the Input Language
Tap the settings icon Languages and types Manage input languages and choose the languages you wish to use.
When you select more than one language, you can switch between them by tapping the language button.
Changing the input language
Tap ⚙️→ Languages and types → Manage input languages and select the languages to use. When you select two or more languages, you can switch between the input languages by tapping?.
Copying and Pasting Text
Press and hold on the text you wish to copy or cut.
Drag ![]() to choose the desired portion, or tap “Select all” to choose all the text. Choose “Copy” or “Cut.”
to choose the desired portion, or tap “Select all” to choose all the text. Choose “Copy” or “Cut.”
The highlighted text is now saved to the clipboard.
Press and hold at the destination where you want to insert the text, and then tap “Paste.”
To paste previously copied text, tap “Clipboard” and pick the text you want.
Installing or Uninstalling Apps
Play Store
Purchase and download applications.
- Open the Play Store app.
- Browse applications by category or search for them using keywords. Managing Apps
Uninstalling or Disabling Apps
1. Press and hold on an app and select an option.
– Uninstall: Remove downloaded applications.
– Disable: Turn off selected default apps that cannot be removed from the device.
Note: Some apps may not support this function.
Enabling Apps
1. Open Settings.
2. Tap Apps →→ Disabled → OK.
3. Select an app and tap Enable.
Setting App Permissions
For some applications to work correctly, they might need access to certain information on your device.
1. To access your app’s permission settings, open Settings and tap Apps.
2. Select an app and then tap Permissions.
3. You can review and modify the app’s permission list.
– To check or change permissions by category, go to Settings and tap Apps
→ ![]() → Permission manager.
→ Permission manager.
– Select an item and then select an app.
– Note: If you do not grant permissions to apps, their basic functions may not work correctly.
Google Apps
Google offers a variety of apps for entertainment, social networking, and business purposes. Some apps may require a Google Account for access. For more details about each app, refer to the help menu within the app.
- Chrome: Look up information and explore web pages.
- Gmail: Send or receive emails via the Google Mail service.
- Maps: Locate your position on the map, explore the global map, and get location details for places nearby.
- YT Music: Enjoy a wide range of music and videos offered by YouTube Music. You can also play the music collections stored on your device.
- Google TV: Buy or rent videos, including movies and TV shows, from the Play Store.
- Drive: Keep your files in the cloud, access them from any location, and share them with others.
- YouTube: Watch or produce videos and share them.
- Gallery: Find, organize, and edit all your pictures and videos from different sources in one location.
- Google: Search for information on the internet or your device.
- Meet: Conduct video calls or join video conferences.
- Messages: Send and receive texts on your device or computer, and share various types of content, such as photos and videos.
Note: Availability of some apps may vary depending on the carrier or device model.
Getting 2 Years’ Warranty Support

© 2024 Leon trade (H.K) Co., Ltd.
FCC Statement
Changes or modifications not expressly approved by the party responsible for compliance could void the user’s authority to operate the equipment.
This equipment has been tested and found to comply with the limits for a Class B digital device, pursuant to Part 15 of the FCC Rules. These limits are designed to provide reasonable protection against harmful interference in a residential installation. This equipment generates uses and can radiate radio frequency energy and, if not installed and used in accordance with the instructions, may cause harmful interference to radio communications. However, there is no guarantee that interference will not occur in a particular installation. If this equipment does cause harmful interference to radio or television reception, which can be determined by turning the equipment off and on, the user is encouraged to try to correct the interference by one or more of the following measures:
— Reorient or relocate the receiving antenna.
— Increase the separation between the equipment and receiver.
— Connect the equipment into an outlet on a circuit different from that to which the receiver is connected.
— Consult the dealer or an experienced radio/TV technician for help
This device complies with part 15 of the FCC rules. Operation is subject to the following two conditions (1)this device may not cause harmful interference, and (2) this device must accept any interference received, including interference that may cause undesired operation.
This equipment complies with FCC radiation exposure limits set forth for an uncontrolled environment.
FCC RF Radiation Exposure and SAR Statements
The tablet Ctab 10 has been tested for body-worn Specific Absorption Rate (SAR) compliance. The FCC/ IC has established detailed SAR requirements and has established that these requirements. RF
Exposure Information The radio module has been evaluated under FCC Bulletin C95.1 and IEEE 1528 and found to be compliant to RF Exposure from radio frequency devices. This model meets the applicable government requirements for exposure to radio frequency waves. The highest reported SAR level for usage near the body (0mm) is 0.529/W/kg.
Documents / Resources
 |
Callsky CTCP10 Android Tablet [pdf] User Manual 2AAMS-CTCP10, 2AAMSCTCP10, CTCP10 Android Tablet, CTCP10, Android Tablet, Tablet |